Welcome to Princess Sacrifice: Adventure of Feena Walkthrough & Guide, which helps you to unlock all the events and scenes with all the available characters.
Available classes and how to unlock
Should be a definitive list. I may update it later as I see fit.
Wanderer – unlocked at level 2
Warrior – unlocked after learning Power Strike (or after a certain level?)
Knight – unlocked at level 4-6 (?)
Witch – unlocked after learning Flame (or after a certain level?)
Priestess – unlocked after learning Heal (or after a certain level?)
Dancer – pass all dance checks (?) at Port Wellston pub or unlocked at level 11
Thief – steal something or unlocked at level 12
Whore – need depravity at a certain level to unlock (100?)**
Queen – need depravity at a certain level to unlock (300?)**
Sex Slave – need sexual experience at a certain level to unlock* (lower requirement)
Meat Toilet – need sexual experience at a certain level to unlock* (higher requirement)
Commoner – starting class
Funny enough, the Whore class edges out the Commoner class as the most balanced class.
*not applicable to virgin-run
**your call on whether depravity counts or not (you definitely don’t need these two classes)
Making sense of class selection, level-up mechanics and attributes
I just want to preface this section by saying that you should play around with classes however you like (and you will get through this game just fine). I only wrote it for the min-max enthusiasts (such as myself), and this was what really inspired me to write the rest of this guide.
Your class selection will determine your stat gains during level ups. The differences may seem minute level-to-level but when you observe the total effect over 40 levels there are fairly significant differences (granted most people will not finish the game anywhere close to level 40). My experimentation is limited to the Commoner and Warrior classes so I won’t be able to do a 100% comparison/recommendation across all classes; but frankly, I don’t plan to. Just mapping the stat gains for the Commoner and Warrior classes (latter of which I started after 28 levels as Commoner which I now believe was a timely mistake) has already taken me about 9 days of free time. Leveling up to 40+ for the other 10 classes sounds like a recipe for hating this game permanently. But I will provide a Cole’s Notes version of what I’ve observed/was able to extrapolate:
1. The stat gains per level-up determine your base/Commoner class stats.
2. Each non-Commoner class type grant you additional points towards certain attributes along with 2 class-specific skills/passives. These additional attribute gains seem to be percentage based as they are greater at higher levels.
3. Some classes will lower certain attributes below your base stats. The attribute losses are also greater at higher levels (you win some, you lose some).
4. The letter grade rating for each attribute for each class type are fairly indicative of the additional attribute points you’ll gain/lose relative to the Commoner class, but there are exceptions (most notably the Sadism/Masochism ratings). Warrior has a D in both INT/WILL whereas Commoner has a C in both INT/WILL, but changing to Warrior from Commoner will not lower your INT/WILL. These exceptions have confused me until today – please see point 7.
5. The first level-up right after a class change (i.e. Commoner -> Warrior or Commoner -> Witch) is always worse than a level-up under the Commoner class. This led me to believe for the longest time that the Commoner class has the best stat gains – this is simply untrue. You do not see the full extent of the class differences in just a single level up (but rather over 40).
6. Pursuant to point 5, I currently believe you should commit to a single class type across all level ups to maximize potential stat gains during level up. The first level up right after switching to a new class always seem to yield the least stat gains so if you’re going from lv2 to 3 as a Warrior and from lv 3 to 4 as a Witch you are minimizing potential stat gains. It is perfectly fine to play as different classes as long as you remember to switch back to your level-up class right before each level-up (you have to always keep an eye on your current exp if this is your play style).
7. As I’m typing this section I realized something – the letter grade rating more accurately reflects how many points you will gain for that attribute (HP/MP/ATK/DEF/INT/WILL/AGI/DEX/SAD/MASO) across 40 levels. 40 levels seem to be the point when the stat gain pattern repeats itself:
HP: +2
MP: +0
ATK: +1
DEF: +1
INT: +1
WILL: +1
AGI: +1
DEX: +1
SAD: +0
MASO: +0
This is the “standard” level up for the Commoner class starting from level 2. You will gain at least 2 points in HP and 1 point in ATK/DEF/INT/WILL/AGI/DEX (except MP, Sadism and Masochism) per level-up. However, on certain level-ups you will also gain +1 for MP and/or SAD/MASO:
MP: level 5/9/13/17/21/25/29/33/37/41 (every 4 levels)
SAD/MASO: level 11/21/31/41 (every 10 levels)
Commoner has the following attribute grade ratings:
HP: C
MP: C
ATK: C
DEF: C
INT: C
WILL: C
AGI: C
DEX: C
SAD: D
MASO: D
Strangely enough, on certain levels the Commoner class will gain a +2 to certain attributes rather than the usual +1 (I don’t actually have an explanation for this part since they’re all C’s – just treating it as weird coding at the moment):
WILL: level 11/31
DEF/WILL/DEX: level 21/41
I have also observed this 40-level pattern repeat itself for the Warrior class (just with a different stat gain pattern).
So leveling up with the Commoner class from level 2 to level 41, Feena will have the following cumulative stat gain (Commoner attribute grade rating):
HP: +80 (C)
MP: +10 (C)
ATK: +40 (C)
DEF: +42 (C)
INT: +40 (C)
WILL: +44 (C)
AGI: +40 (C)
DEX: +42 (C)
SAD: +4 (D)
MASO: +4 (D)
Here what I’ve observed for the Warrior class across 40 levels (Warrior attribute grade rating):
HP: +95 (B)
MP: +4 (E)
ATK: +52 (A)
DEF: +48 (B)
INT: +29 (D)
WILL: +28 (D)
AGI: +44 (B)
DEX: +42 (C)
SAD: +6 (C)
MASO: +2 (E)
Note this 40-level pattern for the Warrior class was observed from levels 29 to 68. You will likely notice slight differences in your own testing if you start from level 2. I was hoping for clearer cut numbers per grade level increase/decrease but at least the total gain is reflective of the attribute grade level.
You should now be able to extrapolate using Commoner as the control class to determine how other classes will level up over time.
I understand that most classes are not unlockable at level 1 (either due to level restrictions or Feena being too weak to defeat a certain enemy). The takeaway here is that you will be able to observe this 40-level pattern if you stick with a single class as you level up, regardless of which level you start at. So for example, if you start leveling up as a Witch from level 8 to 9, your cumulative stat gains from levels 9 to 48 will be the same as your cumulative stat gains from levels 49 to 88. And your cumulative stat gains from levels 89 to 100 will be the same as your cumulative stat gains from levels 9 to 20 (or from levels 49 to 60). Max level 100 confirmed.
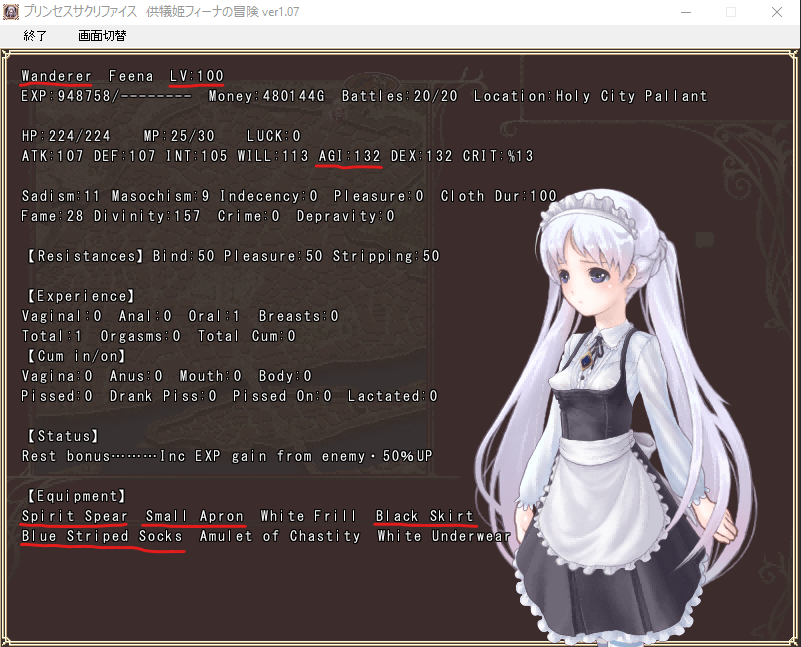
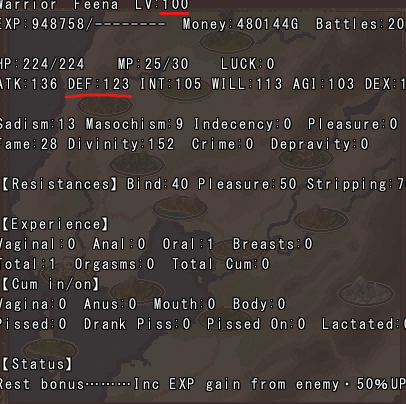
Here are Feena’s final stats at level 100 if you use the Commoner class for all level-ups. 948,750 total EXP is required to reach level 100 (27,000 is the most EXP you will require for a single level-up). Equipment minimized for easier comparison.
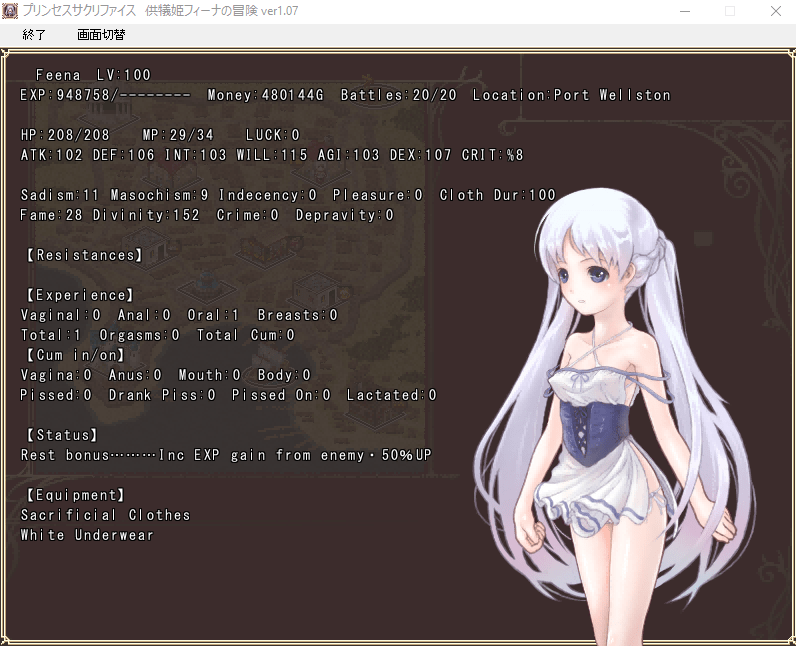
Obviously if you switch classes often as you level up the stat gain pattern becomes unpredictable. But my understanding is that it will be less than sticking with one single class over time.
By the way, here’s what each stat does according to the Japanese read me file (to help you determine which stats to prioritize for your play style):
ATK – how much damage you do with physical attacks
DEF – how much damage you take from physical attacks
INT – how much damage you do with magical attacks
WILL – how much damage you take from magical attacks
AGI – accuracy, evasion, escape success rate, bind evasion rate, rate of preemptive attacks vs enemy surprise attacks
DEX – critical rate, effect of items (interestingly enough, the Japanese version does not show the critical % rate separately under “Status”)
SAD – affects MP recovery rate as you inflict damage (can exceed 1MP recovery per hit if SAD stat is high enough)
MASO – affects MP recovery rate as you receive damage (should also be able to exceed 1MP recovery per hit if MASO stat is high enough)
Just a heads up – this guide will make liberal use of the difficulty setting adjustment under “system”. The difference between normal and hard mode is night and day – anything higher than normal and a train will slip through and hit Feena sooner than later. You simply will not be able to out-level the stronger enemies on hard/very hard mode. In fact, they will out-level you over time. So swallow your pride and play on very easy if you have to (even normal is pretty unforgiving for a virgin-run until you hit the mid-20s).
Enemies will gain HP as you level up (usually at the rate of +2HP for every 3 of your levels). They likely also have internal (hidden) stats that are increasing but I can’t verify that (the difficulty setting seems to modify this). Every time the enemy HP increases their exp will also increase slightly (around 3 points with extra 50% exp resting bonus). Enemy gold drop will also increase by 2-4 gold with each level-up (with no extra 50% gold resting bonus).
Battle/Resting Bonuses – can only have one type at a time (randomized and reset after resting at an inn):
Item drop chance increase – 30% (maxed at 50% after 20 battles) [Can be very helpful if you’re trying to farm for a specific skill essence]
Gold drop increase – 30% (maxed at 50% after 20 battles) [This is the least helpful of the three in my opinion]
Experience increase – 30% (maxed at 50% after 20 battles) [This should be your default everyday bonus]
The difficulty setting can be changed at any time until the battle begins (it’s very flexible).
System -> Game Settings -> Difficulty
Very Easy – how easy? You should be able to kill Skalmgriever without having to use an elixir around level 23 easy
Easy – bad RNG? What is that?
Normal – default hard mode
Hard – You will struggle even in your late 30s/early 40s with the later crowds; surprise attacks/consecutive blow 3-hits with critical mixed in will likely get you even at full HP
Very Hard – how hard? I was getting two-shot by an orc squad at Fort Regla at level 68 (enemies will critical and surprise attack you like there’s no tomorrow). 90 bloody damage per hit at 96 defense (my Heal spell with mystic scroll activated was only healing about ~48HP/pop). My only solace with all that grinding is that I was finally able to steamroll Puck at the Fairy Hills in my late 50s/early 60s (he proved a threat through the 30s on this mode)
The difficulty setting will also affect your experience gain which is the main reason why you want to adjust it liberally. The 1.5x/2x exp also compounds with the 50% extra experience resting bonus so make sure the latter is always active.
Very Easy – 1x exp and gold gain
Easy – 1x exp and gold gain
Normal – 1x exp and gold gain
Hard – 1.5x exp and gold gain
Very hard – 2x exp and gold gain
If you can farm an enemy on hard/very hard with relative safety put it on hard/very hard. Very easy is pretty tame admittedly so for your every day adventuring put it on easy/normal depending on how much you’ve leveled. That’s it. There are a few hot spots for leveling up that I’ll point out later.
I have divided this guide into many sub-maps. Each location will have it’s own sub-map(s) and all spots of interests will be numbered. Again I tried to number them in the recommended visit order sequence (note: tried). Each numbered spot of interest will have a matching numbered caption below explaining what will happen there or what you should do. Unnumbered spots may have random encounters but for the most part they are of little significance other than as pass-through points.
World Map (all Palas Region locations) – location name can be viewed under “Status”
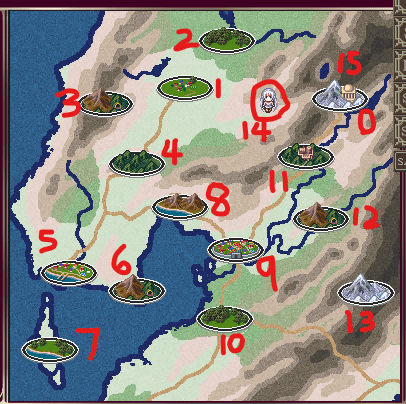
0A. Palas Monastery (mandatory)
0B. Sanctuary (mandatory)
1. Gnossel Village
2. Slime Forest
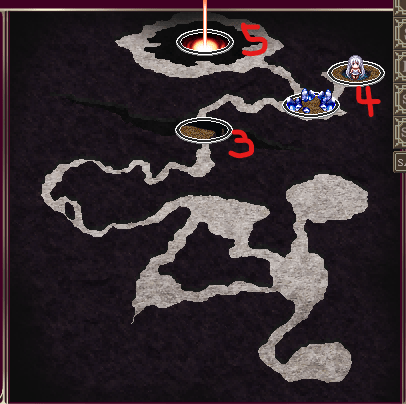
3. Abandoned Mines
4A. Fairy Hills (mandatory)
4B. Ancient Tomb
5. Port Wellston (either 5+6 or 8)
6. Seaside Cave (either 5+6 or 8)
7. Eskarma Island
8. Thieves’ Road (either 5+6 or 8)
9. Holy City Pallant (mandatory)
10. Forked Road
11A. Fort Regla – Surface (either 11A or 12)
11B. Fort Regla – Dungeon
12A. Undermountain – South (either 11A or 12)
12B. Undermountain – Centre (either 11A or 12)
12C. Undermountain – North (either 11A or 12)
13. Heaven’s Spiral Peak
14. Hidden Mountain Range
15A. Monastery – Approach (mandatory)
15B. Monastery – Interior (mandatory)
15C. Monastery – Sanctuary (mandatory)
15D. Fire of Life (mandatory)
There are quite a few ways to get from 0 to 15. A number of locations are completely optional provided you are leveled enough for the final boss. This was quite a revelation to me.
Shortest path to end game:
0 -> 4A -> 8 -> 9 -> 11A -> 15
While theoretically possible, this will make a virgin-run exponentially more difficult even if you play on very easy difficulty mode (Puck is your first gatekeeper after leaving the Sanctuary). You will be missing out on a lot of experience/divinity points/equipment (you can’t even visit the first two towns for basic equipment/items and you have no Heal spell). Strongly recommended for NG+ only.
This guide will take you through every single location for the full virgin-run experience. Save for 1 skill that you can only get through the final boss (for NG+), you can potentially get every skill essence in a single play-through if you get very lucky. It really depends on how much you want to reload and retry until you do though. In my opinion a lot of the skills are fluff and can be easily ignored/replaced with items given the small MP pool and skill inefficiencies.
Note if you are playing a virgin-run you will miss out on 2 pieces of equipment. Neither is terribly essential:
1. Egg vibrator – Defeat Wraith boss in Ancient Tomb
2. Golden Decoration – Dance successfully at the Wellston Port pub until the agility check requirement stops increasing. Fail the subsequent dance check and the men will have their hands all over Feena. Fail the dance check again and the men will have their way with Feena. Afterwards pass another dance check (or two?) and one of the men will put the Golden Decoration on Feena.
Skills List
All skills that I came across from my 2016 play-through of the Japanese version. I don’t have a complete list of which enemies drop which skill essences but I have done my best to fill it in. I may update it later.
Heal (2MP) – Slime
Recover (5MP) – Dark Priest/Roper
Purify (3MP) – Squid Hatchling
Flame (3MP) – Puck/Fairy?
Ice Age (5MP) – Demon Mage
Tempest (8MP) – Skalmgriever/Dark King Baalveil?
Power Strike (2MP) – Orc/High Orc/Orc Squad/Orc Hero
Consecutive Blow (5MP) – Mercenary/Bandit Boss/Lesser Demon
Raging Blow (10MP) – Dark King Baalveil
Slip (3MP) – Gargoyle (?)
Bind (4MP) – Slime Colony (?)
Power (4MP) – Ogre/Bob-kun
Shield (4MP) – Door Mimic/Elder Ogre
All you really need for this virgin-run is Heal/Flame/Power Strike (Power Strike is KING). Recover is very nice but only really useful in a pinch for the few toughest fights at higher difficulty settings. Everything else either costs too much MP to rely on (like Consecutive Blow/Ice Age) or can be replaced with items (like Power/Shield/Purify). Even Heal really only starts to shine at mid-levels after herbs stop healing enough. Flame is for enemies strong to physical attacks until you pick up elemental weapons such as the Silver Sword of Evil’s Bane (Holy) or the Spirit Spear (Ice) at which point the spell becomes kinda obsolete unless you are playing as the Witch class.
Physical skills > Magical skills because the former can actually critical in addition to damage modifiers due to elemental weaknesses.
Getting Elemental Weapons
Spirit Spear (Ice) – Defeat Skalmgriever at top of Heaven’s Spiral Peak (marked #11 on sub-map). He will reward you with the spear afterwards. Wait until you’re at least level 20 before tackling him, and make sure the difficulty is set to very easy. If you want to fight him on normal difficulty wait until you’re in your mid-30s at least (and bring elixirs). Good luck to you if you want a challenge on hard/very hard.
Silver Sword of Evil’s Bane (Holy) – This is a two part quest. First you must first procure a silver ingot through 1 of 4 methods listed below. Then talk to the weapon shopkeeper lady in Holy City Pallant twice (marked #3 on sub-map) and pay her 2500G. She will then craft the silver sword for you.
Known locations for silver ingot:
1. Help or attack the hidden kraken at Undermountain – Centre (marked #9 on sub-map) [guaranteed; RECOMMENDED as he also gives you another 1200G towards the 2500G crafting fee]
2. Orc Hero (rare drop; you could potentially pick one up as early as the Abandoned Mines but wait until Fort Regla if you want to farm it)
3. Skalmgriever (rare drop; NOT RECOMMENDED; he’s too much of an HP sponge to farm)
4. Steal from chest at big mansion in Holy City Pallant (marked #4 on sub-map) [guaranteed; NOT RECOMMENDED unless you have extra divinity to spare and gold to waste (Divinity -20 and Crime +1500); there is also 1500G in the chest though so you only need to pay another 1500G towards the fine]; you may run into a guard continuously inside the mansion which prevents you from access to the chest (the trigger for his not appearing is currently unclear)
Extra silver ingots can be sold for 400G.
Divinity Requirements
20+: Sooth Bandit Boss in his final moments*
30+: Turn yourself in at the town square after Holy City Pallant is attacked (HORRIBLE decision FYI)*
<40: Requirement for two “bad” endings (air quotes)
40+: Save Helene at Underground – North (additional Helene scene in neutral/true endings)
50+: Turn yourself in at the northern gate after Holy City Pallant is attacked (poor decision)*
60+: Trance mode activation during final round of Baalveil fight (after losing twice)
90+: Requirement for true ending
*not applicable to virgin-run
Don’t sweat the <40 divinity ending requirement. Just steal a few things and fight some guards before the final fight. Each guard you fight off will lower your divinity by 10. Just remember to keep a separate save file if you want to see the true ending.
Walkthrough & Guide – Princess Sacrifice: Adventure of Feena
0A. Palas Monastery – Princess Sacrifice: Adventure of Feena Walkthrough & Guide
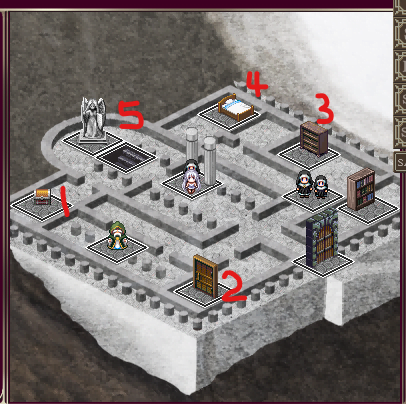
#1 – There is a gate here that you must lockpick (not possible until you return later). Chest contains the Magic Scissors treasure which you can use to adjust clothing durability. It’s a superior version of the Cutting Scissors treasure which you can buy at Port Wellston.
#2 – This connects to #8 marked on Underground – North (not usable right now). Marked as #9 on Monastery – Interior sub-map.
#3 – You can borrow an herb from Elsa room with no repurcussions (Elsa has a pretty serious girl crush on Feena so I’m sure she won’t mind).
#4 – Feena’s room. Rest until you get the extra exp bonus and never look back.
#5 – Move the statue and proceed to the Sanctuary. Helene will give you a Spirit Stone (Decorative) as you leave.
0B. Sanctuary – Princess Sacrifice: Adventure of Feena Walkthrough & Guide
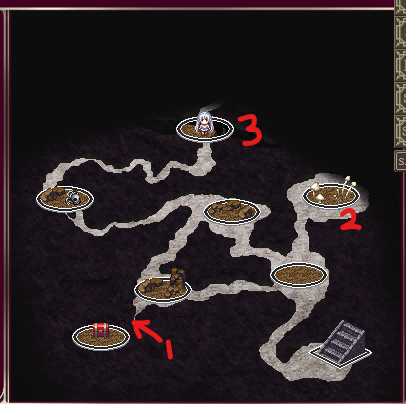
#1 – Click on this spot to reveal a hidden chest containing a pair of Leather Boots (350G value).
#2 – One of the few times collection points are even useful. They become obsolete very quickly as you progress through the game. Please note that every 10 points in a certain stat will grant you an additional bonus point for passing that stat check. For example, if you have 30 points in INT, you will have 3 INT bonus points for any INT-based checks. Equipment/class bonuses to stats are also factored into this. Failing checks at collection points can sometimes lead to an enemy encounter so just be warned.
#3 – Point of no return after crossing the bridge. Make sure you’ve done all you wanted to do in this area as you will not return until the end of the game.
#3 – Can’t return anymore.
#4 – Free healing pool. You’ll come across a couple more like these throughout the game. They are like inns v2.0 as they allow you to keep your battle/resting bonuses while healing you to full. They do dry up after some usage however so use sparingly.
#5 – Meeting Demea. Choose “soft” for oral +1.
1. Gnossel Village – Princess Sacrifice: Adventure of Feena Walkthrough & Guide
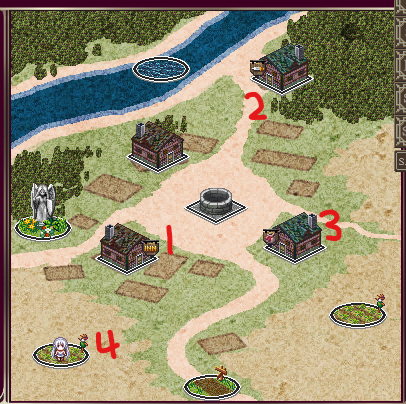
There are a few scenarios that can play out upon your first visit to Gnossel village depending on how and when you visit.
A. Arrive in Gnossel village before clearing out the Slime Forest (clothing durability 51+) – Mariel will not greet you as you enter the village. You must visit Mariel at her inn yourself.
B. Arrive in Gnossel village before clearing out the Slime Forest (clothing durability <50) – Mariel will greet you at the entrance, express shock at your tattered outfit and pull you to her inn for patch up.
C. Arrive in Gnossel village after clearing out the Slime Forest (beat Slime Colony) – Feena will pass out as she enters the village and Mariel will discover Feena and take her to her inn. As beating the Slime Colony at the Slime Forest is the trigger for the orc squad attack on Gnossel village, both events will be triggered back-to-back and you will not be able to preemptively save Mariel. Avoid C if your virgin-run includes saving Mariel’s virginity as well (hence I’ve marked Gnossel village as #1 on the world map).
NEVER bathe by the river/in plain view (depravity+), go anywhere around town with tattered clothing or the indecency stat >0 (depravity+), collect from the fields (crime+) or try to sneak into anyone’s houses (crime+). I’ll point out exceptions but these are the universal rules for this guide.
Crime>0 – high random chance to be confronted by guards in towns. Crime x 2 = the amount of gold you need to pay in fines. Fighting off each guard lowers divinity by 10 and increases crime even further. If you don’t have the gold to pay the fines at that moment simply resist and then run away. You will not lose divinity or add more to your crime.
Depravity>~100 – random men will solicit you for sexual favors. You can refuse. Depravity is not tied to sexual experience and can be lowered to 0 through several means later (mainly gold).
#1 – Mariel’s inn. Best inn in the game (always free). She will gift you a Floral ornament when you first meet her. If you allow the orcs to run a train on Mariel later before rescuing her, there will be another event at the inn later involving the villagers. You will need to fight off Man A to diffuse the situation (Fame+1, Divinity +10, Crime +100; just pay the 200G fine when a guard eventually confronts you). Poor Mariel just cannot catch a break.
#2 – Highly recommended that you pick up the Long Sword and the Amulet of Chastity. The Long Sword will give you a fair fighting chance right away against the early mobs (it is arguably the best physical weapon outside the two elemental weapons) and the latter will keep enemies from successfully grabbing you and ripping off your clothes. The latter is especially valuable for wasting enemy turns as they unsuccessfully grab at you, giving you free shots in turn. Holy Water (for getting out of bind 100% of the time) will not be available for another 3 dungeons.
#3 – Grab a few lock picks for unlocking chests in the next few dungeons. Many of them contain gold which will fund your anti-rape efforts (I would pick up some herbs and a few sewing kits as well as keeping your clothing durability at 100 will delay enemies even further when they have successfully grabbed you).
#4 – This is an early farming spot that will open up once Mariel has been rescued. Each orc/orc squad you fight off will increase your divinity by +1. Eventually the orcs will stop attacking so you can’t farm divinity here forever. Strangely enough this spot can open up again as you progress with the story – but I haven’t figured out the exact trigger for this. Oh and the old man gives you 50G each time on top of what the orcs drop so it’s also a good spot for some early gold (not to mention experience). Just be extra careful of the orc squad. This is a good time to change difficulty setting to very easy/easy as needed.
2. Slime Forest – Princess Sacrifice: Adventure of Feena Walkthrough & Guide
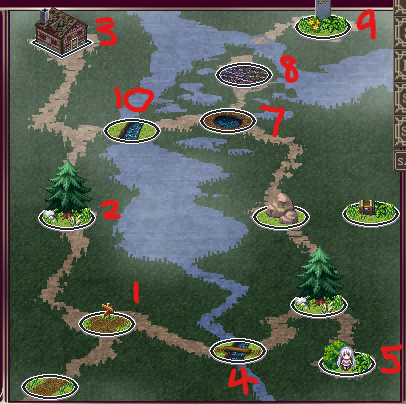
Have you visited Gnossel village yet? A Long Sword and an Amulet of Chastity will go a long way here. But odds are it’s a catch 22 scenario. Slimes drop the Heal skill essence which you will want to farm.
#1 – Your first slime encounter.
#2 – There is a trap check here.
#3 – You don’t have to enter the house. The note inside just tells you about the hidden chest at the location marked #6. Don’t sleep here or you will be taken advantage of by the owner in your sleep (and then you have to fight him).
#4 – Forced slime encounter.
#5 – Collection point. You can grab a few herbs here.
#6 – Click around this area and you will unlock this hidden chest. You will need lock pick to open this (Dex check target 6). 250G inside.
#7 – “Look around” to potentially meet red slimes. They are stronger variants so be prepared. You can also encounter them as you move forward but I noticed the odds of encountering them are much higher if you look around. It’s not a bad idea to farm a few provided that a) you can reliably run into them and b) you can kill them fairly easily.
#8 – Go deeper to encounter the Slime Colony. NOTE: Killing the Slime Colony will trigger the orc attack on Gnossel Village. If you want to save Mariel at the earliest opportunity make sure you are prepared for another fight against an orc squad right after leaving the Slime Forest. You will not have the opportunity to rest in between (can’t sleep at the #3 house after fighting the Slime Colony on a virgin-run). Divinity +1 for killing the Slime Colony.
#9 – 1 of 3 stone monuments in the game that will grant you a SAD+1 or MASO+1 depending on your choice. The remaining two are much better hidden and one of them is off limits for a virgin-run. Take SAD+1. A good offense is the best defense.
#10 – Trap. Def check target 9. You will take water damage if you fail. I would skip this path though. No point skipping the stuff on the longer path.
If you’ve defeated the Slime Colony, your next stop should be the Abandoned Mines. You want to get the jump on the orcs at the entrance and save Mariel sooner rather than later. DON’T go back to Gnossel village just yet unless you want to see a different Mariel event play out.
3. Abandoned Mines – Princess Sacrifice: Adventure of Feena Walkthrough & Guide
Demea will not try to stop you from entering if you are level 3 and above (if you tried to enter here earlier right after leaving the Sanctuary). But you can enter regardless of her warnings. You can pick up Power Strike from the orcs – definitely farm for it. It is invaluable for the rest of your adventures. Don’t think about tackling the Orc Squad or the Orc Hero until you have Power Strike (they’re too much trouble until then).
#1 – Likely an encounter with rats here.
#2 – Weird orc. Pick “treasure” and “let him guide you” and he’ll lead you to the orc squad at spot marked #7 (don’t). Pick fight against orcs and he’ll attack you right there. Pick “treasure” and “refuse” and he’ll bugger off. Picking “treasure” and “attack” or just “attack” right away will give you a pre-emptive attack on him. Pick “return” to say goodbye (he will stay there).
#3 – There is a hidden door here. Dex check target 7.
#4 – You can collect a few energy mushrooms here. Good for boosting attack.
#5 – Pack of giant rats encounter. You can pick up 3 lock picks and a toughtato here.
#6 – Trap. Agi check target 7. Iron ball.
#7 – Orc squad here. You can sneak by them (Agi check target 6) or attack to gain the initiative.
#8 – If you’ve triggered the Gnossel Village orc attack event right after clearing out the Slime Forest this is where Mariel can be rescued from (Fame +2, Divinity +10). Alternatively you can leave her to rot in the orc cellar like she never existed and continue on with your adventure (I have never completed the game like this so I don’t know if she still gets an ending cameo if you pursue this path).
#9 – Orc Hero fight (get Power Strike before tackling him). Divinity +1. Potential for rare silver ingot drop (but don’t bother farming – you don’t need it yet).
#10 – Dex check target 7. Trap check target 7. Iron ball. 250G (?) in chest.
4A. Fairy Hills – Princess Sacrifice: Adventure of Feena Walkthrough & Guide
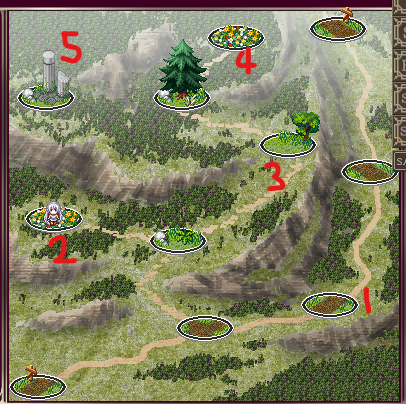
Demea will not try to stop you from entering if you are level 3 and above (if you tried to enter here earlier right after leaving the Sanctuary). But you can enter regardless of her warnings. You can learn Flame from Puck or the Fairy (?) here.
#1 – Best early grinding hot spot for exp/gold. Puck and the Ctrl key will be your best friend for a while. After your first forced encounter with him (pick “don’t play”), you will have the option to pick “attack” on subsequent encounters. This will always give you a pre-emptive attack going into battle. Once you get to the point where you can 2-shot him (3-shot is okay; you just need to heal periodically) you can start farming with impunity. Just hold down the Ctrl key and keep clicking away at this spot. Just be careful not to pick “Play” accidentally. If you’re not strong enough to do this now come back a bit later. Adjust the difficulty to hard/very hard for the extra experience once you’re strong enough.
#2 – Last time I’ll point out a standard collection point. Soon you can buy everything that you can potentially find at collection points for much less hassle.
#3 – There is a check here for your first elixir. Take the shiny thing!
#4 – The fairy will tell you to search for Vieve. Come back to her once you’ve located Vieve and she’ll give you the Fairy Dress. Vieve is at the spot marked #4 at the Seaside Cave. Talking to the fairy before finding Vieve is optional. She will reward you either way.
#5 – Entrance to the hidden Ancient Tomb. Click around in the circle area on the sub-map to unlock.
4B. Ancient Tomb – Princess Sacrifice: Adventure of Feena Walkthrough & Guide
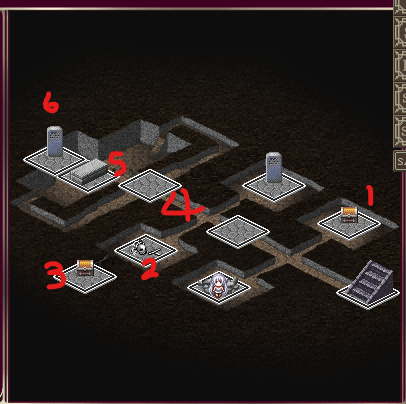
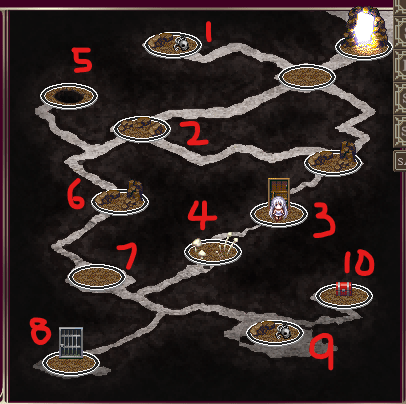
Don’t mess around in here unless you have the Flame skill or the silver sword (Holy). You may even want to switch to the Witch class specifically for this area as all the enemies are strong against physical attacks. There may be a skeleton gatekeeper encounter at the central block closest to the stairs (unmarked). Activating the encounter is a bit of a hit-or-miss for me.
For a virgin-run you’re done with this area after the chests at #1 and #3. You can read a bit of lore at the unmarked stone monument.
#1 – Check to unlock chest and check to avoid trap.
#2 – “Examine human bones” will activate a skeleton fight. “Look around” gives you a clue about the hole in the wall.
#3 – Click on the crack between #2 and #3 to unlock #3. Check to unlock chest and check to avoid trap.
#4 – Gate. Dex check target 7 to open. Agi check target 8 to avoid trap. Pitfall.
#5 – DECISION TIME. Beating Wraith here will lead to Demea using an egg vibrator on Feena (sexual experience +). Beating Wraith also earns you 300 EXP, Fame +1 and Divinity +2. Wraith is a pain to deal with at lower levels.
#6 – 1 of 3 stone monuments in the game. SAD+1 or MASO+1. If you decide to pick up the egg vibrator, go with SAD+1. Otherwise just forget this monument – you’ve lost the battle but you’ve won the war.
5. Port Wellston – Princess Sacrifice: Adventure of Feena Walkthrough & Guide
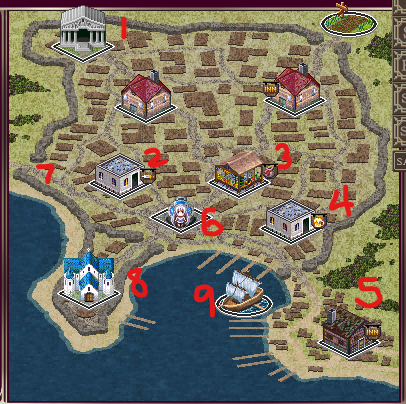
Second town. Lots to do and buy here. This is a good point to start considering equipment combination depending on your preferred class. White Round Hat and White Gloves are great for the Witch class (not so much for the Warrior class).
#1 – The church. Your earliest access to Holy Water. Definitely worth the investment if you want to save yourself the headache of restarting when the “unbind” command eventually fails you in battle (but hold off on the Holy Water for now and see #2). If you’re playing as the Witch class the White Rod is your ultimate weapon. You can donate up to 9000G to increase your divinity to 90 (100G per point in divinity). 90 is the requirement to view the true ending. Donating also lowers your depravity (but only down to 50) – to lower depravity below 50 you will need to perform service activities at church and pass stat-based checks.
#2 – Claude’s shop. If you talk to him he will mention that he’s looking for help. Go back to Gnossel village and talk to Mariel. Tell her about the opening at Claude’s shop and she will then close up her inn permanently and move to Port Wellston (Fame +1, Divinity +5). While you lose the free inn – not really that big a deal since you always want to keep the exp+50% resting bonus – having Mariel relocate to Claude’s shop will increase the available items for purchase at his shop. Herbs/Holy Water/Sewing Kit/Lock Pick will be sold at a discount and this is where you should stock up going forward. The soldier armor becomes available as well (Strip Res +20% and Def +5).
#3 – The earliest you can buy Energy Mushrooms (ATK up).
#4 – Pub. You can drink here for tips (or just read my guide) or dance for chump change. You can dance for the Golden Decoration here but you’ll have to give up on the virgin-run.
#5 – You only stop for Somudo at this point in the game. Just don’t sleep here or the inn owner will get touchy with Feena. Always pair Somudo with Holy Water to remove the -30% agility debuff (lowered agility means that enemies are more likely to surprise you in battle or pull a critical on you). Plus you don’t want the pleasure meter to run its course, have Feena orgasm in battle and lose all her MP in the process (it’s not in the spirit of this virgin-run).
#6 – Two side quests here. The strolling youth lost his wallet which can be found at #7. The burly farmer owes the Duke 1200G and his daughter has been taken as collateral. The bard here will sing songs of praise if Feena’s Fame is high enough (10+ is enough for the first verse; I’ve seen a second verse before which just requires a higher level of fame). He will chastise you if your crime is too high. This seems to be the only implementation of the fame stat (flavor text).
#7 – Click around here to pick up the lost wallet (500G, Divinity -1). Return the wallet to strolling youth at #5 (-380G, Fame +1, Divinity +3).
#8 – Visit the castle and ask for an audience with the Duke. Ask for support first to receive 800G. Then ask him to release the child. You will have to pay the 1200G debt. The burly farmer will reward you with 600G (+200G net) and an elixir (Fame +3, Divinity +10). I have not been able to seduce the Duke. Crime does not pay in this game so forgot about sneaking in to rescue the child (it’s a net loss).
#9 – The sailor here will take you to Eskarma Island (100G) or Holy City Pallant (100G) after you deal with the kraken at the Seaside Cave. So that’s our next stop.
6. Seaside Cave – Princess Sacrifice: Adventure of Feena Walkthrough & Guide
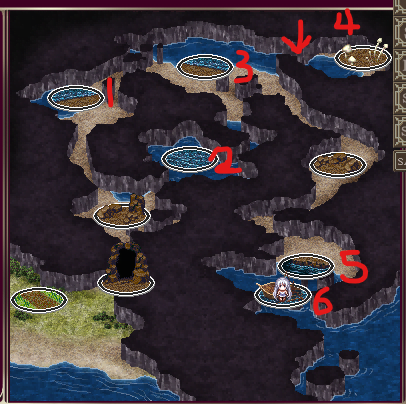
#1 – 3 fights in a row against squid hatchlings.
#2 – Be careful here. You start the battle bound. Holy Water recommended.
#3 – Proceed forward.
#4 – Click around where the arrow is pointing. You will need to pass a Def check target 7 to avoid water damage. Vieve is here but you’ll have to fight off a Giant Squid to save her. Go back to Fairy Hills (marked #4 on the sub-map) and the fairy there will give you the Fairy Dress (Divinity +5). The Fairy Dress is very good for the Witch class.
#5 – Kraken fight (weak to fire and bombs; he really likes to grab you). 200EXP, Fame +3 and Divinity +2 for winning.
#6 – Dex check target 7. 900G.
7. Eskarma Island – Princess Sacrifice: Adventure of Feena Walkthrough & Guide
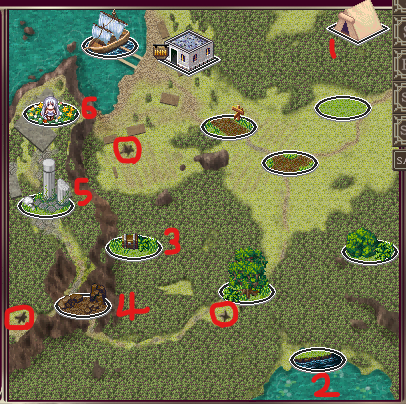
Go back to the location marked #9 in Port Wellston and talk to the sailor again. Pay 100G to sail to Eskarma Island (it’s a one-time fee). This guide will be taking the long way around to Holy City Pallant after this. The inn here sells nothing new.
You’ll encounter a wolf pack (or two) here on the island. But like rats/bats they are one of few safe enemies for our run.
#1 – The bard in the tent here can sing cursed songs to remove people’s memories. For 2500G he can remove (reset) all of your unpleasant memories (sexual EXP) as well as any bad rumors about you (depravity). You will not need his services with this guide, but just know that he exists.
#2 – You’ll notice on the sub-map that there are three circled asterisks that form a triangle. If you listen closely to the singing fairy here she will tell you that there is a hidden chest at the center of the triangle. She will run away if you try to approach her (99.99% sure she’ll always run). You can safely take a bath here (it does nothing though). The only benefit to bathing is to wash off bodily fluids (if you can’t spare a Holy Water).
#3 – Str check target 9 to dig up. Dex check target 8 to open chest. Agi check target 8 to avoid aphrodisiac gas. 1100G.
#4 – Agi check target 7 to avoid falling rocks.
#5 – Boss fight against Topknot-octopus-vegetable-man monster. Watch out for his Consecutive Blow. 500G, 300 EXP, Fame +1 and Divinity +2 for winning. Also gives you an elixir.
#6 – Backstory of Dragon-Slayer Sacrificial Princess Lyn from 400 years ago.
8. Thieves’ Road – Princess Sacrifice: Adventure of Feena Walkthrough & Guide
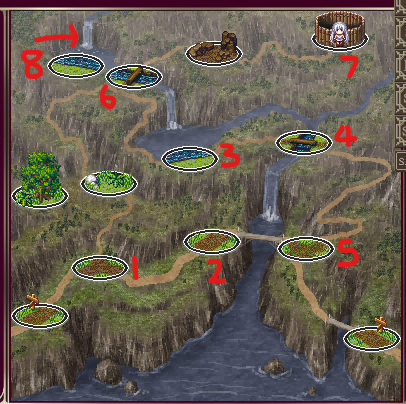
There is an interesting scene here involving the bandit boss and his merry gang (not applicable to a virgin-run). If you lose in this area at any point you’ll be taken to the bandit’s lair (marked #7 on the sub-map). After refusing to become the boss’s woman Feena is fed to the wolves figuratively. Afterwards, as she makes her escape and passes through the point marked #5, she’ll see the aftermath of the bandits vs monsters fight. Feena can take the saintly route and gain some additional divinity points or Feena can give him the middle finger (either choice gets my nod of approval).
#1 – Seed Bandit. Help the old man (Feena’s first kill). 80G, Fame +1 and Divinity +2.
#2 – Get ready for an ambush. You will have to fight a squad of bandits and the bandit boss back-to-back. Watch out for the bandit boss’s Consecutive Blow and his high tendency to critical (the game designer really wants you to lose here). If you’re not prepared enough to win you can also take the the bridge at #4 instead and bypass the ambush here altogether. You can always come back later at a higher level just to show him who’s boss (at normal difficulty).
#3 – Don’t take a bath here.
#4 – You can avoid the fight with the bandit boss if you take the #4 bridge instead of the #2 bridge.
#5 – Nothing here for the virgin-run. There is a fight with a Greater Flesh Golem at the corner exit. Watch out for his Consecutive Blow. He is also strong against physical attacks so you’ll have to rely on Flame. 300 EXP, Fame +1 and Divinity +2.
#6 – Persuade for his backstory. You’ll have to attack him though to pass.
#7 – Attack triggers a fight with a mercenary. Watch out for his Consecutive Blow. Divinity +1. Dex chk target 7 to unlock door. Dex chk target 8 to unlock chest. 1000G. If you want to sneak in instead there is an Agi chk target 7.
#8 – Click around the top waterfall to unlock. Safe bathing area. Look around for the chest – Dex chk target 8. 1700G.
9. Holy City Pallant – Princess Sacrifice: Adventure of Feena Walkthrough & Guide
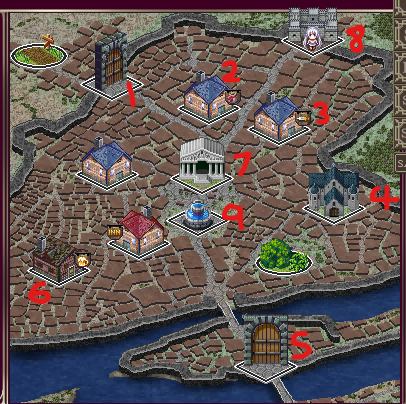
Sailing here from Port Wellston for 100G was an option, but since we didn’t want to skip Thieves’ Road we took the land route.
This is the third and final town/hub.
Leave Holy City Pallant immediately after entering (before even going through the northern gates marked #1). This will unlock Fort Regla and the Undermountain areas right away.
If you accidentally click on #8 DO NOT talk with the soldiers there (immediately return). Otherwise you will trigger the Menike demon army siege event which will close off the northern gates marked #1 until you escape the city through the southern gates marked #5. Menike will now be permanently parked outside Holy City Pallant until you either a) turn yourself in (divinity 50+) or b) fight them at the northern wall until you lose (aka Death Gauntlet with no escape). Both options results in Feena getting horribly abused on the way back to Fort Regla and immediate ends the virgin-run.
There is another way to turn yourself in at the town square marked #9 after triggering the demon army siege event (divinity 30+), but all it really does is add to Feena’s suffering. There are some parallels here to Lyn’s fate at the hands of her subjects 400 years ago after she revealed her identify as the king’s daughter – just thought I should point that out.
Parking Menike and her army outside Holy City Pallant on a virgin-run means that you will no longer be able to kill her at Fort Regla for the additional EXP/Fame/Divinity. And worse of all you will lose the best grinding spot in the entire game (marked #4 on the Fort Regla sub-map). More on that when we get there.
#1 – Enter the City. Now all the areas will be open.
#2 – This is the first shopkeeper that sells Mystic Scrolls (INT/WILL up in battle). Helpful even if you are playing a non-Witch class (mainly for the Heal/Recover spells and for reducing enemy magic damage).
#3 – White Frill, Black Skirt, Small Apron, Red Striped Underwear/Socks and Black/Red Rabbit Ribbons are exclusive to this shop. She will also craft you the Silver Sword of Evil’s Bane for 2500G if you bring her a silver ingot.
#4 – There is a chest in the big mansion that contains a silver ingot (along with 1500G), but this is not the recommended way for getting one. You may also run into a guard inside the mansion once you’ve successfully sneaked inside – beating him or running away automatically ejects you from the mansion. There is likely an internal check that spawns/de-spawns the guard that’s tied to story progression/Feena’s level (but I have not figured out what it is). There is a guaranteed silver ingot roughly 4 sub-maps later and you only need 1 to craft the Silver Sword. I would hold off until then, but it’s up to you.
#5 – Opens the way to the Forked Road optional area. You must persuade the guard here to let you through (WIL check target 8) or bribe him with 200G. This is also the only way to escape from the city once you’ve triggered the demon army siege.
#6 – Pointless as I’ll cover all the bar tips in this guide. If you click on Feena’s icon while she’s drunk Demea will have words for you. Being drunk halves your INT/AGI but slightly increase your CRIT rate. You can also undress Feena completely while she’s drunk -> Indecency increases while nude -> depravity + if you walk around town nude. Being nude also slightly increases you CRIT rate in battle. Holy Water will sober you right up.
#7 – Protective Robe is exclusive here (magic resistance +15%). Some flavor text dialogue and world history here. Otherwise same functions as church at Port Wellston. Elsa will take over the clergyman role here after rescuing her later.
#8 – Stay away from here.
#9 – Stay away from here if you have triggered the demon army siege. While you can help the innocent woman (divinity 30+) and get away scot-free if you pass an INT check, there are no rewards for doing so.
Demon Army Siege Stealth Rescue Mission Explored
This is for non-virgin runs only, but after you trigger the demon army siege at #8, you have the option of jumping over the northern wall and attempting a solo rescue mission yourself. But before the inevitable Death Gauntlet, you have the opportunity to pass a target check of 29 for a successful stealth rescue. I’ve always wondered if this check was actually passable at higher levels.
Both the Wanderer and Thief class give you an additional boost to your base agility stat (same percentage increase for both), but the Wanderer class also gives you an additional +1 to target checks.
For my main game I had Feena level up using the Commoner class which has an agility growth rate of C. This guarantees a +1 to agility with every level-up. An agility stat of 132 gives me a +13 and the Wanderer class brings that to a +14. I would only need a roll of 15 or higher to pass the check (using three dice).
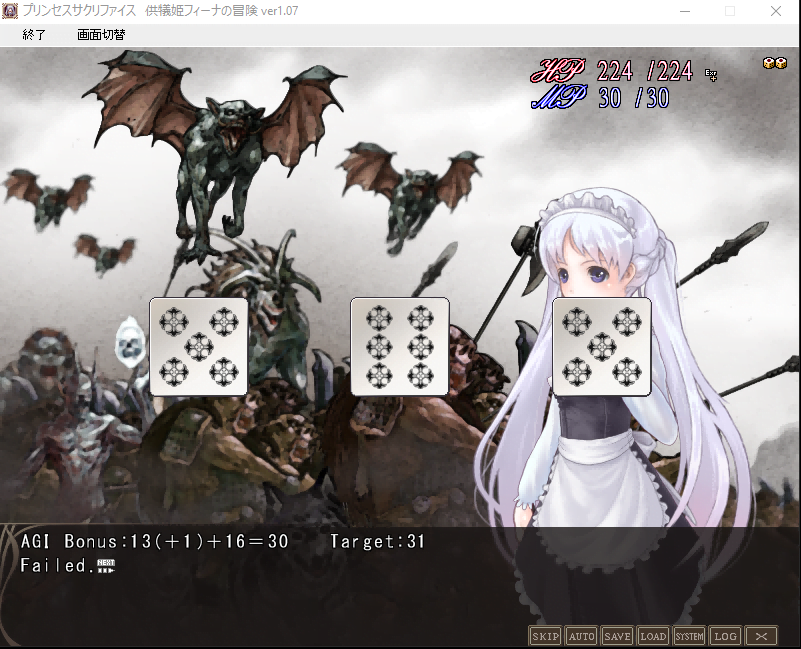
Surprise! It’s a moving target. Once you agility stat hits the realm of potentially passing the 29 target check, it moves again. Not only does it move, it moves in quite a malicious manner. You see, every time you reload and retry, the target check will change but stay within a certain set range – in my case it was 31-35.
So instead of simply moving up to an impossible target check of 33+, it occasionally dips low enough to give you a glimmer of hope of passing. Except you will never roll what you need.
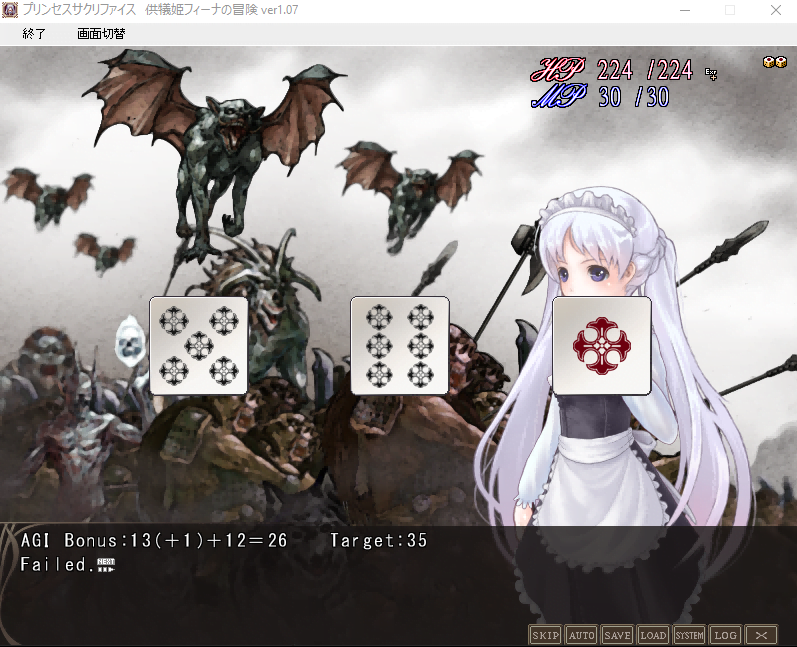
Target check of 35. Obviously not possible.
Closest attempt #1. Note the changes in dice numbers between closest attempts.
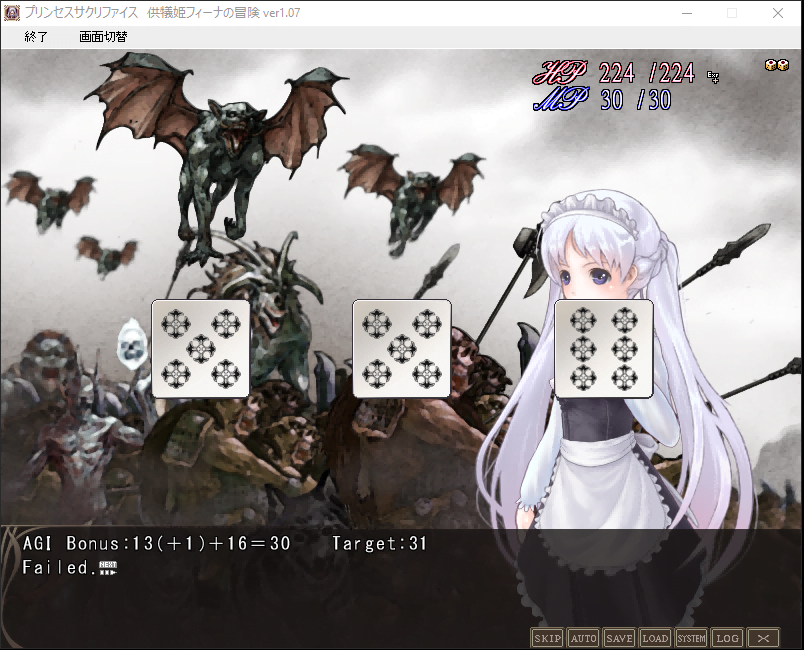
Closest attempt #2.
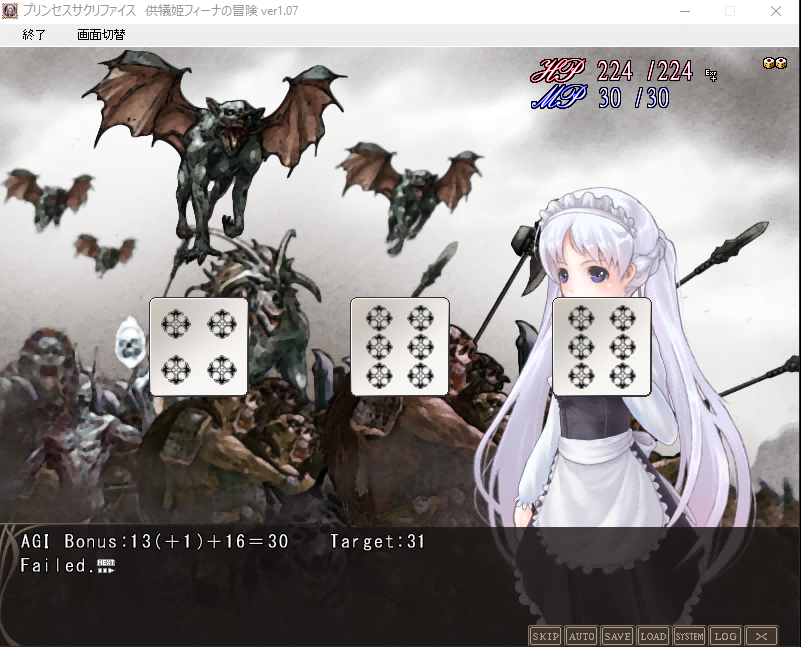
Closest attempt #3.
Closest attempt #4.
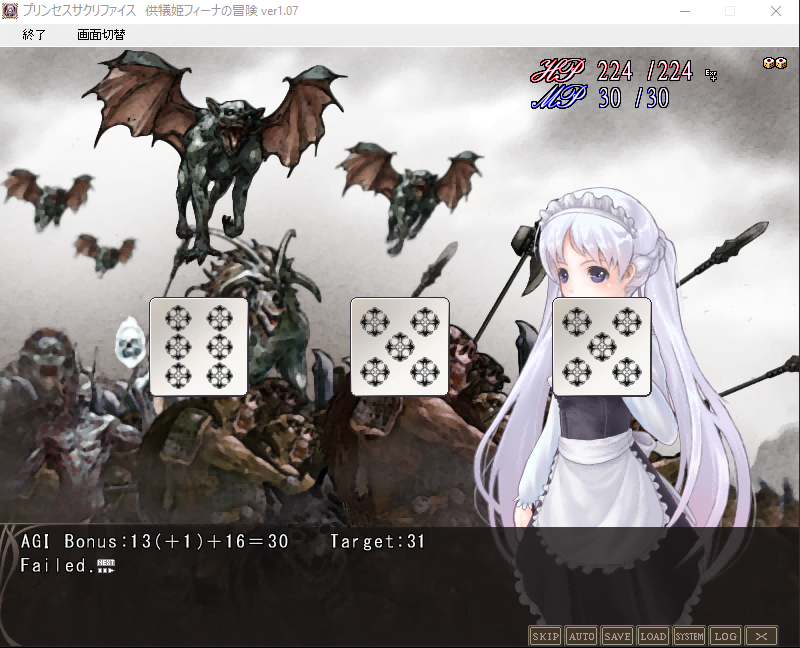
Closest attempt #5. Note I was finally able to roll a 17 here (but only when the target was 32).
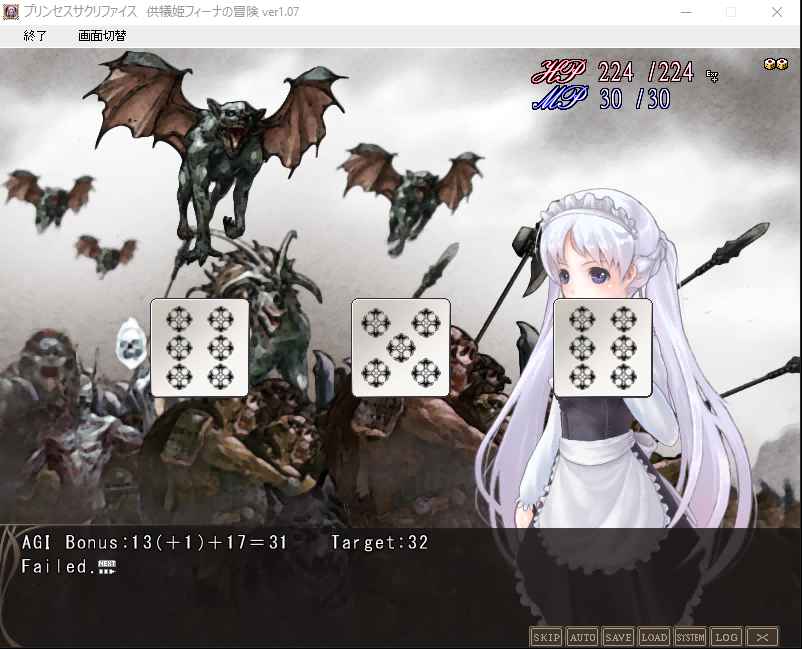
I have to conclude – after roughly 3 hours of testing – that no scenario was programmed in for passing this check.
By the way, you will never roll boxcars here (two sixes for an instant target pass). Likewise for three sixes.
10. Forked Road – Princess Sacrifice: Adventure of Feena Walkthrough & Guide
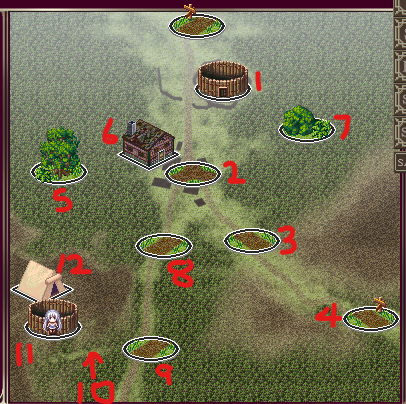
This is an optional area where you can help the human army take down Tusklord Gerzahar, the Dark Lord’s right hand man/orc.
There are a few ways to go about it, but the cumulative rewards at the end will always be the same. There are two reward tiers.
If you help fight Gerzahar (or kill him on your own):
1000G
400 EXP
Fame +4
Divinity +10
If you let the soldiers fight Gerzahar instead:
1000G
100 EXP
Fame +1
Divinity +7
#1 – This is where you receive the espionage mission. Completely optional (you don’t even need to talk to them and Feena will automatically assume that she’s on an espionage mission).
#2 – Must enter the village. opens up #3/#5/#7/#8. This is where the final showdown will take place once you’ve returned from your espionage mission. Whether Gerhazar shows up here depends on whether you’ve dealt with him already at his tent (marked #12 on sub-map).
#3 – Ogre fight. They like to power up. Kill them quickly.
#4 – Pass through to open up Heaven’s Spiral Peak optional area.
#5 – There is a soldier here that’s being attacked by a pack of wolves. After “saving” him he tells you about the enemy base down south in the forest and then dies. Inconsequential.
#6 – Just wanted to point out the worst collection point in the entire game (5G).
#7 – Look around first before proceeding forward. If you don’t, the orc squad will get the jump on you. You can lose or surrender here without ending the virgin-run and be taken directly to Gerzahar for a one-on-one fight. Don’t forget to use a Holy Water on the sub-map before clicking on his tent otherwise you will start the battle bound. It’s a shortcut to the boss but you have to finish him off there on your own. Nothing happens though if you beat the orc squad here (just some exp and gold).
#8 – Proceed forward.
#9 – Optional. You can just go straight to #10.
#10 – Click on the spot as indicated by the arrow. There is a hidden path here where you will have to fight a high orc.
#11 – This is what I dub a “Death Gauntlet” hotspot (similar to the unwinnable north wall fight at #8 in Holy City Pallant if you trigger the demon siege – the only difference here is that you can actually run away). The enemies get progressively stronger with each successive fight but the EXP/gold rewards also grow exponentially. Since you only really get one chance to do this before having to escape north back to camp (can’t go back to a town in between sessions), this is a bad hotspot to grind. I would just hide and proceed forward to avoid attracting enemy attention (Agi chk target 7). You can still visit Gerzahar’s tent (marked #12) even if you fail the hide check here.
#12 – 300 EXP, Fame +3 and Divinity +3 if you challenge Gerzahar to a one-on-one fight and win. You have to fight another high orc afterwards. You can delay the rewards and choose to go back and report to the fort instead. A soldier will assist you with the fight against Gerzahar if you take the fight there (recommended).
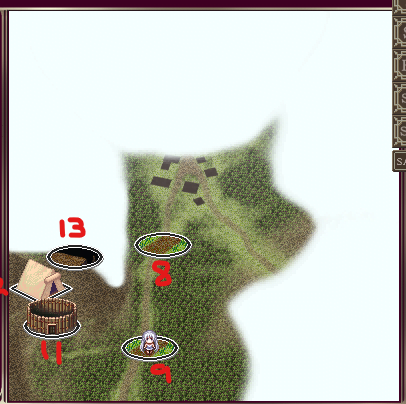
Most of the sub-map will be obscured after you visit Gerzahar’s tent or fail the hide check at #11.
#8 – Another one-time Death Gauntlet. Just run. Escape north to #2 marked on the previous Forked Road sub-map to trigger reinforcements for Feena (they’ll be there regardless of whether you’ve visited #1).
#9 – Fight or escape option. Sexual favor is not an option for the virgin-run. Plus that just leads to more enemies to deal with.
#11 – You can keep fooling around with the hide check until you eventually fail it and get discovered. Pass it once and #9 will open up.
#12 – You can go back and challenge Gerhazar while the tent is accessible. You have to fight another high orc afterwards. Tent disappears after he is defeated.
#13 – Agi chk target 6 if you have no pursuers (check requirement will be lowered if you attack and kill the pursuers). Agi chk target 8 if you try to jump with pursuers. You will take fall damage if you fail either check.
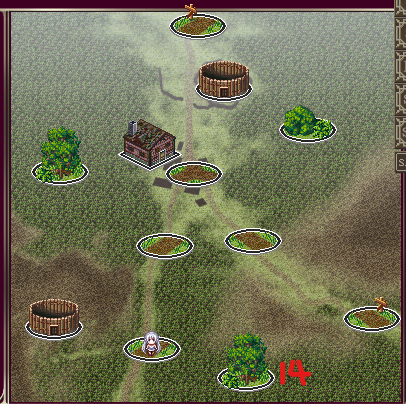
This is the aftermath sub-map after completing the Gerzahar event.
#14 – The BJ orc from #9 on the previous sub-map can be found here. You can farm him if you want to (don’t bother though).
11A. Fort Regla – Surface – Princess Sacrifice: Adventure of Feena Walkthrough & Guide
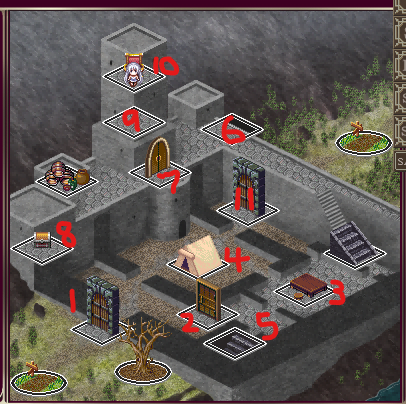
Fort Regla is currently occupied by Menike the Fiend (Dark Elf) and her forces. If you’ve triggered the demon siege event at Holy City Pallant and escaped through the southern gates, she will be absent from her throne (#10). Most importantly, the Death Gauntlet hotspot (#4) will no longer be a hotspot – as most of the demon army has moved to attack the Holy City – and you will be able to clear out the hotspot enemies in 3 encounters. Menike would normally be holding the fortress key to unlocking the gate at #11, but if she’s away from her throne you will get the fortress key after clearing out the hotspot (#4) instead.
You can turn yourself in at the northern wall at Holy City Pallant to have Menike and her army move back to Fort Regla but that’s not an option for a virgin-run.
Killing Menike for the extra EXP/Fame/Divinity (and the satisfaction) is the recommended route. We also want to grind some levels at the Death Gauntlet hotspot (#4) until we can steamroll every enemy on very easy difficulty (early 20s should be sufficient for Skalmgriever; your mileage may vary depending on your chosen class) so hold off on killing Menike until then. The #4 hotspot will become exhaustible once you kill her.
Note that if you lose at any point in Fort Regla you will end up in the dungeon cell below (marked #1 on sub-map). Not applicable to virgin-run.
#1 – Gaining the initiative in battle requires an agi chk target 5. Sneaking past him requires an agi chk target 6.
#2 – Door leads to #3 and #5. I’m surprised considering how much this game loves checks.
#3 – Demon mess hall. Orc squad eating and having a nice conversation. You can ruin their day via sneak attack (and winning) or you can sneak by them (agi chk target 7).
#4 – Best spot to level up in the entire game, no contest. Death Gauntlets are efficient (no running around sub-maps hoping for an encounter), back-to-back, and the more kills you chain together the more EXP/gold drop increases. You’re averaging 500-1000 EXP per enemy by the 10th kill, and by the time you’ve chained 20+ kills you should be averaging 2000 EXP per enemy. Finally, it’s right next to the Fort Regla entrance so you can leave to restock at any time.
Absolutely do this on very easy difficulty only. Death Gauntlet enemies are slightly stronger than their regular variants to start, and each kill you chain makes the next enemy slightly harder. Eventually you will have to bail and run (it’s just that much easier on very easy). You also get two retries before the demons drag you off for funny business (but each time they knock you down their HP recovers to full and they get a slight power up). The 1.5x/2x EXP bonus from hard/very hard mode sounds good in theory until you realize you can’t chain more than 3 kills together because the enemies are suddenly 15x/20x harder right off the bat.
Grinding at #4 – 2nd fight, Orc Hero on very hard difficulty mode.
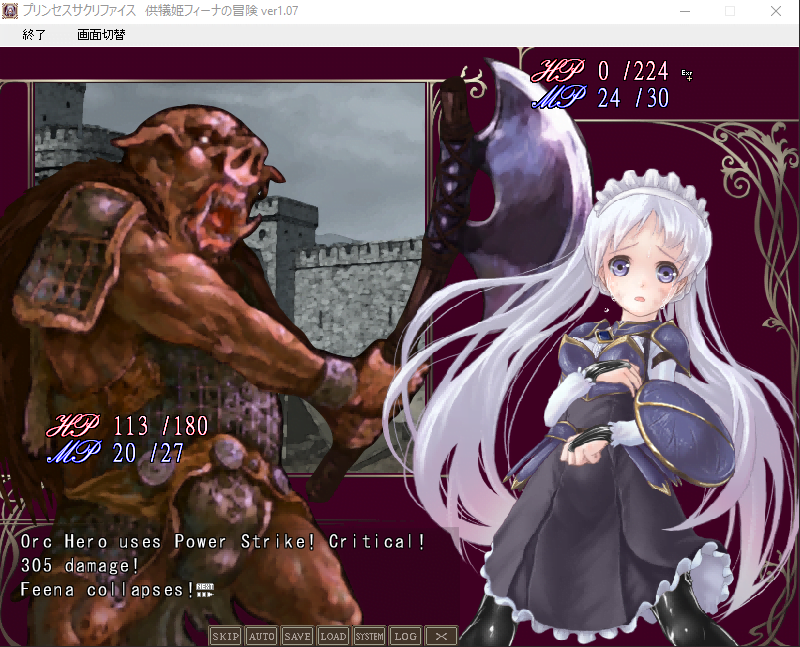
Don’t listen to Demea. The enemies will forget all about your existence the moment you successfully escape, and the difficulty of the Death Gauntlet will be reset anew.
My observations (note these numbers were observed in the 30s-60s; enemies give more EXP at higher levels):
| Total Kills Chained | Cumulative EXP from Single Death Gauntlet Run |
| 20 | 17562 |
| 17 | 11654 |
| 16 | 9678 |
| 20 | 17692 |
| 20 | 16726 |
| 21 | 20312 |
| 23 | 24426 |
| 22 | 21192 |
| 25 | 28585 |
| 27 | 36284 |
| 28 | 34374 |
In terms of preparation for physical classes, the Long Sword is fine to use for a bit but eventually you will want to switch to the Silver Sword of Evil’s Bane (Holy) as the Demon Mage and the Lesser Demon are both weak against it (the silver ingot is a rare drop here from the Orc Hero). The Demon Mage is strong against the Spirit Spear (Ice) so you want to avoid using that if you’ve already beaten Skalmgriever and just want to grind more. Always stock 20 Herbs/Somudo/Holy Water/Energy Mushrooms/Toughtatoes/Mystic Scrolls. You may even want to skip ahead to the Undermountain – Centre (marked #9 on sub-map) and grab the guaranteed silver ingot there first.
If gold is an issue and/or you’re not quite ready for the Death Gauntlet yet, Puck is great for grinding until you are. I know he doesn’t give the most EXP even on very hard mode but he shows up pretty consistently and that’s the most important thing. Two Power Strikes should be enough to take him down each time and you don’t even have to waste time healing HP or clothing durability (Warrior Feena level 9 was earning 18 EXP and 54G per kill with the 50% EXP battle bonus). He likes to hang out at the spot marked #1 at Fairy Hills. Don’t forget to hold down the Ctrl key to save time. I was averaging around 1000 EXP from Puck every 7-10 minutes when Feena’s level was in the mid-late teens. I did grind Puck for EXP longer than I should’ve though (that was before I knew of this hotspot).
#5 – This leads to Fort Regla – Dungeon.
#6 – Ogre fight.
#7 – Dex chk target 7 to open gate. Agi chk target 7 to avoid trap (aphrodisiac gas).
#8 – Dex chk target 8 to open chest. Agi chk target 8 to avoid trap (dissolving fluid). 850G.
#9 – Demon Mage fight.
#10 – Menike the Fiend. Defeat her to obtain the fortress key and the Saint Killer (useless for virgin-run). 500 EXP, Fame +5 and Divinity +10. All the prisoners in the dungeon (including Elsa) will be freed.
#11 – Use the fortress key to open a path to the Monastery – Approach.
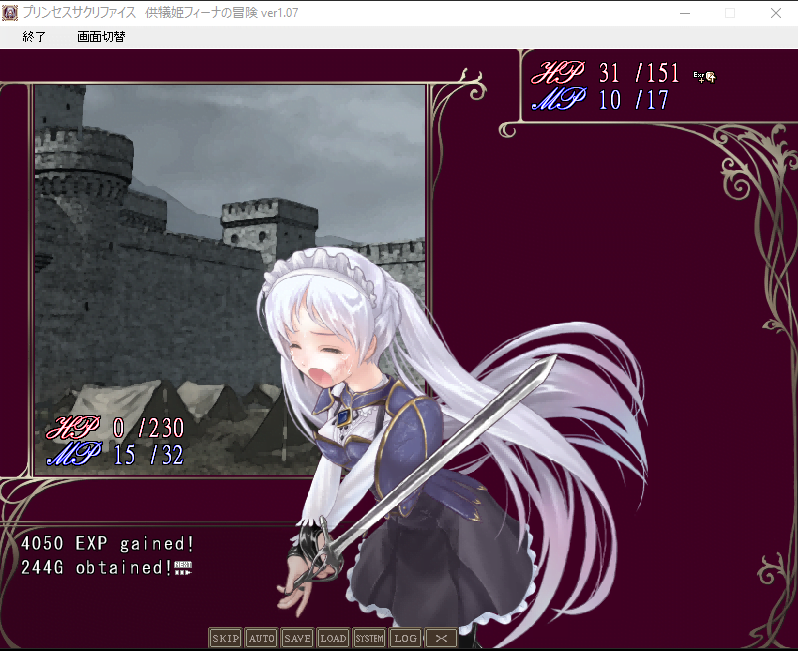
Grinding at #4 – 22nd kill, Orc Hero on very easy difficulty mode. This is the most experience I’ve received in a single battle. Orc Heroes are my favorite because they give the most EXP by far:
11B. Fort Regla – Dungeon – Princess Sacrifice: Adventure of Feena Walkthrough & Guide
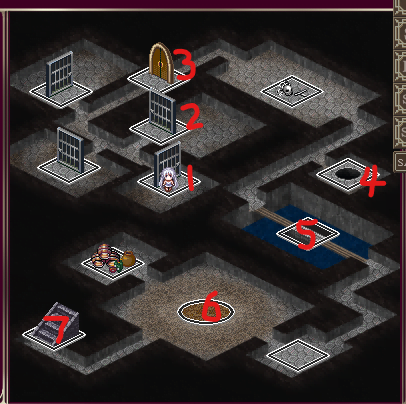
#1 – This is where Feena will end up if she surrenders herself to the demon army at Holy City Pallant or loses a battle at Fort Regla. She will start in this area bound in chains, and if you try to remove the chains via Holy Water, the orc squad wardens will confront her about it (you can acquiesce or fight them off). Not relevant to the virgin-run but just FYI.
#2 – This is where Elsa is being tortured. If Menike is off at Holy City Pallant Elsa will also not be here. Defeating Menike will free Elsa and she will take over the church post at Holy City Pallant (marked #7 on sub-map).
#3 – Door Mimic gatekeeper.
#4 – The hole here leads to Undermountain – Centre (marked #1 on sub-map). One way only. This hole is an escape option for Feena if she was captured and too weak to win the 3-round coliseum battle at #6 to escape up the stairs. Don’t jump down from here. We will take the long way around.
#5 – If you fail the check here it’s an instant game over for a virgin-run. Agi check target 5.
#6 – 3-round coliseum battle against Feena’s captors. If you win all 3 battles the enemies will turn tail and run away. Nothing for you here on a virgin-run.
#7 – This leads to Fort Regla – Surface.
Now for our detour through the Undermountain area.
12A. Undermountain – South – Princess Sacrifice: Adventure of Feena Walkthrough & Guide
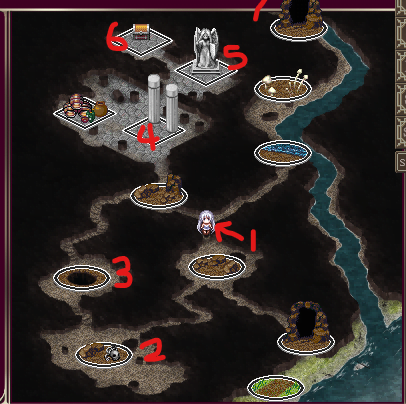
#1 – Click around where the arrow is pointing to discover a shortcut. Str chk target 9 to push the boulder or you can use an explosive keg. You can head straight to the spot marked #7 from here.
#2 – Skeleton fight. They are strong against physical and ice but weak to fire and holy.
#3 – If you fail the check here it’s an instant game over for a virgin-run. Agi chk target 8. Climb into the hole afterwards of your own volition to fight the Slime Colony. You will still be bound when the battle begins but you will have the opportunity to use a Holy Water. You are rewarded with an elixir for winning. Don’t forget to use a sewing kit after battle.
#4 – Cultist fight. They like to heal a lot.
#5 – Skeleton fight followed by Dark Priest fight. I believe this is one of the few encounters with a Dark Priest – they drop the Recover skill essence rarely (Heal v2.0). These jerks will literally heal until their MP exhausts so just keep attacking. 300 EXP, Fame +1 and Divinity +2.
#6 – Dex chk target 6 to open chest. Agi chk target 10 to avoid aphrodisiac gas. 1000G.
#7 – Continue on to Undermountain – Centre.
12B. Undermountain – Centre – Princess Sacrifice: Adventure of Feena Walkthrough & Guide
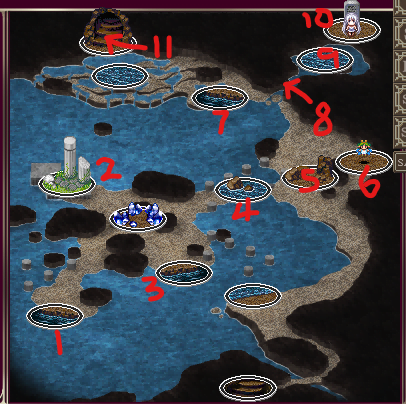
#1 – This is where you will end up if you jumped down the hole at Fort Regla – Dungeon (marked #4 on sub-map).
#2 – You will not meet the Spirit on a virgin-run. The requirement for meeting her is that you need to have the Saint Killer equipped (she will remove the curse so that you can take it off). She will also offer Feena the choice of eternal frozen sleep to escape from her horrible fate (if Feena was captured by Menike and had jumped through the hole at Fort Regla – Dungeon while equipped with the Saint Killer). This is a bad ending if you accept. More FYI – not really relevant to our run.
#3 – There is a friendly slime here that gives you a hint about the hidden Kraken at the spot marked #9. Killing him will lower your divinity by 1.
#4 – Agi chk target 6 to avoid water damage.
#5 – You will regroup with Demea here if you had to jump through the hole at Fort Regla – Dungeon to escape your captors.
#6 – Vieve will set up shop here if you rescued her from the giant squid at Seaside Cave (marked #4 on sub-map). The explosive keg consumable is exclusive to her shop and you will need to use one to help the hidden kraken at #9.
#7 – Giant squid encounter.
#8 – Click on the spot that the arrow is pointing to to reveal #9.
#9 – Hidden kraken. “Wait and see” and the kraken will tell you that it is stuck. Click on #8 and use an explosive keg to free it. You will receive a silver ingot, 1200G, 300 EXP, Fame +1 and Divinity +3. If you opted to kill it right away you just miss out on the Divinity +3 reward (you still get everything else). The last of the 3 stone monuments at #10 opens up once the kraken leaves the scene.
#10 – “I’ll be greedy” for SAD+1.
#11 – Click on the waterfall (roughly where the arrow is pointing at) to uncover the hidden pathway. Leads to Undermountain – North.
12C. Undermountain – North – Princess Sacrifice: Adventure of Feena Walkthrough & Guide
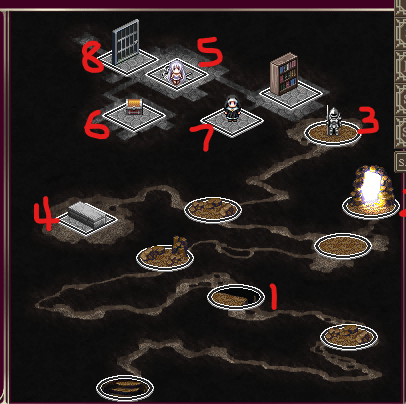
Almost done here.
#1 – Agi chk target 5 to climb slope.
#2 – Leads to Monastery – Approach. Go there first and then return immediately to this area. This is the trigger for discovering/activating the switch behind the statue at #3.
#3 – Examine and move the switch to fight the living statue. Beating him unlocks the path to #5.
#4 – Wraith fight. Weak to fire and holy. Reward is an Elixir, 180G and Divinity +2.
#5 – Helene being tortured by some orcs. Make sure your divinity is 40+ before killing the orcs (you can return and come back once your divinity is high enough – Helene will wait for you). If you are shy of 40 simply go back to the church at Port Wellston or Holy City Pallant and donate your way there. It’s only 100G per extra point in Divinity. She gets a scene in the neutral/true endings if she survives. Divinity +15 for saving Helene.
#6 – Dex chk target 8. Agi chk target 8 to avoid bomb damage. Holy Winged Helmet – I have no idea what pain resistance does but the helmet goes nicely with the Soldier Armor.
#7 – This is where Helene will be chilling until you beat the final boss.
#8 – Dex chk target 6. Agi chk target 7 to avoid aphrodisiac gas. Leads to Monastery – Interior (marked #9 on sub-map). Lets you skip the series of fights at Monastery – Approach (we’re not skipping anything).
Before we continue on with the Monastery – Approach however, let’s take a detour and fight an optional dragon boss. I hope you’ve taken advantage of the #4 grinding hotspot at Fort Regla – Surface.
13. Heaven’s Spiral Peak – Princess Sacrifice: Adventure of Feena Walkthrough & Guide
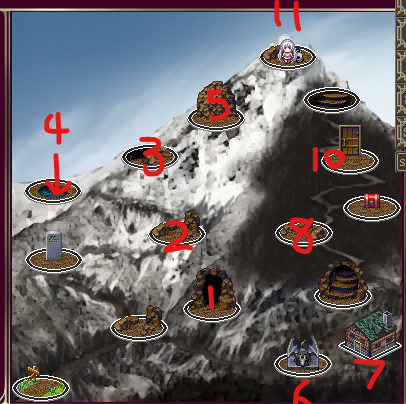
This is the infamous machine translation (MTL) area. I initially thought it was the translators having fun with the dragon’s speech pattern (i.e. he’s not very fluent in the human tongue) but alas.
This is what I pieced together from the MTL and the various lore scattered throughout the game (happy to receive corrections):
#1 – Old woman man shopkeeper. He’s not carrying anything new.
#2 – Agi chk target 8 to climb.
#3 – Elder Ogre encounter. Attack him to knock him off the path. Alternatively, pass an int chk target 9 to climb over the ogre and nobody gets hurt.
#4 – Hidden hot springs. You must defeat Mighty Orc while nude (def halved) in order to use the hot springs. It’s a free healing pool that dries up after a certain number of uses. the Mighty Orc drops 2000G and the Devil Boots upon defeat (it’s worth using for the SAD+2 bonus).
#5 – Agi chk target 7 to climb. Agi chk target 7 to avoid falling rocks and falling to the bottom. Def chk target 7 to resist the cold.
#6 – Enter the village and try to talk to the villagers. They will avoid her until the little girl/shrine maiden comes out to talk. Talk to the villagers again and the Elder will come out and ask if Feena is interested in becoming the shrine maiden this year. “Refuse” or “I’ll think about it” for this virgin-run. The Elder will then offer free lodging (heh) at his place should Feena change her mind.
#7 – Take him up on his offer and ask for shelter. There is a point to this by the way. Feena will wake up bound and find out about the Elder’s plans to sacrifice her for their village. Resist and a 3-round fight will begin. Use a Holy Water right away and dispatch the vigilantes/villagers. Next is the Dark Priest. Finally Bob-kun (Elder Ogre). None of them should be an issue at this point if you plan on fighting Skalmgriever. 300 EXP, Fame +1 and Divinity +2 is your reward for the first part of the village quest.
#8 – Elder Ogre encounter.
#9 – Dex chk target 9 to open chest. Agi chk target 8 to avoid aphrodisiac gas. 1500G.
#10 – Dex chk target 7 to open door. Agi chk target 7 to avoid dissolving fluid.
#11 – Skalmgriever fight. Change the difficulty setting to very easy unless you’ve been grinding a lot and want a challenge. You will need to be in your mid-30s at least to stand a fair chance of winning on normal difficulty. On very easy mode all you need to watch out for are his Scorching Breath and Tempest attacks (it was doing 28 and 27 dmg respectively whereas his standard strike was only doing 0-1 dmg; note I had 20 DEF and 16 WILL at level 12 when I tested this). But even on very easy I would still hold off on fighting him until you’re close to level 20.
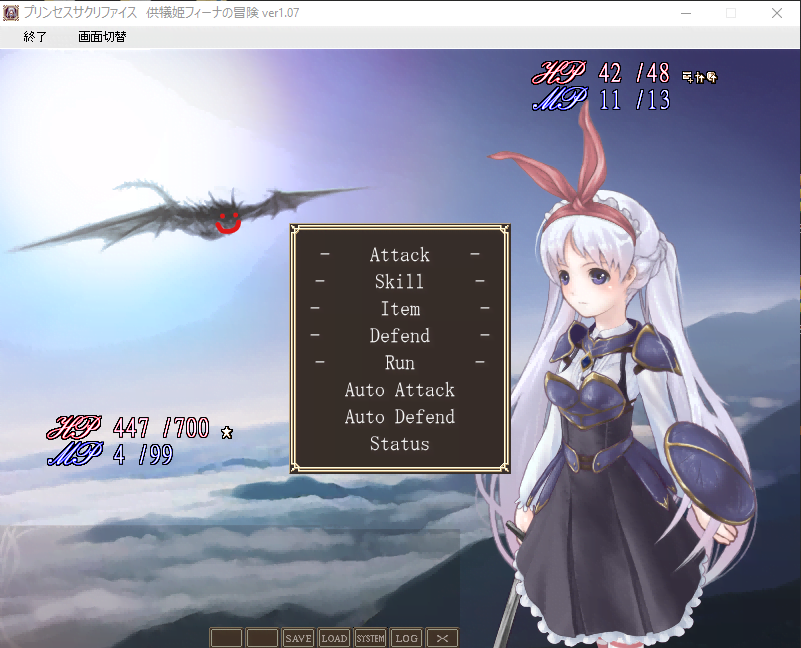
During the first phase (HP>25%) Skalmgriever likes to escape into the air. You won’t be able to hit him with physical attacks while he’s in the air, but your magic will – he’s strong against Flame but weak against Ice Age. Ice Age will force him to land immediately (and lose a turn) – if you want to go that route you can farm Demon Mage for the skill essence. Skalmgriever can also hit you with magic while he’s in the air (although it’s more likely that he’ll just hang in the air and slowly recover MP). I prefer to just heal up and rebuff while he’s in the air. The effects of Energy Mushroom/Toughtato/Mystic Scroll will last for 8 turns and you can rebuff at any time – you don’t need to wait for it to expire first.
Make sure to defend when you see him zooming in from the sky (as shown in the screen cap below). He will use his rush attack the next turn (this is basically game over on normal difficulty if you don’t defend):
During the second phase (HP<25%) he’ll stop flying period and will start attacking you non-stop. Just remember if he hits harder and faster than you can heal during this phase, better luck next time. You may wish to save your three dice for this phase of the fight for the extra critical/evasion chance.
Remember that all those elixirs that you’ve been saving up are good to use for this fight (you may want to save a couple for the end boss).
For beating the great calamity from 400 years ago you are guaranteed to receive the Spirit Spear (Ice), the Dragon Skin Black Underwear, 800 EXP and Fame +3. The black underwear unfortunatey raises depravity in towns but the +20% fire resistance is quite solid. You can make use of it as long as you remember to change into a regular pair of underwear whenever you visit towns (I just shoved it into the bottom of the bag as I’m too lazy to swap equipment).
Talk to the dragon again afterwards and then go back to the Village Elder to receive the rest of your reward for the village quest. Fame +1 and Divinity +10.
If you really want to farm Skalmgriever for the Tempest skill essence, just remember to equip the spirit spear. At 8MP a pop you’re not going to get a lot of use out of it honestly.
Note: Skalmgriever will demand sex from Lyn as a reward should Feena lose the fight (but Feena will join in halfway out of sympathy/guilt) -> End of virgin-run.
14. Hidden Mountain Range – Princess Sacrifice: Adventure of Feena Walkthrough & Guide
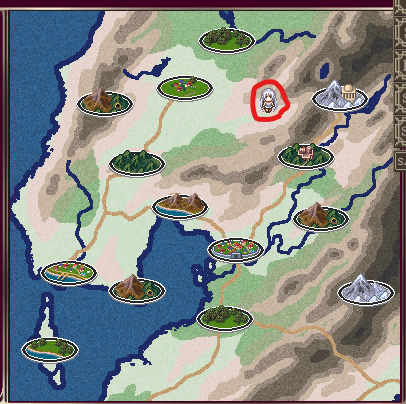
You can actually visit this location as soon as you unlock access to Fort Regla – Surface. There is an elixir here.
15A. Monastery – Approach – Princess Sacrifice: Adventure of Feena Walkthrough & Guide
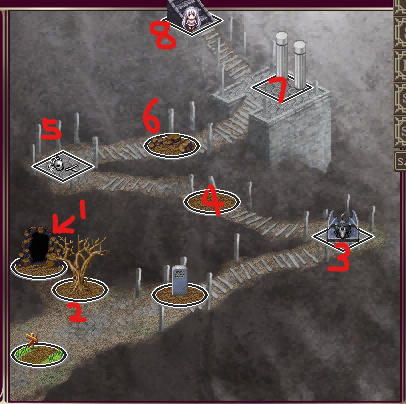
Homestretch. This is where I farmed EXP back in 2016 (rerunning #4 to #6 over and over again). Certainly can’t call it the best spot to grind anymore, but if you’ve exhausted the #4 hotspot at Fort Regla – Surface this is the next best spot (better than Puck). The silver sword (Holy) is recommended for this area onwards.
#1 – Leads back to Undermountain – North (marked # on sub-map).
#2 – The tree here gives you a clue about the secret entrance at #1 to Underground – North.
#3 – Gargoyle encounter. One-time only.
#4 – High Orc encounter. Leave the sub-map and return to refresh encounter.
#5 – Orc Squad encounter. Leave the sub-map and return to refresh encounter.
#6 – Ogre encounter. Leave the sub-map and return to refresh encounter.
#7 – Lesser Demon encounter. Killing him ends all future encounters at #4-#6. 500 EXP, Fame +1 and Divinity +2.
#8 – Leads to Monastery – Interior.
15B. Monastery – Interior – Princess Sacrifice: Adventure of Feena Walkthrough & Guide
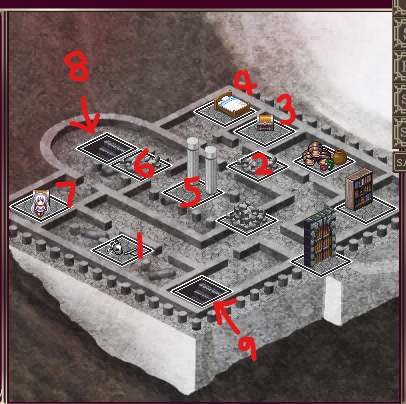
Get ready for some sub-bosses.
#1 – Optional but there’s an elixir here. Cultists encounter. Next, examine for Greater Flesh Golem encounter.
#2 – Greater Flesh Golem encounter.
#3 – Mimic encounter. Use Holy Water. End of virgin-run if it surprises you. Be careful. 1600G.
#4 – Open door to lead to #4. Dex chk target 7. Agi chk target 7 to avoid dissolving fluid. Defeat the Demon Mage to receive another elixir. Can’t rest here anymore.
#5 – Two-part fight. Red Slime encounter. You will start the next fight against Angie/Roper bound. Use Holy Water. Don’t let her surprise you or it’s the end of the virgin-run. You cannot save her. 250 EXP and Divinity +2.
#6 – Pandor encounter. 400 EXP, Fame +1 and Divinity +3.
#7 – You can finally open this gate now leading to the chest. Dex chk target 7. Dex chk target 15 to open chest. Agi chk target 8 to avoid bomb. Magic Scissors treasure (lets you modify clothing durability).
#8 – Leads to Monastery – Sanctuary.
#9 – Leads to Undermountain – North (#8 on sub-map).
15C. Monastery – Sanctuary – Princess Sacrifice: Adventure of Feena Walkthrough & Guide
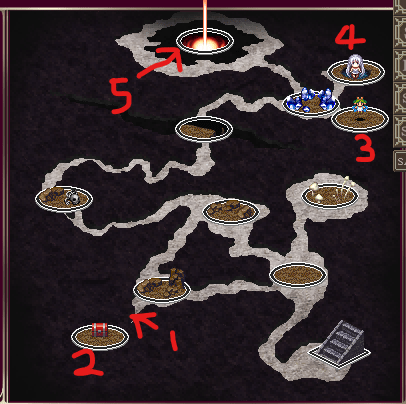
#1 – Click here to reveal the hidden spot marked #2. Get ready for a Slime Colony encounter.
#2 – No checks. Sticky Treasure (cum/estrus/restraint state change) – not much use for a virgin-run.
#3 – Vieve will set up shop here if you’ve rescued her from the Seaside Cave. Nothing new here.
#4 – Healing pool.
#5 – Make sure you’ve done everything before you approach the fire. Make a separate save file here. Dark King Baalveil encounter.
Round 1 – Demea will assist you here but she won’t really make much of a dent (she’s holding back big time btw). She’s fine as a shield though. You are actually not expected to win during round 1 (you can just skip it by running away). Save your resources for round 2 and 3. If you do beat Baalveil here though the subsequent events play out a little differently.
Round 2 – You will start this round at full health. Baalveil’s max HP will have dropped by ~400 points. Demea is no longer around to assist you. If your divinity is 60+ I would recommend you throw this round as well. If your divinity is <60 though this round is your last chance.
Round 3 – Feena begins this round with all her combat stats doubled (she goes into permanent Trance mode). If you’ve damaged Baalveil during round 2 to the point where he loses his mask his max HP will have dropped even further (he went from 622HP to 260HP for me). Demea returns to your side for round 3 (she still won’t make much of a dent). This is you last chance to win. 800 EXP and Fame +10.
15D. Fire of Life – Princess Sacrifice: Adventure of Feena Walkthrough & Guide
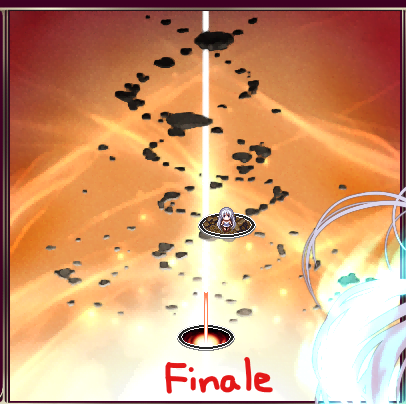
Continue on to the bottom. You will encounter a burning corpse/criminal or two on your way down but you should be able to dispatch them with ease (or you can just run away).
Now enjoy the endings.
Endings and Requirements
Bad Ending 1 – Talk to the spirit at Undermountain – Centre (marked #2 on sub-map) after Menike uses the Saint Killer underwear on Feena and agree to be put into frozen sleep forever*
Bad Ending 2 – Lose to Dark King Baalveil either after the first two rounds and then give up (<60 divinity) or after all three rounds (60+ divinity)
Bad Ending 3 – Fight and lose to Demea after refusing (<40 divinity)
Bad Ending 4 – Fight and win against Demea after refusing (<40 divinity)
Neutral Ending – Keep silent when Demea poses her final question (no divinity requirement)
True Ending – Agree to become Demea (90+ divinity)
*not applicable to virgin-run
Just remember Demea is no pushover – she’s not the Dragon Slayer Sacrificial Princess for nothing. Make sure you have the Spirit Spear equipped as she’s weak to it. Her large MP pool will allow her to spam Recover and Consecutive Blow like no tomorrow (to say nothing of her large HP pool), and if you’re playing above normal mode good luck keeping up with her absurd rate of healing. No Trance mode to rely on either on the low divinity ending path.
Beating Demea rewards with you the Phantom Orb treasure for New Game+ which lets you increase sexual exp/depravity to max or reset both to zero. It’s like having the Eskarma Island bard in your party, only you don’t have to pay a single gold for his services.
Both “bad’ endings are worth seeing in my opinion. I especially enjoyed these what-if scenarios considering Feena’s age and the burden that she’s expected to carry. While admittedly uncharacteristic of her, it’s quite believable to just see her snap at Demea there at the end upon the realization of the horrors in store for her (and give up on her martyr path afterwards. She’s certainly earned it). Also, love Demea’s battle track.
If your divinity is too high (which it will be if you’ve been following this guide) simply load your separate save file and fight some town guards. Each guard you fight lowers divinity by 10 points.





Not applicable to virgin runs, but dancing has +1 bonus to rolls for each 10 of indecency stat. You can push it up to +8 and temporarily even to +10 right after she orgasms on stage with the right equipment, state and class combination.
That skill learned from a gargoyle is not Slip but Sleep.