Welcome to Being a Dik Walkthrough & Guide Interlude & EP9, which helps you to unlock all the events and scenes with all the available characters.
Season 1 (EP1-4) Walkthrough:
Being a Dik Walkthrough Season 1
Season 2 (EP5-8) Walkthrough:
Being a Dik Walkthrough Season 2
Mini-games – Being a Dik Walkthrough & Guide Interlude & EP9
This section will guide you through playing the new mini-games for Season 3 of Being a DIK. It will not show the solutions to specific mini-games. If you are looking to beat a particular mini-game, read the walkthrough section for that episode.
Drawing mini-game
In the drawing mini-game, you need to click the blue dots as fast as possible while avoiding the red dots. Your final rank is based on the time it took for you to complete the mini-game as well as how many red dots you touched. You need to avoid all red dots and finish clicking all blue dots faster than 10 seconds for the best rank, S rank.

Party Planning mini-game
In the party planning mini-game, you plan parties by choosing activities, managing a budget, and buying and placing items. Your goals are to satisfy as many needs as possible for the DIKs and to get a high score and party rank.
Much like the mansion mini-game in Season 2, choices you make affect the story, and your progress is cumulative for future party planning mini-game rounds. Choices you make early on affect how you play the party planning minigame later.
There are countless of ways you can play and win the mini-game and this section will present the basics of the mini-game. Refer to the episode guide if you want tips on how to achieve the highest rank for each party. Please note, there are random elements to this mini-game, making it impossible to write a guide that is tailored to your particular playthrough. However, by learning general tricks, you will be able to throw amazing parties in no time.
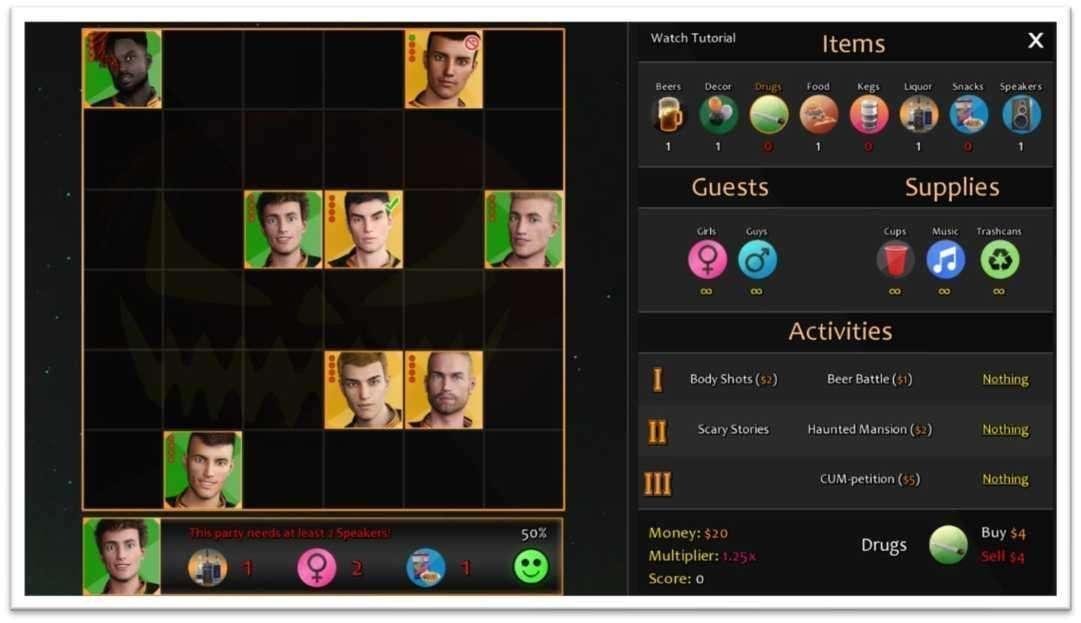
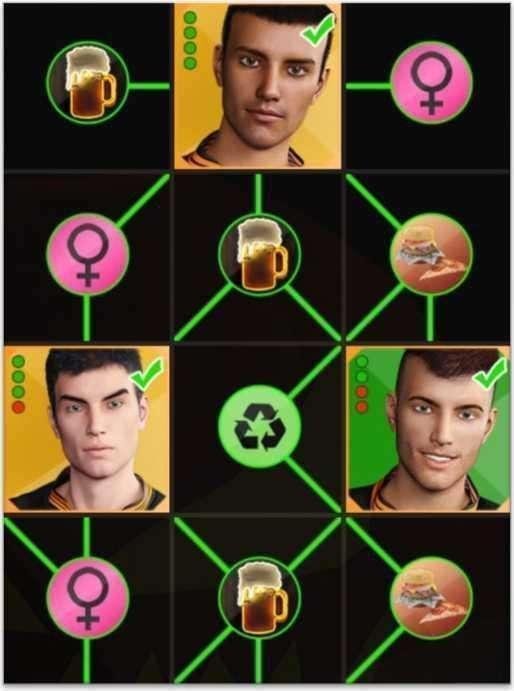
The playing field
DIKs are placed on a grid and the empty boxes surrounding them are used to fulfill their needs. The DIKs have different needs and you need to optimize the use of the empty boxes to fulfill as many of their needs as possible.
Click any DIK to see their needs.


The needs represented by icons show which items and how many of the items they want to be surrounded by. Place items in the adjoining boxes to fulfill those needs. The need at top, represented by text, is a special need that you can fulfill by using the entire grid. For the special need, read the text and place items anywhere on the grid to satisfy it. Sometimes, the special need requires you to avoid placing a certain item on the grid.
You can also see the DIKs’ happiness by clicking on them. There are four levels of happiness: Disappointed (<25% happiness), Neutral (<50% happiness), Happy (<75% happiness) and Very Happy (> 75% happiness).
The right part of the interface shows your item inventory, party activities, scores and budget.
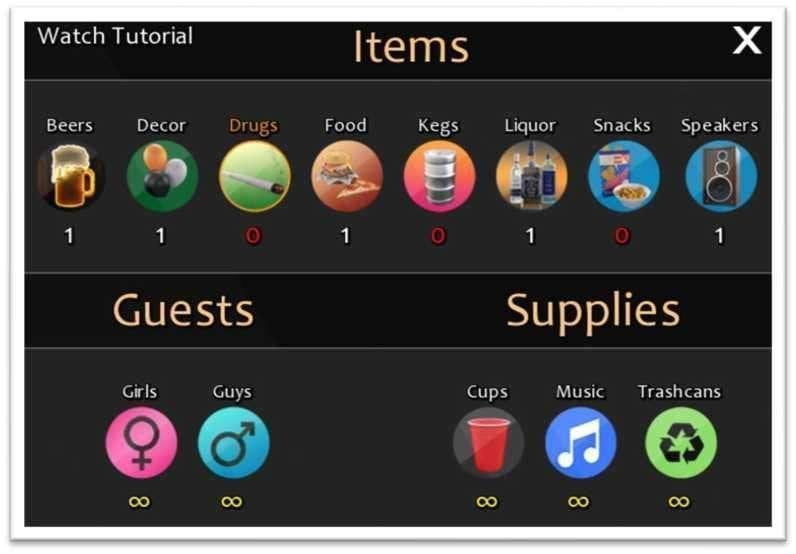
The numbers below the items show how many items of that kind you own. If you need more items you have to buy them by selecting the item and clicking the Buy button at the bottom right of the screen. Buying items will deduct money from your budget. You have an endless amount of Guests and Supplies and they don’t cost money to use.
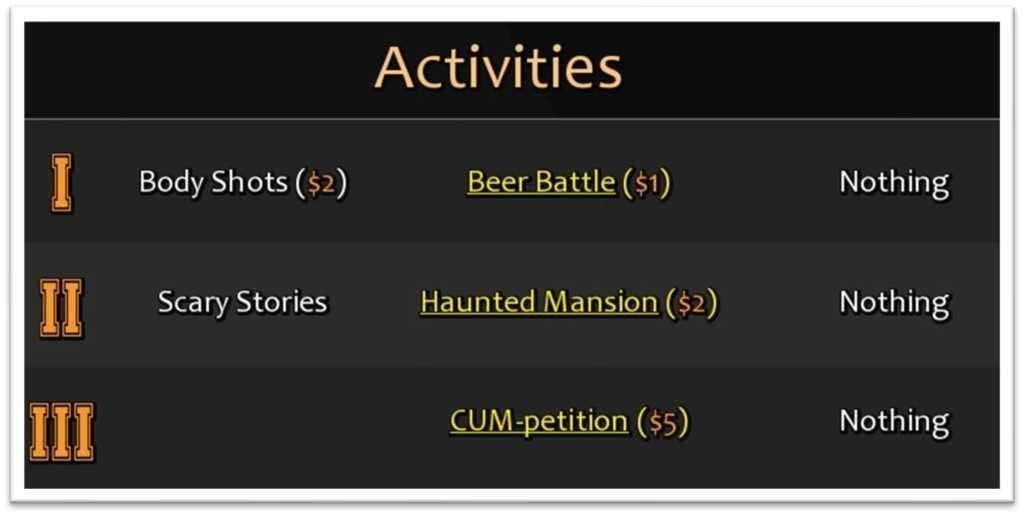
The activities give special events during the story. Some activities are free, but most cost money. They are all the same when it comes to scores, but they also
give minor happiness boosts to some of the DIKs. To maximize the score, you should always choose as many activities as possible. The activities can give you a boost in the final rank too, if you prioritize them.

Money: $20
Multiplier: 1.25X
Score: 0
Buy $4
The party budget starts at $20 for your first party. The party budget will be different depending on the party and excess money isn’t saved between parties,
unless you have the “Below Budget” perk. Make sure you fully utilize your budget for every party.
The multiplier is used to multiply the score for each party. The higher it is, the higher your score and party rank will be. The multiplier will increase for each need you fulfill.
The score shows your total score for all parties. Each party has an individual score shown after the party has taken place.
Each party will get a party rank, depending on your score for that party. The different ranks, ranging from lowest to highest, are F, E, D, C, B, A and S.
How to play
To play the mini-game, start by selecting the activities you want for your party. Locking these in early makes sure you don’t run out of money for them. Although it is possible, it is not advised to skip activities for your parties.
After that, click each DIK on the grid and see what their needs are. If you see DIKs who share needs, if possible, plan to put items in boxes that are next to both DIKs at once. That way you will optimize the use of the grid, as free boxes on the grid are valuable and will be an issue you have to plan around. Sharing items also give you an efficiency bonus, increasing your overall score.
When you find a need you want to fulfill, click the corresponding item and place it on the grid. Some items need to be activated by Supplies. Read the information box to the bottom right after selecting an Item, to see if you need to activate the item.
Place the item on the grid, and if you have to activate it, place the correct supply
next to that item.
The following dependencies exist:
Beers, Liquor and Kegs need Cups to activate
Food and Snacks need T rashcans to activate

Speakers need Music to activate
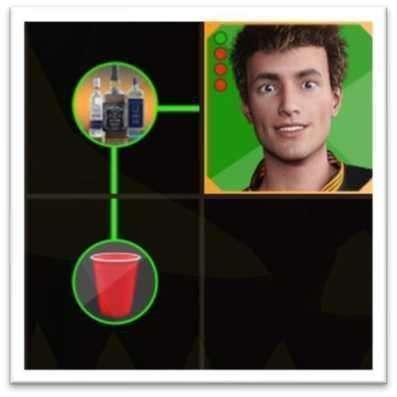

When the number of items needed for a DIK is met, his need is fulfilled and a green dot will appear on his avatar. The fulfilled need will be shown in green text. In this example, the need for 1 Liquor has been met, and the Liquor is activated by the Cups supply.
If you wish to remove an item from the grid, hover and click it. Please note that you can undo purchases. For example, if you bought one beer but later find out that you don’t need it, you can sell it back and use that money to buy something else. You cannot sell items from your permanent item inventory. The items from your inventory that you can sell are colored green.
When you are satisfied with your item placement, press the X button at the top right to close the mini-game and continue playing.
Item inventory upgrades
Your item inventory shows how many items you will start every party planning round with. At the start of the mini-game, you randomly get three different starting items. Between parties you get to choose two items to upgrade. Upgrading an item increases their free uses by one. A smart strategy is to make
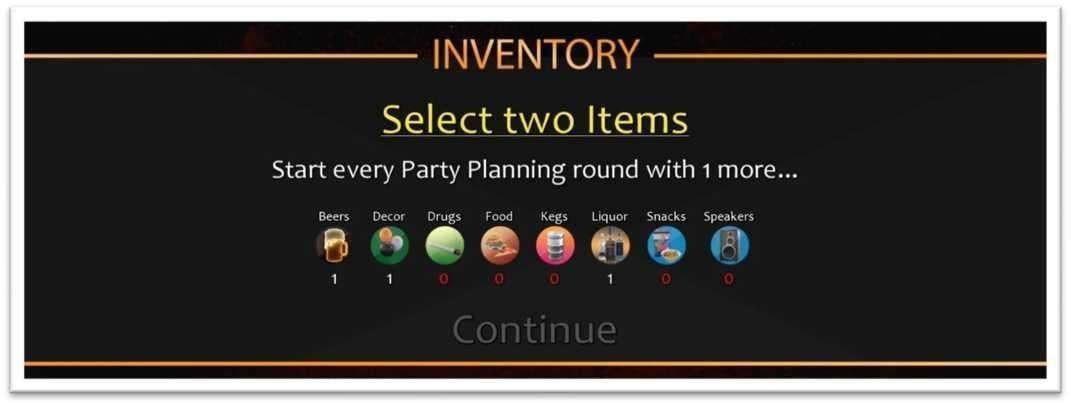
sure you have one of each item early on and later focusing on upgrading expensive items or items that you think will be in high demand. There is no way to predict what the next party planning round will bring you in advance, so it’s best to have a broad approach and not focus too much on upgrading one item type.
Perks
There are 12 different perks to choose freely from between party planning rounds. You get to select one per round and each offer different advantages and cater to different playstyles.
The top row offers three perks that allow you to place Beer, Food or Liquor without any extra required items for activation. The good thing about these perks is that it will save you boxes on the grid when placing these items. Empty boxes on the grid are valuable and having them makes it easier to fulfill more needs.
The second row offers three perks that reduce the cost of the three most expensive items in the mini-game.
The cost of the items before and after activating their respective perk are:
Drugs $4 ^$1 (With the Connections perk)
Kegs $5 3$2 (With the Wholesale perk)
Speakers $3 ^$1 (With the Black Friday perk)
The advantage of this is that you will spend less money on these items, allowing you to spend more money on other items and activities. A smart strategy is to get the perk that you aren’t planning to upgrade the free item inventory of. For example, if you have 3 free Drugs in your permanent inventory for every party, getting the “Connections” perk won’t give you the same benefit as getting another perk, since you likely don’t have to buy a lot of Drugs for the party.
The third and fourth rows have perks that affect your score, happiness and budget.

The “Crowdfunding” perk increases your budget for each party by $4. You get the most use for this perk by choosing it early on, as you get $4 extra for every party, regardless of the party budget.
The “Below Budget” perk is a perk better left for later as your leftover money will likely be low during the first parties. As soon as you get money left when planning a party, consider choosing this perk to save that money for the next party. If “Crowdfunding” and “Below Budget” are active and utilized at the same time, they can collectively offer a whopping $9 extra for your party.
The “DIK party” perk increases the bonus score from activities by 50%. Instead of getting 1OOO points per activity, you will receive 1500 points. This is a powerful perk as long as you always choose to have the maximum number of allowed activities. It affects your party score and party rank. Consider choosing this perk to maximize your total score and get higher party ranks easier. To demonstrate the power of the perk, consider that you planned a party and got a x7.0 multiplier, without the perk you would get an activity score of 21000 points, but with the perk you would get 31500 points. The “DIK party” perk offers an easy way to significantly boost your score and rank.
The “Easy to Please” and “Hard to Let Down” perks affect the happiness of the DIKs. Happier DIKs give a higher score when fulfilling their needs. If you want the DIKs to gain happiness faster, choose “Easy to Please”. You benefit the most from this perk when fulfilling 3 or 4 of a DIK’s needs. If you feel that your DIKs are losing happiness too fast, you can lower that effect by choosing “Hard to Let Down”. Failing to fulfill more than 2 of a DIK’s needs will cause less damage to their happiness. Both of these perks, in combination, become a powerful way to attain and keep your DIKs at the highest levels of happiness in the mini-game, and thus increasing the score for each party. The drawback is that you have to choose two perks to get the full effect, forfeiting two other perks.
Finally, the “Multiplier Madness” perk will increase the multiplier if you can keep your DIKs happy. If you keep many DIKs above 50% happiness, you will notice a great increase in your score attributed to this perk.
As an example, if all of the DIKs make use of this perk, they will collectively give a 0.8x multiplier increase. For a party with 90 000 points and a 6.75X multiplier, the score would roughly be 100 000 and have a 7.55X multiplier with the Multiplier Madness perk fully utilized.
The difficulty of making use of this perk lies in keeping the DIKs at 50% happiness or above, as anything less makes this perk useless for those with lower happiness. The aforementioned “Easy to Please” and “Hard to Let Down” perks are excellent for keeping the happiness above 50%.
Happiness and Score
After each party you will get a report on how well you did.
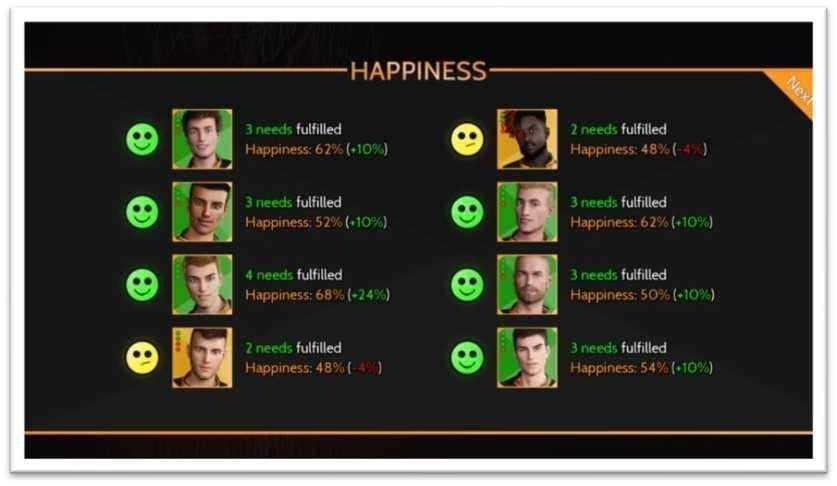
Depending on how many needs you fulfilled for the DIKs, their happiness will
either increase or decrease. A happier DIK will yield a higher score.
In this example, you can see how Leon scores the highest individual score
because he has the highest happiness out of all of the DIKs and all four of his needs were fulfilled, and conversely, how Jacob and Rusty give the lowest scores because of their lower happiness and lack of fulfilled needs.
Keeping DIKs happy will net you a higher score for each party.
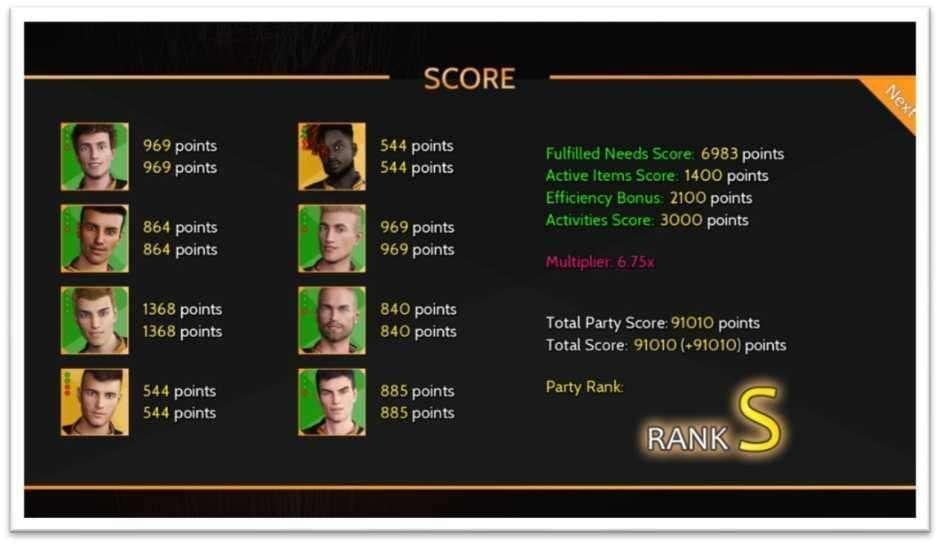
The right part shows the score tally. Fulfilled Needs Score is a sum of the DIKs’ individual scores. Active items on the grid will increase the Active Items Score. The Efficiency Bonus is based on how well you utilized grid by sharing items among the DIKs. Having one item used by several DIKs at once will increase the Efficiency Bonus. The Activities Score will give you 1000 points per activity, or 1500 points per activity if you have the “DIK Party” perk.
The sum of the scores is multiplied with the multiplier and presented as your Total Party Score. It’s added to your Total score, representing your score across all planned parties. And finally, your Party Rank is presented. It is calculated differently for each party.
Interlude – Being a Dik Walkthrough & Guide Interlude & EP9
During the Interlude, you’ll be in control of Zoey. Your choices will help shape her. If you have already played the Interlude once, you can choose to skip it and jump to episode 9. The game will simulate the Interlude if you do this.
The episode guide will use a DIK point when referring to Zoey’s stat. It’s not to be confused with the DIK point of your main character.
Scene location: Home
You “It is!”
Encourage him: -1 DIK point
Such a girl: +1 DIK point
Alison “Your grandma must have confused her medicine. Aunt loline found her on the floor when she checked up on her.”
Is she all right?: -1 DIK point
What the Fk!?: +1 DIK point
Alison “No, you’re not. You have school tomorrow morning.”
Nana is important!: -1 DIK point
Fk school!: +1 DIK point
Alison “No alcohol in this house until you’re 21.”
Apologize: -1 DIK point
Talk back: +1 DIK point
You “What’s wrong?”
Not your business: +1 DIK point
Nothing: -1 DIK point
You “I don’t think it’s a great idea to show up to dinner drunk. Dad would probably tell Alison we’ve been drinking.”
What a snitch: +1 DIK point
You’re right: -1 DIK point
Enjoy the Scene. Pick whatever you wish.
Alison “Zoey? You have to eat something.”
Answer: -1 DIK point
Ignore: +1 DIK point
Scene location: Train station
You “I’ll drop by and talk to her from time to time.”
Appreciate it: -1 DIK point
Don’t have to: +1 DIK point
The first drawing mini-game will begin if you’re playing with mini-games enabled. If you get the S rank, you will unlock a special render.
You “Now would be a good time to remember that you forgot to pack something.”
LOL! Asshole!: +1 DIK point
You “Yeah.”
You ok?: -1 DIK point
I’m excited: +1 DIK point
Scene location: Hostel
Owner “You cannot drink unless you’re 21. That cannot be news to you, darling.” I am 21: +1 DIK point
Drink in my room: -1 DIK point
Owner “You’ll have to wear this red wristband when you’re in the bar, and we have a collaboration with other hostels and bars in the area…”
You can click a magazine on the desk that will unlock a special render.
Scene location: Beach
Emma “Well, you found the waves.”
Love your tats: -1 DIK point
Too many tattoos: +1 DIK point
Emma “We’re pretty small, but it’s a living, and we tattoo each other for free.”
Joke: +1 DIK point
Don’t scare me: -1 DIK point
Sounds dope: -1 DIK point
Emma “Can I see some of it?”
Um… Why?: +1 DIK point
Kinda personal: -1 DIK point
Emma “We’ve been talking about hiring a part-timer for the reception. Can you handle bookings and shit?”
Yes: -1 DIK point
Joke: +1 DIK point
Scene location: Tattoo studio
Bret “Ouch!”
It could be better: -1 DIK point
It sucks: +1 DIK point
Bret “I’ll be your first if you’ll let me.”
Ignore him: -1 DIK point
Talk back: +1 DIK point
Scene location: Hostel
You “Sounds like you’ve got a lot going on for you…”
Sure do: +1 DIK point
Show concern: -1 DIK point
Scene location: Tattoo studio
The second drawing mini-game will begin if you’re playing with mini-games enabled. If you get the S rank, you will unlock a special render.
Bret “Zoey… You drew this?”
Good, huh?: +1 DIK point
Yeah: -1 DIK point
Bret “Sketch some more stuff while you wait for work. If it looks good, we could use it for stencils and inspiration for the customers.”
Pay me for it: +1 DIK point
Sounds fun: -1 DIK point
Scene location: Beach
Emma “How’s that banana working out for you?”
Had better ones: +1 DIK point
Back hurts: <Nothing>
Emma “You are fuming. Did it get to ya?”
I’m fine: -1 DIK point
I’m pissed: +1 DIK point
Emma “You’ll get it eventually. It takes practice.”
Right… -1 DIK point
Talk back: +1 DIK point
Scene location: Bar
Bartender “I’ve always wanted to try blue, but it’s scary taking that leap.”
Not for everyone: +1 DIK point
Encourage her: -1 DIK point
lonah “Zoey, help me out here. You’re bright. You’re going to college someday too, right?”
Help him out: -1 DIK point
Don’t look at me: +1 DIK point
Scene location: Tattoo studio
Bret “You didn’t drink anything today or yesterday?”
Is that a problem?: <Nothing>
Nope: <Nothing>
Bret “Ems and I started making shitty tattoos on each other for practice.”
I can tell: +1 DIK point
Which ones?: -1 DIK point
Bret “Know what?”
Fk: +1 DIK point
Discover our bodies: -1 DIK point
There’s a magazine on the table on Bret’s balcony. If you click it, you will unlock a special render.
Scene location: Beach
Open the notebook and go to the final page. Enter the code 2575 to unlock the vault.
Choose whatever you like for the photo session.
Emma “So… Who do I send these to?”
A guy: You get to pick either Bret or Jonah, and Emma will send him the photo.
A girl: Emma sends the photo to Jenna.
You can click a magazine on the beach towel that will unlock a special render.
Scene location: Emma’s apartment
Emma “Yeah!? I’ll do that when you unFk Bret, you skank!”
Calm her down: -1 DIK point
Take her phone: +1 DIK point
Zoey “Let’s talk. Ok?” If you calmed Emma down
What did Bret say?: <Nothing>
I didn’t Fk him: <Nothing>
Emma “They’re gone!” If you calmed Emma down
It is too late: +1 DIK point
Thank you: -1 DIK point
Zoey ”(And the gallery too!)” If you took Emma’s phone
Get revenge: +1 DIK point and you put Emma’s nude pictures on Rooster
Be a bigger person: -1 DIK point
Scene location: Ending
If you calmed Emma down, you will unlock a Scene.
The third and final drawing mini-game will start if you’re playing with minigames enabled. If you get the S rank, you will unlock a special render.
You “Dad. Now is not a good time for me. I-”
There’s a magazine on the counter that you can click to unlock a special render.
Enjoy the end of the Interlude.
Episode 9 – Being a Dik Walkthrough & Guide Interlude & EP9
During the episode, scenes will be shown depending on which branch you are playing. In episode 8 you ended up with one out of five possible branches. The walkthrough refers to the five different branches as:
Isabella’s branch
Jill’s branch
Josy’s & Maya’s branch
Sage’s branch
Others’ branch
Skip reading the sections of the guide that aren’t meant for your current branch.
Scene location: DIKs’ mansion
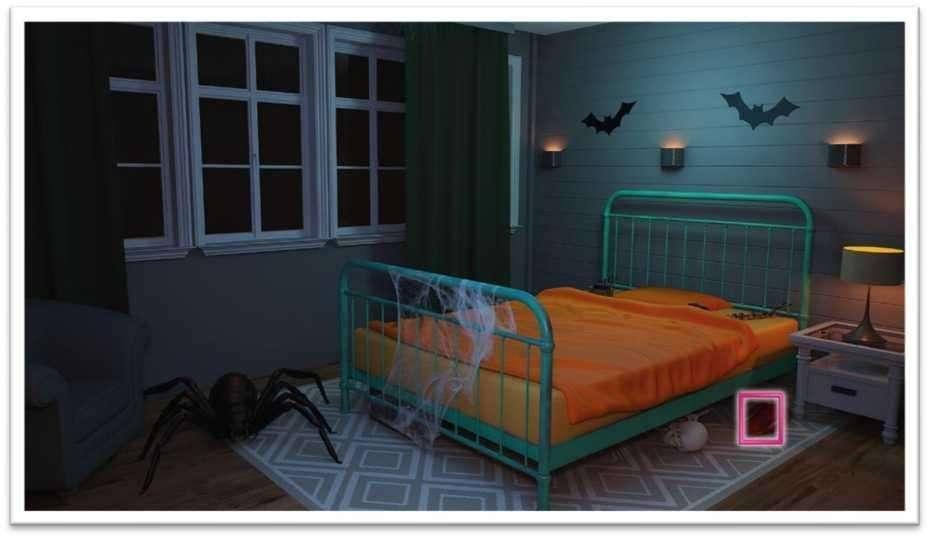
In the scene with Jacob and Tommy, at the start of the episode, you can click a magazine on the floor behind Jacob to unlock a special render.
Rusty “厶ha… Ok… We”, take it up with Tommy again. I don’t wanna get involved” You’re not gonna help?: +1 DIK point
I’ve got this: -1 DIK point
Tommy “It’s fine, you know. Everyone makes mistakes.”
No mistakes: -1 DIK point
Blame Tommy: +1 DIK point
Tommy “Ask yourself, what’s most important when you’re planning a party?”
The alcohol?: <Nothing>
The girls?: <Nothing>
The decorations?: <Nothing>
The food?: <Nothing>
Tommy will ask you questions about the activities for the party. These activities will give you different scenes during episode 9, but they are also part of the party planning mini-game. If you’re playing with mini-games disabled, your choices will affect DIKs’ happiness with your party more clearly.
Choose which activities you want for your party. Worth knowing is that the “Haunted mansion” activity will unlock a Scene if you’re playing Sage’s branch. And the “CUM-petition” activity will possibly unlock a Scene if you’re playing Others’ branch.
If you’re playing with mini-games disabled, the two recommended combinations of choices are:
“Body shots”, “Telling scary stories” and “CUM-petition”
and
“Drinking competition”, “Haunted mansion” and “CUM-petition”
If you are playing with mini-games, pick whatever you want for now and refer to the guide below for the rest of the mini-game.
Mini-game: Party Planning #1 – Halloween
If it is your first time playing the mini-game, play the tutorial to learn the basics.
There are countless of ways to pass the party planner mini-game. And since there are random elements to the mini-game, it’s impossible to give one perfect solution that covers everything. Instead, the guide will offer tips and tricks on how you can play each party. It is recommended to play the game as you want and find your own solution and strategy to the mini-game.
When you start the mini-game, three items will have been selected at random for you. The items that can be useful to upgrade for the Halloween party in general are: 1 Kegs, 1-2 Speakers, 1-2 Food, 1-2 Liquor. For your first item upgrades, choose items with that in mind.
The easiest perk to start with is Pink Weiss, as it removes the requirement to use Cups to activate Beer. But if you’re planning long term and welcome a trickier start, “Crowdfunding”, “Multiplier Madness”, “Easy to Please” or “Hard to Let Down” are great choices as well. All perks are viable, and with the right strategy, you can attain the S rank at the Halloween party using any of them.
Before you start purchasing items, make sure you have selected the activities you want for the party. It is recommended to always select as many activities as possible, as they boost your rank, DIKs’ happiness and give extra scenes. One recommendation for the Halloween party is to either choose one of the following combinations:
Beer Battle, Haunted Mansion and CUM-petition (Total cost: $8)
Body Shots, Scary Stories and CUM-petition (Total cost: $7)
Beer Battle, Scary Stories and CUM-petition (Total cost: $6)
All items except Decor and Drugs are worth buying for this round. Decor only fulfills one of Nick’s needs, and adding Drugs won’t increase your multiplier because Jamie doesn’t want Drugs at the party.
A good general strategy is to start by clicking all DIKs and reading their needs. Their positions are randomized, meaning that you’ll have to evaluate the best approach every time you play the mini-game. Some needs that are always worth fulfilling to get a high score are Girls, Food, Beers and Trashcans. Consider fulfilling Derek’s Speakers need, if you have at least one free Speakers item in your inventory; it is too expensive to fulfill this need if you have to buy two Speakers.
Start fulfilling needs by adding Girls, Beers, Cups (if needed to activate the Beers), Trashcans and Food. If you have a Keg, activate it with a Cups supply, and use that same Cups supply to activate Liquor for either Leon, Derek and/or Rusty. Keep fulfilling the easy and cheap needs and at the end, if you have money left, look into fulfilling the more expensive needs.
Be mindful of how you use the grid, try to share as many items as possible between DIKs. The most valuable slots on the grid are the ones next to several DIKs on the second and fourth rows. Make sure you share the items in those slots. It’s recommended to choose 1 Food over 2 Snacks, since the Food item only takes up one slot on the grid.
In this example you can see how to share items during the Halloween party. Use it for inspiration, as you likely won’t be able to follow it completely due to the random nature of the mini-game.
Pink Weiss was used in this example, and Beers were prioritized and effectively shared among DIKs. If you choose a perk like Pink Weiss, you should maximize your usage of it or it would be a wasted perk. Always apply that logic to the perks that you choose.
As a final tip for this round, try to keep all DIKs above two fulfilled needs, and favor the DIKs who have easy and shared needs. If you want to achieve the highest score and rank, aim to get a multiplier of at least x6.5.
Click the X button to the top right to end the mini-game.
After finishing planning the party, when Tommy leaves, you can click a magazine on the floor in the background to unlock a special render.
Derek “Great. That’s one out of three votes.”
Don’t count on it: <Nothing>
Maybe: <Nothing>
Joke: <Nothing>
Scene location: The Burkes
Others’ branch
lade “You smell incredibly good.” If you’re having an affair with Jade
Don’t stop her: Enjoy the Scene
Keep it together: Skip the Scene
All branches
lade “Yes. Of course.” If you rejected Jade’s advance in episode 3
Talk to Josy: <Nothing>
Antagonize Tybalt: +2 DIK points
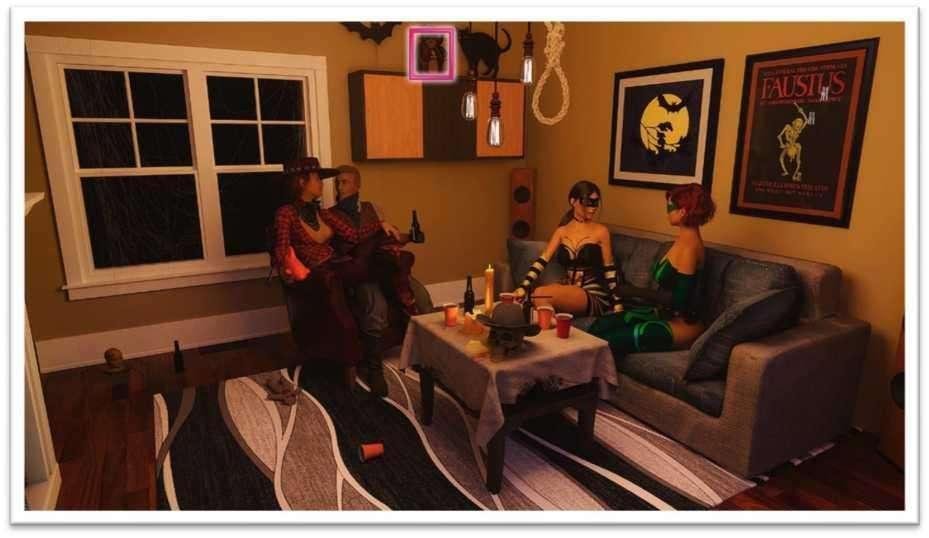
In the scene with Professor Burke, Sage and Maya, there is a blurry magazine to the right of Stephen. Click it to unlock a special render.
When Neil calls you, there is a magazine on his table. Click it to unlock a special render.
Sage “But now he tells her he can’t help because she’s not studying economics or something.”
What can we do to help?: <Nothing>
Don’t take it personally: <Nothing>
Sage ” I don’t know, dude. What does it matter? I mean, what’s your dad’s name?” Enter your and Neil’s last name.
If you chose to banter with Tyballs in episode 6 on Tybalt’s cluck, by choosing “It’s an orange one, he should get himself checked out.”, you get + RP Sage.
Scene location: Park
Zoey “Hey!”
Hey…: <Nothing>
…: <Nothing>
Zoey “Wow. You look good! Really good!”
Thanks: <Nothing>
You too: <Nothing>
…: <Nothing>
Zoey ”卩m good. You?”
I don’t know: <Nothing>
I’m fine: <Nothing>
When the camera zooms out, there is a magazine on the ground underneath the bench near Zoey. Click it to unlock a special render.
Zoey “You’re mad at me…”
I’m mad: You chose to be mad at Zoey.
I’m not mad: You chose to not be mad at Zoey.
Scene location: DIKs’ mansion
Derek “Is she a better friend than me?”
Yes: Derek will remember this.
No: Derek will remember this.
When Derek leaves, there is a magazine on the table near you. Click it to unlock a special render.
Scene location: The first Halloween free roam event
Hint! If you want to unlock the vault, open it now. The code to open the vault is 4232.
Hint! Your DIK score will be updated, and you may have a new status in your Stats app.
Open Rooster and read the clucks.
Open the 2D art app and buy any new art pieces. Read the special render section of this guide for more information. Any new 2D art pieces you ordered in episode 8 will unlock at the start of this free roam event.
Open the Chat app and respond how you wish to Zoey and Elena.
Respond to your dad’s chat. If you end the chat by telling him “I love you too, dad.”, you get – DIK point. If you end the chat by telling him “Dad… That kiss emoji makes your text look weird as hell.”, you get + DIK point.
For Jill’s branch, respond to her how you wish. Complete her chat to get + RP Jill.
For Josy’s & Maya’s branch, respond to Josy’s and Maya’s chats.
For Josy, end the chat with “Can’t wait to see you tonight. Good luck with the costume!” to get + RP Josy.
For Maya, complete her chat to get + RP Maya.
You can find money at two spots in this free roam event, the first one is on the floor at the bottom of the screen in the Main party room. The second spot is in the back of the Theater room, next to the mini-fridge.
Exit your room and click on the group with the Santa Claus, if possible. Apologize to Santa Claus and you get – DIK point, or confront Santa Claus and you get + DIK point.
Go to the Dining room and click on your sword, it’s on the dining room table.
Go to the Main party room and click on Jamie.
Still in the Main party room, click on Becky, Zoey and Tommy to view their scenes.
Click on the door behind Jacob to go to the Left hallway. Click on Leon.
Leon “We were gonna have theme costumes and he bailed on me. / feel ridiculous wearing this.”
Sympathize: – DIK point
Joke: + DIK point
Leon “She’s a party killer, dude. In a few hours she’ll be lecturing people on why they shouldn’t be wearing slutty outfits.”
If it’s needed: + DIK point
I can’t do that: – DIK point
Joke: + DIK point
Go to Upper main room and talk to Rusty.
Rusty “It totally was. After all you did to get us back on track after the alphas trashed this place” or Rusty “He is such a trouper. He helped us get back on track after the alphas trashed this place.”
Don’t mention it: <Nothing>
You’re the real leader: – DIK point and + RP DIKs
Go to the right area and click Derek.
Derek “Wh。even invited these two?”
We could throw them out: + DIK point
Don’t start something: – DIK point
Go to Upper main room and click the arrow down. Talk to the group of girls.
Go to Derek’s room and click Sally.
Sally “Is that how you greet your guests?”
How I greet you: + DIK point
I was surprised: <Nothing>
Sorry: – DIK point
You ”We”, he’s out there arguing, so that might be a while.”
Offer to help: Make drinks for Sally and Karen
Leave: <Nothing>
Sally ”…” If you stayed to make drinks for Sally and Karen
Tease her more: + DIK point
Don’t tease her: – DIK point
You ”厶 tequila drink for Karen is coming up… ” If you stayed to make drinks for
Sally and Karen
Soda, lemon and salt: <Nothing>
Green mixer and lime: Sally will comment on your drink
Neat: <Nothing>
Sally ”卩m surprised you didn’t Fk that up.” If Sally comments on your drink
I know what I’m doing: <Nothing>
Me too: <Nothing>
Joke: + DIK point or +2 DIK points if you have DIK affinity
Sally “Actually… My hopes of you making me something I’d enjoy are exceptionally low. Give me a beer.” If you stayed to make drinks for Sally and Karen
Beer: <Nothing>
Derek’s special bottle: + DIK point and Sally drinks from Derek’s bottle that’s labeled “Don’t drink”.
Go to Nick’s room and click the beer tap on his bed.
Go to Tommy’s room and click on his curtain. Click the kegs to the right.
lohn Boy “How do you know her again?”
Ex-girlfriend: Tell John Boy Zoey is your ex-girlfriend
Childhood friend: Tell John Boy Zoey is your childhood friend
Isabella’s branch
This section is for Isabella’s branch, skip to the next section unless you’re playing her branch.
Go to your room and click the windows and end the free roam event.
You “0f course, I have.”
I feel the same: +2 RP Isabella
That’s nice: <Nothing>
You “Yeah, the door’s locked. Come on in.”
Kiss her: <Nothing>
Hug her: <Nothing>
Isabella “What do you think?”
Scary: <Nothing>
Hot: <Nothing>
Joke: <Nothing>
Isabella “Quit your moaning…”
Behave: <Nothing>
Touch them: Touch her breasts
Isabella “*Sigh* Go ahead…”
Kiss: Kiss her breasts.
Fondle: Fondle her breasts
Behave: <Nothing>
You “Here, let me check…”
Fondle: Touch her ass
Behave: <Nothing>
Isabella “Like what?”
Underdressed: <Nothing>
Hot: <Nothing>
Joke: <Nothing>
Dodge the bullet (CBICK affinity): + RP Isabella
If you chose to have either body shots or a drinking competition as the party’s first activity, the scene will play now. Read the section below for the corresponding activity or skip ahead if you chose to not have any activity. All branches
After placing the keg in the Main party room, the first activity will start, if you chose to have either body shots or a drinking competition for your party.
Refer to the section corresponding to your choice or skip ahead.
Drinking competition
Tommy “What do you say, my half-naked brother with a skirt? Who’s your winner jn this race?”
Becky: Becky is favored to win
Kylie: Kylie is favored to win
Christie: Christie is favored to win
Tie: A tie is favored
Tommy “Here you go. You saw what I did, MC this bitch.”
Hype the crowd: <Nothing>
Hype Becky: – DIK point and Becky is favored to win
Hype Christie: – DIK point and Christie is favored to win
Hype Kylie: – DIK point and Kylie is favored to win
Neg Becky: + DIK point
Neg Christie: + DIK point
Neg Kylie: + DIK point and Kylie is favored to win
Crowd ”*Crowd shouts*” If you have DIK affinity
Spilling doesn’t disqualify: + DIK point and the competition ends in a tie
Hype the crowd:〈Nothing〉
If the game didn’t end in a tie yet, the girl who is favored to win wins.
If Becky wins, you can neg her for + DIK point.
If you’re playing with mini-games enabled, Jamie, Leon, Rusty and Tommy will get a small boost of happiness from this activity.
Body shot battle
It doesn’t matter if you accept or refuse, Tommy will force you to participate. You can either choose Becky or Tiffani as your partner for this activity.
Choosing Becky
To win with Becky, choose to: T ransfer the shot > Pour fast > Focus
You can make Becky lose by dropping the shot when she is straddling you.
If you choose “enjoy it too much”, you will make out with Becky.
Choosing Tiffani
You cannot win the competition with Tiffani.
You can choose “enjoy it too much” to make out with Tiffani.
You can choose to lick Tiffani’s kitty a bit for + DIK point or to ignore it for – DIK point.
If you’re playing with mini-games enabled, Jacob, Jamie, Nick and Tommy will get a small boost of happiness from this activity.
No activity
If you chose no activity for this part of the party, nothing will happen.
After the activity, go to Derek’s room to end the free roam event. You don’t have to do this if you’re playing Isabella’s branch.
Scene location: The Moose Lounge
This is a branch specific scene.
There are no choices during this scene for Isabella’s branch, skip to the next section.
Jill’s branch
lill “Or…we can cuddle”
Cuddle: Cuddle instead of getting a Scene
Try sexy stuff: Unlock a Scene
Josy’s & Maya’s branch
losy ” We can get several and change between them.”
Kinda funny: Take Josy’s side in the argument and get + RP Josy
Pretty lame: Take Maya’s side in the argument and get + RP Maya
Choose to follow Josy or Maya into the changing room and get +2 RP for the girl you choose. Choose whatever you wish for the scenes inside the changing room.
Sage’s branch
Choose what you wish for Sage’s text message.
During Sage’s Scene, call her a whore to get + DIK point.
Exhaust all options for the talk about her family.
Others’ branch
Text the girls who are available. If you can text Quinn, you must text her to choose to stop texting. Choose whatever you wish for the different text chats. Texting Lily unlocks a Scene.
Unknown “Haha! He’s pretty cute, but I don’t know… He came dressed as a Spartan. Maybe he’s the violent type?”
You got me there: <Nothing>
Not really: <Nothing>
Scene location: DIKs’ mansion
Isabella don’t know yet. I don’t want to scare her away. ” If you are playing
Isabella’s branch
Take it easy: – DIK point
Joke: + DIK point
When you walk down the stairs and Sage greets you, there is a magazine to the right on the floor near the door to the Left hallway. Click it to unlock a special render.
You “Whoa! Hey!” or You “Hey!” or You “Yeah! Finally! I’ve been waiting for you.”
Nice costume: <Nothing>
Hot costume: <Nothing>
Where’s your costume: <Nothing>
You “I see you’re stilHooking great in those outfits.” If you are playing Josy’s & Maya’s branch
Notice Josy’s hairstyle: +2 RP Josy
Notice Maya’s hairstyle: +2 RP Maya
Notice their hairstyles: + RP Maya and + RP Josy
losy “Excuse me for trying to save us money.” If you are not playing Josy’s & Maya’s branch
Don’t fight tonight: Calm them down
Anyway…: Don’t calm them down
Scene location: Forest
If you are playing Jill’s branch or never tried to take it further with her than your first date you can skip to the next section.
If you are playing any other branch than Isabella’s branch, Jill might ask you why you think the relationship didn’t work out. Answer what you want to this question.
lill “What made you choose her and not me?” If you are playing Isabella’s branch and chose to fight for Jill in episode 7
Followed my heart:〈Nothing〉
Couldn’t choose both: If she wanted you, she will try to kiss you. You must choose to either kiss her back or not.
Scene location: DIKs’ mansion
You “Sarah… Melanie…”
Hot!: Opens up additional dialogue
Fun costumes: <Nothing>
You “Oof…” If you chose “Hot!” in the previous choice
You’re killing me: If you have a DIK affinity you can choose to grab their asses for + DIK point
I prefer the front: + DIK point
Tommy “There are a lot of cocks in disguise here. Make sure some asshole doesn’t harass her.”
Ok: + RP DIKs
She doesn’t need it: <Nothing>
Heather “What?”
Nice hair: <Nothing>
Tease: <Nothing>
I recognize that outfit: <Nothing>
Flirt: + DIK point if you have a DIK affinity.
Camila “Haha. G。ahead and get it done. Gush over how good I look”
Flirt: You get a choice to kiss her
Tease: You get a choice to kiss her
Compliment her: <Nothing>
You ”「m joking of course.”
Cute costume: <Nothing>
Compliment her: <Nothing>
Joke: <Nothing>
Sage “What?” If you are playing Sage’s branch
I really like you: +2 RP Sage
Thanks for the drink: <Nothing>
lill “Go bananas! Get it?” If you are playing Jill’s branch
You look cute: <Nothing>
You look silly: <Nothing>
Scene location: The second Halloween free roam event
Hint! If you want to unlock the vault, open it now. The code to open the vault is 4232.
Hint! Your DIK score will be updated, and you may have a new status in your Stats app.
Open Rooster and react to the clucks.
For Jamie’s cluck, there is a third option if you have a DIK affinity; choose this option and get + DIK point.
For Elena’s cluck, thank her for helping out and get – DIK point.
You can find money in one spot of this free roam event. There’s money on the table in Tommy’s bedroom.
In the Main party room, click Sage.
Sage “Disappointed, huh?” If you are not playing Sage’s branch
Yes: A flirty response
No:〈Nothing〉
More like worried: <Nothing>
Sage “Not likely. Stand next to me for one.”
Funny pose: Snap a funny picture of the two of you
Sexy pose: Snap a sexy picture of the two of you
In the Main party room, click Riona.
In the Main party room, click Jill.
lill “/ can’t reach him! Haha! This will have to do.” If you’re playing Jill’s branch
Gently place your hand on ass: Bianca notices what you did.
Grab her ass: Bianca notices what you did.
Hover-hand: – DIK point
lill “/tS kind of scary, isn’t it?” If you’re playing Jill’s branch and weren’t in Josy’s and Maya’s relationship.
A bit: <Nothing>
No: <Nothing>
Joke: <Nothing>
Bianca “Oh, boy. Here we go…” If you’re not playing Jill’s branch and Jill isn’t upset with you
It suits you: <Nothing>
Totally not you: <Nothing>
In the Main party room, click the stairs and talk to Jamie and Leon.
Choose to side with Leon or Jamie. If you choose the opposite of what you chose in episode 8 during the dorm party, there will be another scene with Jamie and Leon near the end of the episode.
Click the left door and a scene with Leon will play.
Leon “It’s impossible to get laid while wearing this.”
Remove the wig: <Nothing>
I bet I could: + DIK point
Leon “You don’t see it?”
Humor him: + RP DIKs
No: <Nothing>
Click Sarah. If you want to take a picture together with Sarah and Melanie, you need to offer to fetch some punch for her. If you’re not interested in that picture, you can choose to tell her where the punch is, instead. We’ll return to this task later.
Go to the right area and click Derek who is talking to Camila on the couch.
Derek “You still think that’s a good idea, right?” or Derek “Yeah, but come on… /t would be good for me, / think.”
Go for it: Encourage Derek
Not when you’re drunk: Encourage Derek
Don’t do it: <Nothing>
Derek “Yeah! Talk me up to her. Be my wingman.” If you encouraged Derek
Ok, I’ll do it: Derek will remember that you tried to help him
Not gonna happen: <Nothing>
If you are playing Isabella’s branch, click Isabella and you will take a picture together. Choose to do a scary or cute pose for the picture. Click the down arrow to exit your room and a scene with Isabella and Jill will play.
Go to the Right hallway and click Josy and Maya next to the table of cakes. This scene has variations depending on your branch and status with Josy and Maya. If you are playing Josy’s & Maya’s branch, you will snap a picture together with Josy and Maya and choose to do a funny or sweet pose. If you are in Josy’s and Maya’s relationship, but not playing their branch you will get another variation of the scene.
There is a third variation if you aren’t playing Josy’s & Maya’s branch and never were in their relationship. Josy will ask you to take a picture with her and you can either accept or decline. If you accept, you will take a picture together and she will ask you:
losy “Can’t help but wonder n。?” If you took a picture alone with Josy
All the time: Tell Josy you wonder about them all the time
A bit: Tell Josy you wonder a bit about them
We wouldn’t have worked out: Tell Josy you don’t think you would have worked out together.
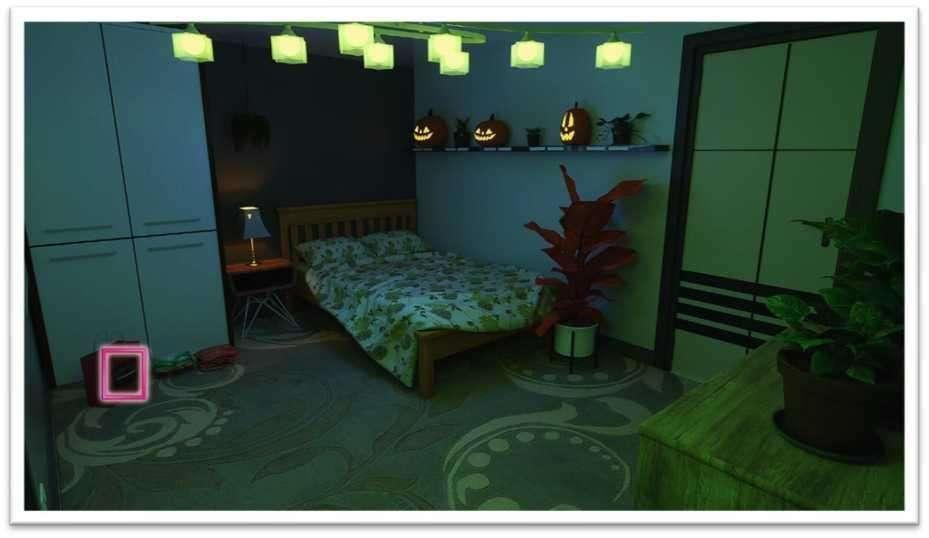
In the Right hallway, click Quinn. After Arieth suggests renting a bus, there is a magazine on the table. Click it to unlock a special render.
In the Right hallway, click the table with cakes. If you accepted to get Sarah punch, click the punch bowl to fill a cup with punch. Click the plate with Halloween muffins while you’re here. You will make a comment that you need to restock the cakes. Go to the kitchen and click the fridge to fetch cookies. Return to the table and click the Halloween muffins again to restock the cakes and get + RP DIKs. Go to the Upper main room and click Sarah to give her the punch. Choose to take a picture together of her and Melanie.
Melanie “What a lame answer.” If you took a picture of Sarah and Melanie
Something sexy: A sexy picture and get another choice
Something cute: A cute picture
Sarah “Do we look Fkable?” If you took a picture together of Sarah and Melanie, and chose a sexy picture
Yes: + DIK point
Looks good: – DIK point
Not to me: + DIK point
Melanie “Wanna take a picture with us?” If you took a picture of Sarah and Melanie
Sure: Take a picture with them and get another choice
No thanks: <Nothing>
You “Let’s do it like this…” If you took a picture of Sarah and Melanie and chose “Sure” in the previous choice
Grab their asses (DIK affinity): A raunchier picture
Hold up sword: A group picture
In the Right hallway, click the door to the Theater. A scene with Sage and Maya will play. When Maya asks Sage to look around the room, there is a magazine on the table to the right. Click it to unlock a special render.
Go to Jacob’s room and click Zoey. Choose to take a picture with her if you want.
Go to your room and click Riona. You can choose to cheer her up or not.
Riona “No, I don’t want to see more blood spilled.” If you chose to cheer her up Hug her: Offer her support and a choice to kiss her if you’re playing Others’ branch.
Cheer her up: <Nothing>
Go to the Main party room. If you chose an activity for this part of the Halloween party, it will start now. Refer to the corresponding section below.
Scary Stories
If you’re playing with mini-games enabled, Derek, Jacob and John Boy will get a small boost of happiness from this activity.
Haunted Mansion
If you’re playing with mini-games enabled, Jacob, Jamie, Nick and John Boy will get a small boost of happiness from this activity.
During this event you’re looking for a way to escape the room. Start by clicking the down arrow to turn around. Then read the note on the door again.
If you’re playing Sage’s branch, and want to end the event without exploring, click the cage and find the up arrow. Then find the key in the upper area of the screen. Exit the cage and you will unlock a Scene.
If you’re playing any other branch, you need to find three keys. Find the key in the cage in the same way as in Sage’s branch.
The second key you find by inspecting the colorful jars to the right. Click the green jar twice to get another key.
For the third key, click the torture device in the middle of the room. Click the upper part of the device and it will open. Click the symbols to reveal that they were numbers all along. Go back and click the freezer. Click the key pad to enter the code and click the key lodged in the brain.
Go back and click the locks on the door to unlock the room and escape.
Nothing
If you chose to not have any activity, Becky will bitch about it to Quinn.
If you’re playing Sage’s branch, go to the Right hallway for a scene with Sage.
If you’re playing Josy’s & Maya’s branch, go to Derek’s room to get a scene with Josy.
Pete “Hi, is this Josy’s friend?” If you’re playing Josy’s & Maya’s branch
Yes: <Nothing>
More than a friend: + RP Josy
losy “Imagine if we never did. We’d meet here at college instead; it might have been totally different” If you’re playing Josy’s & Maya’s branch
Reassure her: + RP Josy
Who knows?: <Nothing>
If you’re playing Josy’s & Maya’s branch, go back to the Main party room.
A scene with Josy and Oscar will play.
〈Nothing〉
Are you ok?: <Nothing>
What happened?: <Nothing>
Want me to kill him?: <Nothing>
Major choice #16
losy “Yeah.”
Punch him: DIK choice. If you fought the jocks, Caleb or Tommy this choice is available with a Neutral affinity.
Throw him out: Neutral choice
Comfort Josy: CHICK choice
If you’re playing Josy’s & Maya’s branch, go to the Right hallway and a scene with Maya will play. Choose to keep making out to unlock a Scene, or choose to mention Josy and the scene will end.
If you’re playing Jill’s branch, go to the Dining room for a scene with Derek.
Derek ” So…? No more Raincoats?” If you’re playing Jill’s branch
Doesn’t look like it: – DIK point
Never!: + DIK point
If you’re playing Others’ branch and got the scene with Quinn on the park bench in episode 8, go to the Main party room and click Quinn to take a picture with her. Choose to either hold her tits or snap a funny picture. Then choose to grab her ass or lick her tits.
If you made Sally drink from Derek’s special bottle in the first free roam event, go to the Right hallway for a scene with her.
Go to Tommy’s room. Click Rusty for a scene.
In Tommy’s room, click the dance floor. Depending on your branch you will dance with different girls. Refer to the section for your branch below.
Isabella’s branch
Choose what you want.
Jill’s branch
Kiss Jill to get + RP Jill.
Josy’s & Maya’s branch
Choose to dance with either Josy or Maya or both.
Kiss either of them to get + RP Josy and/or + RP Maya.
Sage’s branch
Choose what you want for the choices.
Others’ branch
Choose to dance with Camila if you want. If you tease her, it will unlock a Scene.
In Tommy’s room, click the curtain for a short scene with Heather.
Go to the Left hallway and click Camila to take a picture of her. Choose a pose for her.
Go to the Main party room and a scene will play. The scene has variations depending on your branch, but Sage, Maya, Josy and Isabella are always in it.
To end the free roam event, go to the Upper main room, go right and click Sage.
Scene location: DIKs’ mansion
Sage “Truth or drink!”
Truth: <Nothing>
Drink: <Nothing>
Sage “Now it’s your turn!”
Ask Bella: <Nothing>
Ask Josy: <Nothing>
Ask Maya: <Nothing>
Ask Sage: <Nothing>
Scene location: The blackout free roam event
Navigate forward, talk to Tommy and head down the stairs. Navigate forward and then click the stairs to the basement to end this short free roam event.
After fixing the lights in the basement there is a magazine behind you. Click it to unlock a special render.
Scene location: The DIKs’ mansion
If you’re not playing Jill’s branch, you can skip this section.
lill “Wou/d you like to meet my parents?”
Of course: <Nothing>
Do I have to?: – RP Jill
lill “Sorry… / think that’s enough for tonight. I didn’t want to bum you out, but I wanted to tell you.”
I’m happy you did: <Nothing>
Hold her: <Nothing>
lill “I’ve never felt like that before.”
Me neither: <Nothing>
You deserve it: <Nothing>
Scene location: The final Halloween free roam event
Hint! If you want to unlock the vault, open it now. The code to open the vault is 4232.
Hint! Your DIK score will be updated, and you may have a new status in your Stats app.
Open Rooster and react to the clucks. If you got the Scene with Camila, you can react to her cluck.
You can find money in one spot of this free roam event. There’s money on the floor of the balcony above the Main party room, but only after the best costume competition has ended.
Go to the Upper main room and a scene with Quinn and Vinny will play.
Go to Jacob’s room and click Becky.
Go to Tommy’s room and click Jacob.
In Tommy’s room, click Sandy.
Go to the Right hallway. If you’re playing Isabella’s branch, a scene will play.
If you cheered Riona up and hugged her in the second free roam event, a scene will play.
Major choice #17
You “What are you up t。?” If you’re not playing Others’ branch
Make out: DIK choice. If you Fked Riona in episodes 5 and/or 7, this option available with a Neutral affinity.
Tell her about your situation: Neutral choice
Refuse her: CHICK choice
You “What are you up t。?” If you’re playing Others’ branch this choice isn’t presented as a major choice.
Make out: Make out with Riona
Refuse her: Don’t make out with Riona
Click Nicole for a scene with her and Lily.
Nicole “Looking hot!”
Thanks:〈Nothing〉
You too: <Nothing>
Nicole “Fm so happy we came!” or Nicole ” I can’t get over how good you look in that costume.厶re those your abs?!”
Grab ass: + DIK point and grabs her ass
Don’t grab ass: – DIK point
Lily “I don’t think he likes his girls bad.” If Lily likes you
I like them bad: + DIK point and grabs her breast
Talk about something else: – DIK point
Nicole “Very much so! I feel like I,m in college.”
Dressed as a teacher?: <Nothing>
Dressed as a schoolgirl?: <Nothing>
Nicole “Hey, I was gonna offer first!” If you’re playing Others’ branch and selected private CUM-petition as an activity for the party
Join CUM-petition: Unlocks a Scene later
Skip it: <Nothing>
In the Right hallway, click the ghost. If you are playing Others’ branch, you get a choice to kiss Tara. If you don’t kiss her you get – DIK point.
Go to the Main party room and a scene with John Boy and the preps will start. If you called a truce during the dorm party in episode 8, you can choose to let the preps inside or turn them away. If you didn’t call a truce in episode 8, you will turn them away automatically.
If you are playing Isabella’s branch, a scene will play.
A scene with Tommy and Jamie will play.
If you let the preps inside, go to the Theater and a scene with Gordon will play.
If you turned the preps away, go to the Left hallway and click Christian to kick him out. Head down the stairs to Tommy’s room and click Lucas on the dance floor to kick him out too.
Go back to the Main party room and click Josy and Maya.
Still in the Main party room, click Tommy. If you are joining the CUM-petition, a Scene will play. If you’re playing with mini-games enabled and chose to have the CUM-petition activity, Leon and Tommy will get a small boost of happiness from this activity.
Go to Leon’s room and click Heather.
You “Did you check the dance floor?”
Check her tits: + DIK point
Focus on eyes: – DIK point
Heather “/ mean, he doesn’t ask for permission to be with others; why should I?” That wasn’t what I meant: <Nothing>
You’re not wrong: She will try to use you.
Major choice #18
Heather “Shut up, it’s just a blowiob. I’m using you.” If you’re playing Others’ branch
Let her use you: DIK choice and a Scene
Maybe in the future?: Neutral choice
Refuse: CHICK choice. If you have Neutral affinity this choice is available.
Heather “Shut up, it’s just a blowiob. I’m using you.” If you’re not playing Others’ branch this choice isn’t presented as a major choice.
Maybe in the future?: Don’t close the door on it.
Refuse: Refuse Heather
Go to the Upper main room and talk to Zoey.
Go to Tommy’s room and another scene with Zoey will play.
Go to Rusty’s room and watch the scene with Matthew and Olivia.
Go to Jamie’s room and watch the scene with Penny and the Scuba diver.
If you’re playing Jill’s branch, go to the Upper main room and go right. Click on Jill to get a scene with Jill and Bianca.
Go to the Left hallway and click the door on the left to the porch. Click Sage to play a scene.
Your task is to select your top three entries for the best costume contest. Depending on your branch, you can select different people for it. The list below shows all selectable characters and any requirements for selecting them.
Camila: On the porch. You can always select her.
Riona: On the porch. You can always select her.
Sarah and Melanie: In the dining room. You can always select any of them and you can choose to grope their tits too.
Lily and Nicole: In the Right hallway. You can always select any of them.
Zoey: In the Upper main area. You can select her if you’re not mad at her.
Derek: In the theater. You can always select him.
Jill: To the right of the Upper main area. You can only select her if you’re playing Jill’s branch.
Elena and John Boy: To the right of the Upper main area. You can always select any of them.
Leon: In Tommy’s room. You can always select her…*ahem*…him.
Maya and Josy: In the Main party room. You can only select them if you are not planning on breaking up with them.
Isabella: You cannot select her, but you can talk to her for an extra scene if you are playing Isabella’s branch.
Choose three people and then return to Sage on the porch.
During the scene with Quinn and Sage, you must pick one of your top three entries as your main pick. The winner is decided depending on who you choose and what branch you are playing. Here are the possible winners and what you must do to see them win.
Isabella: If you are playing Isabella’s branch, she will always win, no matter who your top pick is.
Camila: She will win if she is your top pick.
Riona: She will win if she is your top pick.
Sarah and Melanie: Neither can win.
Lily and Nicole: Lily will win if she is your top pick. Nicole can’t win.
Zoey: She will win if she is your top pick.
Derek: Derek can’t win.
Jill: She will win if she is your top pick.
Elena and John Boy: Neither can win.
Leon: Leon will win if Derek, Sarah, Melanie, John Boy, Elena or Nicole is your top pick and you’re not playing Isabella’s branch.
Maya and Josy: Maya or Josy will win if she is your top pick.
After the best costume competition, go to the Left hallway. If you got Nicole’s and Sandy’s Scene in episode 6, or Sandy’s Scene in episode 8, a scene with Sandy will play.
Sandy “Mhm. I’ve waited all night t。pounce on you.” If you’re playing Others’ branch.
Accept: You accepted Sandy, but there is no Scene.
Decline: You dismissed Sandy’s advances tonight.
Sandy “Not at all? Like, not even at the club?” If you’re not playing Others’ branch.
Not even at the club: You rejected Sandy.
Maybe at the club: You didn’t close the door on Sandy.
Go to the Main party room and watch the scenes with Jamie and Zoey.
Zoey 当 would stay fl could, but「m gonna miss the last train ride home.” If you’re playing Others’ branch and didn’t choose to be mad at Zoey.
Crash in your room: You offered her a place to crash.
Say goodbye:〈Nothing〉
Go to the Right hallway and a scene with Riona and Camila will play. You can flatter Riona if you want.
Click the bathroom door to play a scene with Elena.
If you are playing Josy’s & Maya’s branch or if you aren’t planning on breaking up with Josy and Maya, go to Rusty’s room and click Josy.
If you are playing Josy’s & Maya’s branch, there will be an extended scene here. Skip to the next section if you’re not playing their branch.
Josy’s & Maya’s branch
losy “No, I can do it.”
Alone time with Josy: Spend some time alone with Josy
Alone time with Maya: Spend some time alone with Maya
When Maya or Josy returns, the scene that follows is a Scene where you play a drinking game. For the questions you ask Josy and Maya, pick whatever you wish. When you dare Josy or Maya, you can get them to post an embarrassing cluck each on Rooster if you want.
When Maya asks you truth or dare and you pick truth, she will ask you how many girls you’ve been with sexually. You can drink and dodge the question, and get -2 RP Josy and -2 RP Maya. If you choose to tell the truth, you get -3 RP Josy and -3 RP Maya if you’ve had at least 10 different girls. If you have been with 6-9 girls nothing happens. If you have been with at least 4 girls, you get + RP Josy and + RP Maya. And finally, if you only have been with Zoey, Maya and Josy, you get +3 RP Josy and +3 RP Maya.
When Josy asks you truth or dare and you pick truth, she will ask you about Zoey. If you tell the truth and tell Josy that “I wish I knew”, you get – RP Josy and -RP Maya. With the other options, nothing happens.
After this scene, you return to the free roam event.
All branches
Go to the Right hallway and enter your room. Go left to your bed area for a scene with Vinny.
Vinny “Ah, s。you do know your history.”
Rude: + DIK point
Non-confrontational: – DIK point
Major choice #19
Vinny “Or you’ll what?”
Punch him: DIK choice. If you fought Caleb and Tommy this choice is available with a Neutral affinity.
Tell him off: Neutral choice
Defuse the situation: CHICK choice
Go to the Upper main room and go up into the hallway. Click the bathroom and a scene with Sally will play.
You “No due…”
Offer your clothes: You helped Sally with her problem.
Leave her hanging: You didn’t help Sally with her problem.
Pack Quest – Being a Dik Walkthrough & Guide Interlude & EP9
Before you end the free roam event, open the Pack Quest app on your phone and start the new quest. You will have to find ten hidden buttons to unlock a set of special renders.
The other bloody five – Click the bloody handprint on the wall in the upstairs bathroom. You will have to get rid of Sally to be able to enter the bathroom, which you only can do after the best costume contest by either helping her out with your clothes or ignoring her. If you ignore her, leave the area and return; the bathroom will now be available.

A vengeful spirit – Click the hidden button on the orange ghost in the Main party room
Hell Week box – In Tommy’s room, click the curtain to enter his bedroom. The hidden button is on the beer cooler to the right.
Lips – In Rusty’s room, click the lipstick mark on the wineglass that’s on the table.
Rescue me – After talking to Heather in Leon’s room, she will throw her buoy on the floor. The hidden button is located on it.
Ribcage – In the Upper main room go to the right area. There is a teddy bear on the top shelf with an exposed ribcage. The hidden button is found there.
Second costume – In Jamie s room there is a shopping bag on the floor. Find the hidden button on it.
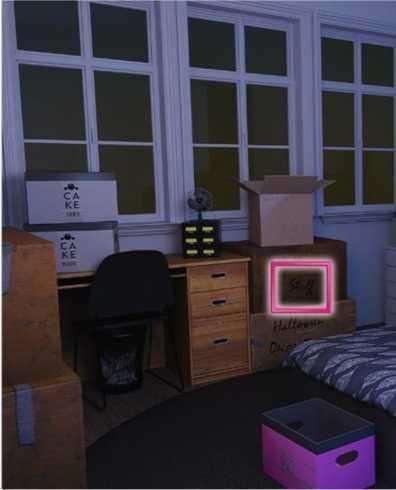
Stuff – In Nick’s room there are cardboard boxes. One of them is named Halloween stuff. Click the hidden button on the word stuff.
The hidden owl – On the porch there is a lantern on the floor with an owl in a tree. You can only click it if Camila isn’t lying on the floor, which is either at the start of the free roam event or at the end of it.
Twins – The final hidden button is found on the polaroid on the wall in Derek’s room.
The end of the free roam event is different depending on your past choices and selected branch. Read how to end the free roam event for your branch below. Isabella’s branch
If you are planning on breaking up with Josy and Maya, go to the Upper main area and click them to end the free roam event.
If you weren’t in Josy’s and Maya’s relationship, go to the Main party room and end the free roam event by clicking Isabella.
Enjoy the Scene that follows the free roam event.
Jill’s branch
Go to the Upper main area and click Josy and Maya to end the free roam event.
Enjoy the Scene that follows the free roam event. If you want to make Jill orgasm, make sure to wait until she does during the “Standing” sex animation. After the Scene she will ask you if you wish she were more vocal during sex. Pick what you want.
If you got confronted by Santa Claus during the best costume contest, Jill will ask you more about it. If you tell her “I don’t know” you will get – RP Jill.
Before the scene ends you get to choose to tell Jill about Matthew and Olivia or not. You either tell Jill that Bianca is being cheated on, or you keep it a secret. Josy’s & Maya’s branch
Go to the Upper main area and click Josy and Maya to end the free roam event. Enjoy the Scene that follows the free roam event.
After the Scene, the girls start comparing how many times you’ve been sexual with them. If you’ve favored Josy over Maya you get +3 RP Josy and -3 RP
Maya. If you’ve favored Maya over Josy you get +3 RP Maya and -3 RP Josy.
If you’ve been with both of them a similar amount of times you get +3 RP Maya and +3 RP Josy.
〈Nothing〉
It’s all about opportunity: <Nothing>
Bad to keep count: + RP Maya and + RP Josy
Maya “/ think that’s what I can share at the moment.”
Hug Maya: + RP Maya
Let her get out of it: <Nothing>
Sage’s branch
Go to the Upper main area and click Josy and Maya to end the free roam event.
Enjoy the Scene that follows the free roam event. Pick whatever you like for the text conversation and the Scene.
Sage “How good was that?
5 out of 5: <Nothing>
4 out of 5: <Nothing>
Sage “You’d be on board for everything I’d suggest, wouldn’t you?”
Likely: You have no preference
I prefer vanilla: You prefer vanilla sex
Others’ branch
There are five different ways you can end your night in this branch, but you can only pick one and some of the endings have requirements to be available.
Sarah & Melanie: Go to the Dining room and enter the kitchen. Click on them and choose to end the night with them. This is only available if you had a Scene with Sarah in episode 6 or 8, or had a Scene with Melanie in episode 4 or 8. One of those Scenes is enough for the choice to be available. Enjoy the Scene that follows and pick whatever you like.
Lily & Nicole: Go to the Main party room and click Lily if she is there. This is only available if Nicole likes you or if you got Lily’s Scene in episode 7. Enjoy the Scene that follows and pick whatever you like. During the ending choose to either spoon Nicole or Lily.
Quinn: Go to the Main party room and click Quinn. This is only available if you got Quinn’s park bench scene in episode 8. Either convince Quinn to take you back home with her or tell her that you saved yourself for her to unlock her Scene. Enjoy the Scene that follows and pick whatever you like.
In bed with three girls: Go to the Upper main room and click Josy & Maya. Choose to join the girls in your bed when you find them.
Alone on your sofa: Go to the Upper main room and click Josy & Maya.Choose to take the couch when you find the three girls in your bed.
All branches
If you are playing with mini-games enabled, there will be a report for the Halloween party after you’ve completed it.
You can get the highest rank in different ways. The first way is to get a party score higher than 9OOOO points, but if you have three activities for your party you only have to score 80000 points to get the S rank. The requirements for the lower ranks aren’t listed in this guide.
You get to choose two new items to upgrade. A recommendation is to either keep it balanced for now and choose items that you have none of in your inventory, or to choose expensive items like Drugs, Kegs or Speakers. Food, Decor and Liquor. In general, don’t upgrade the cheaper items too much, e.g. Beers and Snacks.
For the next perk, consider choosing “Easy to Please”, “Hard to Let Down”, “Multiplier Madness” or “Crowdfunding”. You may choose different too. Other strategies include choosing all perks from the top row to eliminate the need for activation items and thus getting more space on the grid in the future. You can also start reducing the item cost of expensive items with the second row of perks, and later choosing “Crowdfunding” or “Below Budget”, to have plenty of money when planning parties. Maximizing the score of the party planning minigame will require you to choose the happiness and score related perks: “Easy to Please”, “Multiplier Madness”, “DIK party” or “Hard to Let Down”.
It can be good to be a jack of all trades and choose a broad strategy too. For example, choosing one perk per row and keeping an evenly distributed item inventory is a viable strategy.
During the morning scene, there is a magazine between Chen’s (the ghost/ninja) legs. Click it to unlock a special render. Enjoy the ending to episode 9.
Glossary – Being a Dik Walkthrough & Guide Interlude & EP9
RP Relationship points; a higher score means that someone likes you more.
DIK point A point that is added or subtracted to your DIK score.
DIK score Think of your DIK score as your current behavior. Having a higher score means that you are something of a bad boy, whereas a lower score means that you’re more of a nice guy.
Affinity Think of your affinity as your personality. Your major choices shape it. You will either have a DIK, a CHICK, or a Neutral affinity. Your affinity may enable or disable certain choices and affect your story in other ways.
Special Renders Locations – Being a Dik Walkthrough & Guide Interlude & EP9
All Special Renders Locations: Special Render Locations