Welcome to LonaRPG Cheats & Walkthrough, which helps you finish all of the quests, unlock all of the scenes.
Recommended to read ‘General Tips’ if you are beginning the game and need help.
v0.7.5.3
Quest Guide – LonaRPG Walkthrough
Noer – One Time Quest(Story-Line, Mostly)
N1. Rat Quest/Tutorial
– Reward:
2 Large Copper Coins
+1000 XP
– Quest Location:
Noer, Sewers (you start in it)
– Requirement:
None
– Rating:
Great Quest, seriously do it to get an easy boost (9/10)
– Guide:
Move East then South to the middle of the bridge. The rats will likely have aggroed and started funneling into the bridge. If not, get closer to them and run back to the bridge. Turn to face them by using ‘alt’+’direction key’ if you are not yet facing them.
Spam the normal attack button (default ‘A’) until the rats are killed. You can also use your secondary attack (default hold ‘s’) to set the rats on fire to, which deals fire damage, note that this has a charge up that can be interrupted.
Only brown rats attack so the small, gray rats can be safely ignored.
When all the aggroed rats are dead, gather the loot by standing on top of it and pressing ‘Enter’ or ‘Z’. Loot despawns fast so be quick.
At this point you likely be on low stamina. Rest (default button ‘Q’) until you have regained stamina back to 60+ (resting consumes 10 food for 20 stamina & HP, you have a default maximum of 100 food and the ‘Dry Meal’ in your inventory restores 16 food, totaling at 48 food).
Cross the bridge to the East, then cross the bridge to the South, then the bridge to the West (repeat the previous tactic to kill the additional rats).
Continue West until you will see a chest: which contains a pitchfork and has floating papers below it (Feira’s Diary, you will *find* her later on). To take the contents of the chest, walk up to the chest and press ‘Enter’ or ‘Z’, gathering the paper is the same as gathering loot and you can read it in the menu (Menu>Notes>Unread Letters>Feira’s Diary>1771.12.17).
Route to chest:
The pitchfork has double the range and almost double the attack damage. However, it has slightly less defense, a much weaker secondary attack, and doesn’t damage enemies that are standing on the same tile you are on. The pitchfork can kill rats in ~3 hits and at range, so I recommend to equip it (Menu>Equip>Pitchfork>press ‘Enter’).
Make your way back East and North. Then go East followed by North. This area has red moss on the walls and floor (the infestation, Lona will react with dialog).
Go South of the infestation. There will be traps and a short tutorial on how to deal with them. You can throw rocks on them or attack them to disarm them. It is not recommended to try dismantling it as that requires a high scoutcraft to succeed.
Continue South past the traps until you find the missing person (The aforementioned Feira).
At this point you have 2 options, hand in the quest (you also need 8 rat tails), or try to acquire that sword. The following 3 options are for acquiring the sword, skip if you are not interested:
[Option 1] Sneak 100 (Intended):
This requires you to put a minimum of 3 points into scoutcraft (not 5) to unlock sneaking. Save then just follow the wall and the red moss on the floor to the sword.
Throw a rock on the pile of bones to the East of the goblins BEFORE picking up the sword. Pick up the sword and walk back to where you started following the same path and just continue North if the goblins are following you.
[Option 2] I Am Speed (Easier):
Ensure you have enough stamina (40+) and make a save. Sprint (hold shift) to the sword, grab it, then sprint away.
To make it easier, go in naked so the enemies have some hand to gland combat with themselves instead of trying ganking you.
[Option 3] Veni Vidi Vici (Learn more about tactics):
Ensure you have enough stamina (60+) and make a save. Throw a rock by holding the ‘throw’ key (default ‘space’) , then select a tile a maximum of 2 tiles away from the enemy you are luring, and release the throw key to throw the rock.
Do this a few more times until he is sufficiently far away from the other goblins, 1-2 extra throws is usually enough.
Get him to see you so he runs towards you and then attack the goblin with your pitchfork while backing up, so the other enemies don’t see the fight and join.
If the enemy is dodging too much, try cornering him. Running out of energy in combat (red stamina) is a practical death sentence, load your save if this happens.
Rest after the fight to get your stamina back up. Then repeat the baiting method until all the enemies are dead or are sufficiently reduced in number and you feel like doing one of the other 2 tactics instead, collect your hard earned sword either way.
If you lack the sufficient amount of rat tails, 8, to finish the quest, Look around the map to see if you missed a rat. You can also just leave but you will miss out on the reward of 2 large copper coins.
If there are no more rats, you can pass a day/night cycle by sleeping (press the ‘Shift’ and rest key at the same time) to ‘refresh’ the map, which spawns in rats and restores stamina.
When you have the 8 rat tails and discovered the missing adventurer, leave the sewer by going back to the place you started and interacting with the door.
Make your way to the inn (the large red building with a chimney to the bottom left of the town square, move on the roads as it is safer), enter the inn by pressing the interact button while standing on the inn, and talk to the ‘Noer Adventurers guild’ receptionist (dude with a black suit) to your West once inside the inn.
– Tips:
You can skip this quest by immediately leaving the sewer, you will not get any rewards as you do not have 8 rat tails.
One meta strategy is to grind the this area for exp by never leaving this map. You will have to survive off raw rat meat and raw goblin meat.
There is a secret entrance to the goblin lair to the North-East of where the goblins are hanging out, it is a large gap in the wall. You can also enter Noer through that gap, useful if you are missing your ID paper.
N2. Missing Convoy
– Reward:
1 Large Copper Coin
+5800 XP
+1 Morality
– Quest Location:
Noer, Inn: Mercenary Guild
– Requirement:
None
– Rating:
Meh quest with 2 or less Scoutcraft (6/10)
Decent quest with 3 or more Scoutcraft (7/10)
– Guide:
Leave Noer through the Eastern gate, follow the dirt road North along the river (do not cross the stone bridge in front of the gate), cross the wooden bridge to the East of the dirt road, then make your way to the encampment, and enter the encampment.
If you have a companion with you, tell them to wait at the entrance (press enter/Z on while facing them and selecting the ‘wait’ command) so they don’t get spotted.
There are 2 methods to do this quest, the first one is the intended method that requires a minimum of 3 Scoutcraft (for sneaking) and the second method is more tricky but has no prerequisites.
[Method 1] Sneaking Tutorial (Intended, requires 3+ scoutcraft):
Entering:
Start sneaking (‘ctrl’ key) when you leave the dirt path and enter the grassy area. Hide behind the dead tree West of the first archer outpost. Wait until the goblin with a lantern ‘talks’ to the archer and then leaves.
Throw a rock to the directly East of the archer and then go South along the Western wall.
Go East when you reach the wall to avoid the sleeping goblin (he wakes up if you get within 1 tile of him) , then follow the cliff South, and stop when you are West of the dead body behind the cart.
Wait for the goblin patrolling the area to your South to start and finish jacking himself off. Then sneak to the place where he diddled himself and wait for him to move again.
As soon as he starts moving from his Western-facing position, you can sneak West along the cliff to the campfire with a human spit-roast. Be wary of the second goblin that patrols the area just before the campfire.
Head West until you find the survivors (you cannot save them).
Leaving:
You can either go back the way you came from, or use the exit to the East. Leaving through the Eastern exit is easier and shorter: go East through the Southern path, run/sneak past the archer (Go North of him, his South is a dead end blocked by a tree), and follow the dirt path to freedom.
It’s possible to run to either exit without sneaking, just be careful not to get blocked by goblins. Getting spotted has no consequences if you manage to leave before the timer finishes (if the timer ends, goblins will spawn and block the exits).
[Method 2] Sprinting Tutorial (Alternative, much harder):
Entering:
Make sure to have sufficient stamina as you will be sprinting during combat.
Walk South then West from the starting area. Wait behind the dead tree West of the first archer outpost (make a save here) until the goblin with a lantern ‘talks’ to the archer and then leaves.
Throw a rock to the directly East of the archer and then go South along the Western wall.
Go East when you reach the wall to avoid the sleeping goblin (he wakes up if you get within 1 tile of him) , then follow the cliff South, and stop when you are West of the dead body behind the cart. Make a save here. (If you get spotted here just sprint through the path described below)
Wait for the goblin paroling the area to your South to start and finish jacking himself off. He will then talk to another goblin, wait until they are done talking.
As soon as they are done talking and start moving, follow the cliff South then West. The second goblin can get a question mark above his head but that is NOT and issue, you are only spotted if an exclamation mark appears above his head.
If you get spotted, start sprinting West to discover the survivors.
Leaving:
Sprint to the East DO NOT BACKTRACK as the area you came from has 2 choke points you can get trapped in.
Sprint East through the Southern path. You should see another archer ‘tower’. Pass the archer to his North as his South is a dead end blocked by a tree, then continue East following the dirt road to freedom.
If the timer runs out before reaching the exit BUT you are already on the dirt path, sprint towards the exit even if a goblin is blocking it. Chances are that the goblin will move due to dumb AI and you can escape.
Make your way back to the Noer and hand in the quest.
– Tips:
Having a lantern equipped does not increase the distance at which goblins can detect you.
Chances are that a goblin war band will be chasing you as soon as you exit the map, to evade them go directly to the West so you get the road map and just sprint away (the alternative is the ‘Pine Forest’, which is much harder to escape from due to its map layout).
There is slight variation in patrol timing in the outpost due to buggy AI but their paths are fixed, so adjust accordingly by waiting for openings or creating one with a rock throw.
N3. Rescue The Man’s Partner
– Reward:
2 Large Copper Coins
5 Small Copper Coins
Additional 1 Gold Coin (If Cecily is ‘unharmed’) or 2 Large Copper coins (If Cecily was ‘harmed’)
+13600 XP
2 Free Companions (Cecily & Grey Rat)
– Quest Location:
Noer, Inn: Grey Rat
– Requirement:
One-time quest ‘Missing Convoy’ to be completed
Noer Inn to be ‘reset’ after completion of required quest (day/night cycle to pass or leave and re-enter)
– Rating:
Best possible reward is 5 small copper coins, 2 larger copper coins, and 1 gold coin
Great quest with 2 or less scoutcraft (9/10)
Fantastic quest with 3 or more scoutcraft (10/10)
– Guide:
Talk to the gigantic man (Grey Rat) sitting at the Western-most table in the Inn in Noer. He will give you the quest and its reward as a down payment (5 small copper coins and 2 large copper coins). Note: the characters in this quest have 1 life so they are gone forever if they die and if one dies the other will leave forever.
Leave the Inn and go West until you reach the coast and enter the kidnapper’s warehouse. Be aware that the warehouse is filled to the brim with traps. Make a save once inside the warehouse.
The first section/room only has traps, so it doesn’t matter if you sneak or not.
The first door has a trap right in front of it and behind it, disable both of them. Unless you have high survival skill, do not bother dismantling the trap as it rarely works. Just throw a stone on the trap.
Go East along the wall while disabling the 2 traps in the way. Ignore the doors to the South as the rooms are empty. The 2 traps here are the ‘cages’ (traps) and ‘barrels’ (mines). The cage is a normal trap while the barrel trap is a mine that deals massive damage in a 1 tile radius around it.
When between the crates, throw a rock 2 tiles East and 1 tile North to trigger a hidden mine which will disable 2 additional traps.
Continue towards the bandits until some dialogue occurs. After the dialogue, disable the trap directly South-East of you between the crates.
Here the guide splits into the 2 methods: Sneaky Peaky Like and Leggin’ it.
[Method 1] Sneaky Peaky Like (intended)
Entering:
Start sneaking and just stick to the walls to your East then South. Continue sneaking along the wall until you reach the last door. There is a trap hidden just behind the door, disable it and enter the room
Selecting the last option 3 times will cause the girl to be raped and you losing out on the 1 gold coin, you can load a save and still keep the CG)
Hit the bandit in the room from the back ONCE (sneak or not doesn’t matter as the bandit is ‘preoccupied’). Talk to the orange haired girl (Cecily Eaglemore). After the cut scene, they will kill the bandit, you do not need to help.
Leaving:
Tell your companions to wait and back track, you can also safely sprint all the way back to the exit. There is a way to kill a large amount of the bandits before leaving which is explained below in the ‘tips’ section.
[Method 2] Leggin’ it (harder, more damage, higher failure chance, but potentially more loot)
Entering:
Make a save as the bandit can end up blocking you. Run (Do NOT sprint, you will aggro all the guards a corner yourself) along the wall to your West and South until you reach the last room.
If you have quick fingers, you can disable the trap before interacting with the door but that doesn’t matter too much. Upon interacting with the door, line of sight is broken so aggro disappears.
Enter the room and close the door behind you for safety. Whack the bandit in the room ONCE from behind. Talk to the orange haired girl (Cecily Eaglemore). It’s not recommended to participate in the gank as you need conserve your stamina.
Leaving:
Let Grey Rat go through the door first so he takes initial aggro and stand in the doorway to block Cecily (do not stand directly behind Grey Rat as spears can still hit you). You can alternatively tell Cecily to wait.
It will take a while, but Grey Rat has a lot of HP and damage reduction so he will eventually kill some of the bandits in the room above as the doorway makes it a 1v1 where he doesn’t get stun-locked (as much).
Should Grey rat leave the doorway, call him back using the ‘ Rally Trumpet’ skill (you need to assign a key bind) so he doesn’t get stun-locked, his slow attacks means he is only good offensively in a 1v1.
If you want to speed everything up, call Grey Rat back into the room so Cecily can start attacking, note that this puts you and her in danger. After you can finally leave the room (usually 0-4 enemies left alive) go North, trigger the bombs using a stone and leave.
Go back to the Inn and talk to Cecily, you will then be given a gold coin or 2 large copper coins depending on what happened to Cecily and can now recruit Cecily and Gray Rat. Talk to Cecily to recruit them, they are recruited in a pair. You also need the ‘Weak’ stat to be below 100 to recruit them.
– Tips:
If you wish to kill the bandits in the ‘Sneaky Peaky Like’ method, bait the bandits to the explosive traps North of them (next to the door) and, once they are close enough, trigger the trap by throwing a rock on it, the bandits to the left are much easier to bait than the bandits to the right. Reinforcement countdown will only begin if all bandits are dead or you are spotted. You can abuse this by placing your own mines at the front door, where you just killed the bandits, and/or the back door you initially entered from. This means that when the count-down ends, the bandits will spawn next to your mines and blow themselves up (recommended to have Cecily and Grey Rat set to ‘stay’ to prevent friendly fire).
Bandits do not trigger their own traps nor get damaged by them. However, manually triggering a mine will cause the blast to damage them.
The ‘Leggin’ it’ method leads to the best potential rewards (if you can collect the items on time) as bandits drop the following items: food, spears, & copper coins.
Cecily is a great DPS but easily killed, Grey rat sucks at DPS but is practically immortal and stuns enemies a lot. Getting Cecily killed leads to Grey Rat becoming enraged where he moves faster, does more offensive attacks, and becomes hostile to everyone (including Lona).
DO NOT GET EITHER CHARACTER KILLED, they are great for grinding quests and 1 dying leads to both being unavailable forever.
N4. North Pass Whistle Tower
– Reward:
2 Large Copper Coins
1 Chest With Randomized Loot
+7000 XP
+1 Morality
– Quest Location:
Noer, Inn: Mercenary Guild
– Requirement:
One-time quest ‘Missing Convoy’ to be completed
– Rating:
Debatable quest if alone (5/10)
Meh quest with regular companion(s) (6/10)
Good quest with Cecily & Grey Rat (7/10)
– Guide:
Recommended to hire companion(s) for this quest: recommend Cecily & Grey Rat, Jobless Adventurer, or Mercenary Archer & Mercenary Warrior.
Leave Noer from the Northern gate and follow the dirt road East then North at the intersection. You can alternatively cut through the field and rejoin the road going North. To the West of the road you will see a tower, this is the ‘North Pass Sentry Tower’, go to that tile and enter it.
You can spawn in 1 of 3 locations: the pantry (West), the armory (Middle), or the storeroom (East). Remember where you spawned because that’s where the exit to the map will be. There is a corridor below the rooms with goblins and braziers (light source, interact with it to turn it on/off). Be aware that traps spawn in this corridor and that the darkness and walls hide them.
There are 3 rooms below the corridor: corpse room (West), barracks (Middle), and bedroom (East). Animal corpses can spawn in the corpse room, which you can collect meat from by standing on top of it and interacting with it (if you have ‘Cannibal’ trait you can also harvest the human corpses).
The nest entrance (a grate in the floor) is located directly South of one of the doors to the bottom 3 rooms, interact with the grate to enter the nest.
There are 3 spawn locations in the nest: bone room (West), corpse room (South, not sure if avilable in path 0.4.5.0 onwards), and tunnel (East). Remember where you spawned because that’s where you leave from. The goblins are located in the center of this floor.
Clear the goblins out of the nest: companions can do this easily. If you are alone, use the tunnel of your entrance as a choke point. There is a chest with randomized loot in the South-Eastern corner of the Southern room, West of the bones in the Western room, or tunnel leading South in the Eastern room.
After clearing the tower of goblins, exit to the world map and follow the road North to the ‘Society of Saints Monastery’ (Wooden building with grey roof surrounded by tents) and enter the church there. Once inside the church, head North and talk to the priest, fat dude dressed as an off-brand KKK member. DO NOT talk ‘About the Saints’, more about this under the ‘Saintly Prostitution’ job guide.
Leave the church and return back to Noer to turn in the quest.
– Tips:
You can assist your companion fighting the goblins by cornering the enemy and taking aggro (attacking) when your companion is losing or getting stun-locked.
You can interact with impregnated corpses (covered in semen) or kill impregnated prisoners (covered in semen) to cause an explosion that releases baby goblins, which you can then kill; Goblin Slayer style.
Killing prisoners has no repercussions and they don’t fight back, you can use them as exp piñatas under the guise of ‘ending their suffering’. It seems to be impossible to rescue them during the quest.
Leaving and re-entering the tower re-spawns everything in it and re-randomizing the layout, including the chest in the nest.
N5. Cemetery Negative Energy
– Reward:
4 Large Copper Coins
1 Buring Keg Room Key’
1 Chest With Randomized Loot
+16000 XP
1 Free Companion (Cocona)
– Quest Location:
Noer, Inn: Mercenary Guild
– Requirement:
One-time quest ‘North Pass Whistle Tower’ to be completed
Repeatable quest ‘Undead In Cemetery’ to have been completed at least once
– Rating:
Good quest (8/10)
– Guide:
Go to the cemetery North-West of the Inn in Noer. Note: in this quest combat is optional and can be completed without fighting, although that requires a lot of running.
Talk to the grave keeper East of the wooden shack. After some dialogue, walk north and enter the catacomb.
Once inside, go all the way South. Pick up the note in the South-Western corner of this room. Then follow the corridor East.
Go all the way East, be wary of traps. There is another note you need to pick-up at the South-Eastern corner of the room. After picking up the note, head North whilst remaining wary of traps.
Upon reaching the Northern-most room, you will see a big stone sculpture that represents the nameless saint. Pick up the note directly East of this statue.
Go to the stairs to your East after picking up the note. You will get hit with a trap, causing you to be knocked out and losing all your inventory (you can retrieve it later).
After gaining back control, pick up the note to your West. You will need to wait a while in this room, until the person to the East moves to the next room, feel free to explore the room you are in.
Once the person moves to the next room, go to the room where they were just in and pick up the note next to the Eastern wall. Once again, wait for the person to move to the next room.
After a while, the person will move again and go to sleep. Move East and then North. This room has many bones and has the last note you need to pick up: it is directly West of the large bone pile you will face first. To the North of that note is a chest with all your stuff in it and some randomized loot mixed in, take your stuff back.
Read all the notes you have picked up if you haven’t already, this will trigger a short dialogue. Go to the room where that person (who we now know is called ‘Cocona’) is sleeping in (South then East). This will trigger some dialogue and a short scene.
After this scene, run North to the bone room and make your way to the rope ladder on the Northern wall. Interact with the ladder to escape the catacomb.
Once out, interact with the hole to seal it off (you need to be outside of combat). Then exit the grave yard.
Make your way to the Inn and talk to the Mercenary Guild staff (for the quest rewards) and Boss Mama (to give Cocona a new home). Boss Mama will give you a ‘Buring Keg Room Key’. Leave and re-enter the Inn to get Cocona to spawn. Go up the first set of stairs to the West and go to the Western most room to talk to Cocona. You can now recruit Cocona as a companion.
– Tips:
Failure to get all 6 notes means you will not be able to talk to Cocona and thus be unable to recruit her. Although you can pick up the missing notes after being captured, the dialogue still does not trigger so you have to restart.
Killing Cocona’s parents (the 2 skeletons at the table) will make you unable to recruit her.
Cocona will automatically summon skeletons in battle but you can manually summon them by interacting with Cocona as a companion, selecting other, and choosing ‘Summon Warrior’ or ‘Summon Archer’.
‘Good’ NPC’s (civilians, guards, etc) will be hostile to Cocona if you haven’t done the second follow up quest for her that gives her the maid clothes on account of looking like a necromancer.
‘Good’ NPC’s (civilians, guards, etc) will be hostile to the summoned skeletons regardless of Cocona being dressed as a maid. The skeletons will not actively attack but will fight back after enough damage is taken. Additionally, Cocona will not fight the ‘Good’ NPC’s but, instead, will heal the skeletons. You might be able to exploit this to farm drops or create a distraction to rob the bank.
N5-2. Cocona Follow-Up Quests
– Reward (in total):
3 Good Soups
3 Buring Keg Room Key
+46000 XP
Cocona Maid Clothes (Removes Her From Evil Faction)
– Quest Location:
Noer, Inn: Big Mama
– Requirement:
One-time quest ‘Cemetery Negative Energy’ to be completed
Day/Night cycles to pass, stated in guide
– Rating:
Quest 1-2 good quests (8/10)
Quest 3 debatable quest due to difficulty (5/10)
– Guide:
Follow-up quest 1:
After 2 day/night cycles, Boss Mama will have a task for Lona regarding Cocona.
Talk to Boss Mama to get that task. Talk to Cocona (who is in her room) to complete the task.
Boss Mama will give you 3 good soups and replenish all your hunger as a reward . You also get +4000 XP.
Follow-up quest 2:
After another 2 day/night cycles, Boss Mama has another task regarding Cocona. Once again, talk to Boss Mama and then Cocona (who is still in her room).
Cocona will try to run away, all you need to do is interact with her.
Cocona will now wear maid clothes and work as a cleaner at the Inn at night. In addition, you get +2000 XP and 1 Buring Keg Room Key from Big Mama.
Follow-up quest 3:
(Morality loss does not matter as it will be reset to 50 at the end of the quest) After another 2 day/night cycles, Boss Mama will have another task where you need to buy goods for the Inn with Cocona.
Wait until it is morning and then talk to Cocona, who should be sleeping in her room. After talking to her, talk to her again to recruit her and head to the Noer Market to the South-East of the Inn.
Talk to the 3 merchants in the central market and then the bread merchant to the North of those merchants. After a long cutscene, leave the market and head back to the Inn to talk to boss mama. She will then kick you out.
Leave Noer through the Northern gate and follow the road North to the Saint’s Monastery. Enter the church, after the small cutscene, head to the room to the North East. Avoid attacking the people in the church as it lowers your morality, companions attacking also count.
Once in the new area, head East then North to the door behind the big guard (you can just run behind him). If you brought companions, tell them to wait once you enter the basement through the door if you want to avoid blood shed. However, the area is near impossible to sneak through and you will go through combat.
Recommended to sprint through the area as the enemies lose interest quickly.
Once at the end of the hallway, interact with the door to the South. ‘Delaying’ by choosing the bottom 3 options leads to Cocona Being raped, otherwise you intervene before anything too major happens.
Hit the big dude in the back once, talk to Cocona, and sprint back to the entrance (there should be just enough time, use the ‘rally’ skill to get Cocona within the 3×3 area of the exit if necessary).
Once out, tell Cocona to wait and get the enemies at the end of the hallway to aggro on you. Retreat slowly until a gap opens up, sprint between that gap and to the end of the hallway.
Once at the main hall, tell Cocona to wait and Big Mama to charge. Quickly sprint towards the Eastern wall and then the exit, the barricades can be destroyed in 1 hit.
Once out, you get a new (fake) ID to reset your morality to 50. Head back to the Inn in Noer and talk to Big Mama to complete the quest. You will get 2 Buring Keg Room Keys and +40000 XP.
– Tips:
Quest 3: This quest permanently removes the priest so you no longer have access to the church store or ‘saintly prostitution’ upon completion.
Quest 3: If you have the ‘nymphomaniac’ trait, you get a second dialogue option in follow-up quest 3 but there is no difference as of the current moment (0.4.5.0).
Quest 3: After the quest, you will have your original ID paper and a fake ID paper. As far as I know, you can sell the original for 1 gold piece at the harbor back street without consequence.
N6. Missing Daughter
– Reward:
1 Gold Coin
+20000 XP
+6 Morality
– Quest Location:
Noer, Inn: Mercenary Guild
– Requirement:
One-time quest ‘North Pass Whistle Tower’ to be completed
– Rating:
Horrendous quest (1/10)
Bad quest with 5+ blue potions and 7+ red potions (2/10)
Poor quest with 5+ blue potions, 7+ red potions, and Weapons Expert/Mana Knowledge/Succubus trait (4/10)
Debatable quest with 5+ blue potions, 7+ red potions, Weapons Expert/Mana Knowledge/Succubus trait, and Cecily & Grey Rat (5/10)
– Guide:
(This part only applies if you are going for the combat method) Before or just after receiving the quest from the adventurers guild, buy blue potions (5-10), red potions (7-15), and a lantern (quest location is dark) if you are missing them. Note: if you are going the ‘Succubus’ route, buy more blue potions (10-20) and fewer red potions (3-5). You can buy these potions from ‘Elise’s Obstetrics and Gynecology Clinic’ (red building with chimney through the roof on the North-East of the square) and/or create the potions by foraging in the forest (see ‘Gathering’ in ‘Job Guide’ for more info). Don’t forget to hire Cecily and Grey Rat or your preferred companion(s).
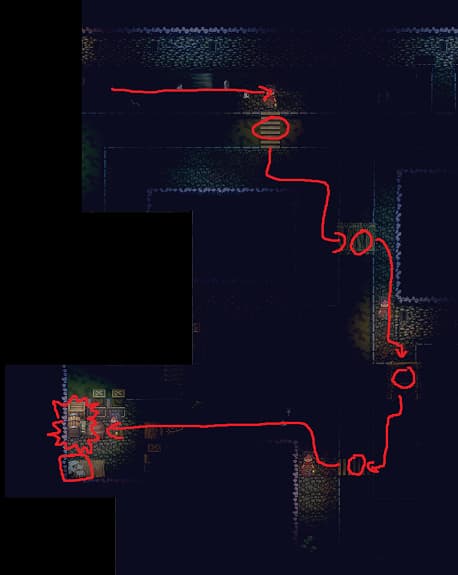
Exit Noer using the Eastern gate, go North at the first intersection, continue North at the second intersection, then North again at the third intersection, then go East at the fourth intersection (across the wooden bridge), and then head into the cave in the mountains to the North-East.
REMEMBER WHERE YOU WENT IN THE CAVE, the cave is a set of maps with several randomized paths, there is only 1 static path: the rope ladder leading into a hole (into Goblin nest) in the central room, which is covered with infestation, bones, and a few puddles of water. However, you only need to remember how to get out. Watch out for traps, there are quite a few and can kill companions due to how often you need to fight.
Once you have located the path into the Goblin nest (aside from the static entrance, there is also one randomized entrance), make a save right before or right after entering. Staying in combat for too long leads to a countdown timer that complicates things. Still, the guide will split into 2 parts where you prevent the timer (Harder, but less fighting) or allow the timer to count down (Easier, but more fighting).
[Method 1] Spotted? Time to restart (More difficult short-term, easier long-term)
This method relies on staying in combat as little a time as possible to stop the count-down timer from starting and requires companion management and baiting enemies.
Entering: This method requires you to use the rope ladder entrance as the other entrance directly leads to combat. As soon as you enter, tell your companion(s) to stay where they are as to not aggro enemies.
There are 2 rooms of note: To the South of where you entered is a tunnel leading to the captives room where the person you need to rescue is located, there should only be 1 goblin in that room. To the East of where you entered is a room that contains a chest to the Eastern wall, only go here if you want the chest (randomized content).
To get the chest stealthily, you need to aggro one enemy at a time (use rocks or sneak so only 1 enemy can see you) and bring them next to your companions so they can assist (watch out for orcs with blood stained clothing and a clever, they deal massive damage).
Once you have reached the girl you need to rescue (blond hair), interact with her and a scene will play (re-playable). Do not bother rescuing the other girls as they cause issues when you escape (they start despawning, cannot talk to girl after escaping, etc).
[Method 2] Spotted? Time to kill everyone (Less difficult short-term, harder long-term)
This method relies on being able to kill all the enemies that will spawn in addition to those already on the map, requiring much more stamina then method 1 but is less intensive as you can do combat however you want.
Entering: Enter the goblin layer through any entrance and just start fighting, kill the goblins inside the room (watch out for the ogre wearing clothes and equipping a butcher’s knife, high damage and can easily kill companions) but DO NOT talk to the girl you need to rescue in the Southern room where captives are held.
Wait until the timer counts down and clear out the room again.
Then you leave the room and clear the newly spawned goblins (note that traps also respawn) that are in the rooms leading to the cave entrance.
Once everything is cleared, go back to the goblin lair and talk to the blonde girl in the captivity room. You will get a CG (you can replay it) and she will follow you, do not rescue the other girls as it can bug the game (despawning, cannot talk to girl after escaping, etc).
Leaving: As the path should have been cleared of goblins and traps in both methods, exiting the cave is simple.
If you did method 2, just go to one of the exits and wait for the girl to arrive.
If you did method 1, go back to the tunnel to the West of the captivity room and wait here until the girl is nearby. If you head North Before this, the girl will head through the heart of the nest, leading to combat. Once she is near you, head North slowly until she is around halfway through the tunnel, at that point she should be able to path to you without issue.
Wait until she is within a 3×3 square below the ladder and exit the lair. Make your way back to the entrance of the cave, be aware that the pathfinding of the girl is bad so don’t go too far away from her or she makes strange decisions on where to move.
Once at the entrance of the cave, talk to the girl you rescued. She should start walking instead of crawling and you can now leave the caves. Make your way back to Noer and, once inside, enter one of the tiles to talk to the girl you saved. After this, go back to the Inn to hand in the quest.
– Tips:
You can pick up the lantern in the tunnel to the West of the captivity room by facing it and interacting with it.
The person/people you are rescuing needs to be within a 3×3 square of an entrance to follow you, but in effect is a 7×7 square if the ladder was in the middle of that square.
Companions block the person you are rescuing and visa versa. So if there is combat, tell the person being rescued to stay (interact with her until she confirms she is waiting). Alternatively, if the area is secure you can tell your companions to wait so they don’t block the (bad) pathfinding of the person being rescued.
The map acts like one big map, so telling your companion/person being rescued to wait means they will wait where they were told to wait even if you ‘leave’ the room. Using the ‘rally’ ability will remove this issue as it automatically sets the companion to ‘follow’, where they will then teleport to you.
There is no ‘quest failed’ if the girl dies, you just need to exit and re-enter the cave (note that it also re-spawns the enemies, traps, and chest). This also means you can’t ‘skip’ the quest by killing the girl and failing on purpose, although this might change in later updates.
N7. Orc Research
– Reward:
6 Large Copper Coins
+10000 XP
– Quest Location:
Noer, Elise’s Obstetrics and Gynecology Clinic
– Requirement:
Think you need to complete ‘Missing Daughter’ quest, not 100% sure. Can also be time based from when you first meat Elise.
– Rating:
Good quest (8/10)
– Guide:
Go to the clinic and talk to Noer about ‘Orc Research’ and accept the quest (recommend to hire Cecily and Grey Rat after this).
Once you have accepted the quest, exit Noer from the Northern gate and follow the road North. Go past North Pass Whistle Tower and then go East at the Society of Saints Monastery to the large trees in the rain forest.
Enter the tile in the forest with the big green tree , go south, and then talk to Elise.
Elise will offer ‘water’, accept it (you will not be raped, don’t worry) and once asked to pee, agree once more. In the case you refuse any of the requests, Elise will tell you to “GO TO HELL! JUST FkING DIE!” and become hostile to you (you can just leave and re-enter to change your choices).
After some lore about the goblins and orc-kind, a goblin group will appear and you must kidnap the baby by interacting with it (need to be outside of combat). You can do it stealthy or kill the goblins.
If you want to do combat tell your companions to follow you and kill the goblins. If you want to do stealth, you need to throw a lot of rocks or sprint to the South-East of the map and start there once you lost aggro.
Once done, make your way back to Noer and enter any tile to talk to Elise to hand over the baby and finish the quest.
– Tips:
Elise is a perma-death character. Meaning that if he dies, he is gone forever. His clinic will become abandoned and you can no longer buy operations, so try not to get him killed.
Elise is a fire mage that deals good DPS but is an artillery/support class and quite fragile. Due to fire magic having AOE attacks, Elise tends to friendly fire and cause companions to aggro on him.
You cannot enter the clinic while having the ‘stolen’ baby from this quest, probably to prevent you from selling the baby and messing up the quest.
N8. Milo’s Invite
!IMPORTANT! As of 0.3.8 you can spare Adam’s life if you have 15 wisdom, will verify this later
What leaving him alive will do
Judging from the game files, Adam is actually helping Cecily and Grey Rat defeat a major slave trading ring. Killing him helps Milo, a ruler who enforces peace through might, while leaving him alive helps Cecily, a naive idealist who wants to help the people. You choose which is better.
– Reward:
5 Large Copper Coins
+5 Morality
– Quest Location:
Noer, Inn: Mercenary Guild
– Requirement:
Complete following quests: N1, N2, N3, N4, N5, N6, N-R2, N3, & N-R4 (basically everything available in Noer)
– Rating:
Good quest (8/10)
– Guide:
When the quest is made available, the mercenary guild’s receptionist in the Noer Inn will get a green exclamation mark above his head. Talk to him to receive the quest, ‘Milo’s Invite’, and a Slope Temporary Visa. Clean yourself and make sure it is day time BEFORE heading to the Rudesin slopes.
Once ready, enter the Rudesin Slopes North of the square then go directly East to ‘The Golden Bar Club’ (large building with a purple roof). Once inside, head North to the end of the building. Talk to the person with blue eyes on the large couch. Talk to him again and accept the quest he gives. Leave the Rudesin slopes and then leave Noer through the North gate.
Follow the road North then East, continue East at the first intersection. Below the road 2 tiles before the next intersection is a grey-destroyed building, enter that building. Once inside, head East and a small cut scene will play. You have to kill the person with the sword and board combo. When you aggro him, you get some dialogue options but they will all lead to combat.
Using the doorway as a choke point is helpful to defeat them, sprinting away and de-aggroing them will cause them to return to the house so you can rest. When you kill Adam, he will drop his head that you need to pick up for the quest. Return to the ‘Golden Bar Club’ and talk to Milo to finish the quest. If he is not there, exit the bar and wait 1 day/night cycle then re-enter.
– Tips:
When you accept the quest to kill Adam, Grey Rat disappears from the Inn and Cecily states that they are “very busy these days” and is thus unable to be recruited. You can recruit them again when you have finished the quest.
You can bait the people in the house one-by-one using rocks to make the fight easier.
After completing the quest, Cecily will give a follow up quest and is unable to be recruited until that quest is completed
N9. Rescue Refugees
– Reward:
3 Gold Coins
– Quest Location:
Noer, Inn: Cecily
– Requirement:
Complete the one-time quest ‘Milo’s Invite’
5 days to pass after initially talking to Cecily
– Rating:
You can get much more money than the advertised reward by siding with Milo. You get 10 gold coins initially and 5 more upon completion of the quest, giving you a total of 15 gold coins.
Great quest if siding with Cecily (9/10)
Fantastic quest if siding with Milo (10/10)
– Guide:
After completing the one-time quest ‘Milo’s Invite’, talk to Cecily in the Noer Inn and she will tell you that she is planning something and needs you to come back in 5 days.
There are 2 ways to do this quest: siding with Cecily and siding with Milo.
[Option 1] Siding with Cecily
Wait for 5 days and talk to Cecily, select the first option to tell her you are ready and the quest will begin.
[Option 2] Siding with Milo
Note that if you choose to spare Adam’s life, you will not receive the letter and be forced to side with Cecily.
Wait 1 day/night cycle after initially talking to Cecily and the mercenary guild receptionist will have another letter for you, “Milo’s Invite 2”. Go to Milo in the The Golden Bar Club (he only appears during the day) and talk to him. Select the second option, then the second option again, then the second option once more (you also get a reward of 10 gold coins for doing so).
Wait for 5 days after initially talking to Cecily and talk to her again after that time, select the first option to tell her you are ready and the quest will begin.
After accepting the quest from Cecily, recruit Cecily and Gray Rat as your companions. Exit Noer through the North gate, follow the road, go North at the first intersection, continue North, at the second intersection continue North, after a while you will see an encampment on the road, enter the encampment by selecting the second option.
Head East then North. After the dialog, you have two choices: Stealth (Option 1, the choice on the top) and Loud (Option 2, the choice on the bottom)
Section 1 [Option 1] Discretion is the better part of valor (Requires a minimum of 3 scoutcraft)
Note that the people have a line of sight to the tiles on their sides, e.g. a person facing North can ‘see’ 1 tile to his West and East.
Go into sneaking mode (‘ctrl’) and head North until you hit the wall. Take one step to the East then throw a rock 2 tiles East of the guard (Moving to the East is unnecessary if you have the ‘Improve Throw’ trait). When the guard is distracted, follow the Western wall to the bushes and wait for the second patrolling guard to arrive.
Follow the second guard once he starts walking to the East. Stay close behind until you reach a relatively open area to the south, go South (you only have 2-3 seconds from when the guard stops moving) behind the pine tree until you reach the Southern wall.
Wait until you see the second Bandit with a dog start moving to the East, follow behind them East (be careful about the dog because it goes back and forward) Keep going East until you reach the wall, wait to the South East of the tree against the wall
Wait until the third Bandit stops then starts moving North. Go North. Stop if the fourth guard is looking West or South. When he isn’t looking in those directions, move up and throw a rock to his direct South-East. Move North then East past him (don’t get withing 1 tile of his sides).
Head South then East to the exit.
Section 1 [Option 2] Destruction is the better part of valor (Blue and red potions recommended)
Just move through the linear path while killing all enemies in sight. The only thing you need to be careful of is friendly fire, Cecily has low HP and can be killed easily. If Cecily is difficult to keep alive, tell her to stay where she is before moving through the path (Do note that the 2 mercenaries follow Cecily so you won’t have their help if you do this).
There are a total of 11 bandits and 3 dogs that need to be defeated: 3 bandits and 1 dog spawn at the exit when the timer starts and an additional 3 bandits and 1 dog spawn just east to the open area when the timer ends.
Go to the exit and enter the next zone, in this area you will no longer have the 2 mercenaries following you. Follow the linear path and, upon reaching a camp, dialog will play where you need to choose between stealth and non-stealth again. The choice you can take in this section is not affected by the choice you made in the previous section.
Section 2 [Option 1] They’ll never know what hit ’em (Requires a minimum of 3 scoutcraft)
Choose the first option and enter stealth mode. Head south until you reach the tent. Get ready to throw a rock to the West of the guard West of the fire below. Wait until the guard patrolling on the road stops and starts moving East. Once the guard on the road those that, throw the rock.
Quickly sneak behind the the person to the East of the fire and hit him once to knock him out. Walk (sneaking is not necessary for this part) to the guard on the road from behind and knock him out as well. If you are fast enough, you can knock out the third guard you baited earlier; if not, you can kill him through combat without issue.
Once the three guards are incapacitated, sneak again and knock out the guard next to the carriages by hitting him from behind. You can then run back to get Cecily and Grey Rat to follow you and you can kill the guards one by one or until the next section starts (don’t know what precisely triggers it, perhaps interacting with the carriages after everyone is dead/incapacitated?). Note that they only stay incapacitated for ~1 minute.
Section 2 [Option 2] The last thing they will see is death
Once again, this does not need much explanation, just head South and kill the 4 enemies guarding the slave transport. Cecily and Grey Rat should easily be able to handle this themselves.
Once all enemies are killed, head to any of the slave carriages and interact with it.
A scene will play after this section and what occurs depends on who you sided with.
[Siding With Cecily]
This occurs if you didn’t talk about Cecily to Milo or refused to divulge information.
Total reward for this path is 3 gold coins.
[Siding With Milo]
This occurs if you talked about Cecily to Milo and divulged information. Choosing the first option leads to Milo rewarding Lona with more money and the second option is Lona becoming angry at Milo for lying to her, causing Milo to order Lona’s execution (Lona gets shot and dies).
Total reward for this path is 15 gold coins.
– Tips:
You can get an additional 10 gold coins while siding with Cecily by selling her out to Milo AFTER the quest is completed (version 0.3.8)
You can still side with Cecily even if you talk to Milo; provided that you refuse to give him any information.
Siding with Milo unlocks a CG.
As of writing this (0.3.8.1.1), there is no punishment for going the ‘loud’ path so that path is recommended as you get more items from killing the enemies.
You do not actually need to read ‘Milo’s Invite 2’ to talk to Milo about Cecily’s plan.
If you decide to spare Adam’s life in the ‘Milo’s Invite’ quest, Adam appears as the mercenary helping Cecily. If you killed Adam, generic mercenaries will appear and comment on Adam’s sudden disappearance.
N10. Statue Of Leeruoi
– Reward:
Chest with randomized loot
+7000 XP
+5 Morality
– Quest Location:
Noer, Victory Square
– Requirement:
None
– Rating:
Bad Quest (3/10)
– Guide:
Enter Victory Square in Noer and talk to the person directly North below the pedestal.
Leave Victory square and head to the Noer docks. In the docks, head West and enter the last warehouse. Once inside the warehouse, a small cut scene will play.
Make a save and wait at the door until the first guard starts to head South after he stands idle near the crates.
Walk West to the small space between the wall and the crates and go North as quickly as possible. If the timing is perfect (not necessary to sneak past the second guard), you will avoid detection and can head West, where you will most likely be detected by the last guard.
As soon as you are detected, start sprinting to the Western most room and interact with the statue and the chest to the East of the statue.
Make an additional save (need at least half of the timer over) and sprint back to the entrance and leave. If you have the time, it is better to wait until the 2 initial guards are in the bottom rooms before leaving to greatly reduce chances of them blocking you.
Head back to Victory Square and talk to the person below the pedestal again to finish the quest.
– Tips:
The Deep One guards seem to have better detection then their human counterparts so sneaking is much harder. Hence why it is recommended to do this task without stealth.
Leaving and re-entering the warehouse re-rolls the chest contents.
The first 2 Deep One guards have an ability to jump to you, causing them to frequently block the passage.
Pirate’s Bane – One Time Quest
P1. Overlord M405 Cannon
– Reward:
+4000 XP
– Quest Location:
East Seven Sentry Point (Eastern Outpost)
– Requirement:
None
– Rating:
Decent quest due to being fun (7/10)
– Guide:
Leave Noer using the Eastern gate and continue East and cross the 2 Stone bridges and continue on the Road East. You will reach a stone tower between mountains with tents behind it, this is the ‘East Seven Sentry Point’ (which I call “Eastern Outpost”).
Enter the East Seven Sentry Point and head East. A solider will talk to you, enter the door he is guarding and go up the stairs on the West. Once on the roof, talk to the ‘Artillery Officer’ to the North and select ‘Offer help’ (You can say ‘Nevermind’ without consequence). You then have to interact with the artillery piece with a computer on it (the cannon in the middle).
The artillery piece play like an AC130 from Call of Duty by firing explosive rounds that causes damage to the aimed tile and the tiles around it (causes damage in a 3×3 area) while having a delay to reach the targeted location (~2 seconds, depends on distance) and a short reload (~3 seconds). The artillery is deadly to everyone so watch your aim. There are a total of 3 waves, each wave larger than the previous. To succeed you need to have at least 1 surviving soldier on the front line (the solider guarding the entrance counts).
Once finished, press ‘X’ to exit the cannon and talk to the artillery officer. You will receive 4000 exp as a reward and after a short skit you will be tasked with repairing the cannon. This quest is covered in the ‘Repairing Overlord M405 Cannon’ quest guide.
– Tips:
Failing this quest leads to the outpost being overrun and destroyed, locking out the special prostitution in this area (See ‘Sentry Prostitution’ job guide) and the ‘repair’ quest which has a CG scene.
If you want to assist a friendly fighting an enemy, aim behind the enemy to prevent friendly fire. Although friendly fire is not penalized so you can ‘sacrifice’ your allies if they are surrounded and about to die.
The barricades are good funnels but will be destroyed if you shoot them with the artillery so avoid shooting the barricades if possible.
On the first floor of the tower, there is also a letter on the table to the East containing Lore and you can talk to the Soldier there if you want to prostitute yourself, more info in the ‘Sentry Prostitution’ job guide.
P2. Repairing Overlord M405 Cannon
– Reward:
8000 XP
Unlocks Overlord M405 mini-game
– Quest Location:
East Seven Sentry Point (Eastern Outpost)
– Requirement:
Finished ‘Overlord M405 Cannon’ Quest
– Rating:
Debatable quest (6/10)
Decent if done together with ‘Mine Monster Cleanup’ quest (7/10)
– Guide:
Make your way to Noer and enter the ‘Central Noer Market’ at night. Walk to the North-West corner of the map, between the buildings and talk to the person standing on the carpet (blond hair, googles, blue eyes, etc). Talk to him about ‘Gunpowder Supplier?’. Before leaving for the mines make sure to hire adventurer(s) to help, I recommend the ‘Jobless Adventurer’ due to being well suited to fighting the infestation and has a lantern.
Leave Noer through the Eastern gate and make your way East on the road past the 2 stone bridges. Go North at the intersection after the 2nd bridge and enter the ‘Crystal Mine’. Once inside, make your way South-West and enter the cave system, Your companion should be able to easily deal with the enemies there, you can assist them by standing next to them to prevent enemies from ‘jumping’ to that tile and causing your ally to miss.
Blue crystals will appear in the walls at random locations, note that Lisa (the engineer) has to be nearby to reveal it. You can collect these crystals nodes by interacting the node and picking up the drops, one node will have 3 crystals inside.
After you collect 10 crystals, an ambush will occur shortly after and a scene will play for Lisa. You then need to find either 1 bug repellent (can be bought from Elise’s Obstetrics and Gynecology Clinic for 1000p) or 5 repellent Herbs (found in the wild or bought from the herb merchants for 300p a piece, found in the Central Noer Market). Once you have the required item(s), head back to the mine and enter the room to the South-West and talk to Lisa.
After Lisa is cured, head back to the East Seven Sentry Point to your East and talk to the Atillery Officer on top of the Tower about ‘Repair Cannon’. The reward talked about is for Lisa, not you, as you will only receive 8000 XP and the ability to play the mini-game anytime you want.
– Tips:
You can also speed up the quest by bringing 1 bug repellent or 5 repellent Herbs before leaving for the mine.
You keep the extra high quality minerals which you can sell.
The mini-game of killing deep-ones with the artillery piece is repeatable once this quest is completed, just talk to the artillery officer and select ‘Artillery’. Note that using the artillery system doesn’t seem to give any exp so has no purpose other then fun.
Doing this quest together with the ‘Mine Monster Cleanup’ quest gives more rewards for practically the same amount of work, doing so is highly recommended.
P3. Escort Travelers
– Reward:
1 Large Copper Coin
+2 Morality
– Quest Location:
Camping site in the road between Pirates Bane and East Seven Sentry Point
– Requirement:
None
– Rating:
Good Quest (8/10)
– Guide:
Enter the ‘Unknown Camp’ and walk East. An event will occur and you need to defeat 2 deep-ones (watch your stamina, their attacks mostly deal stamina damage). Once the enemies are killed, return to the traveler and talk to him. Accept the quest and leave the area.
Continue to follow the road North-East until you see a fortress (Pirates Bane). Go to the tile to fortress is located in and enter, it’s the same as entering Noer but with a different guard model. Once inside, talk to the traveler to finish the quest.
– Tips:
This quest is best done when traveling from Noer to Pirates Bane.
If you have the ‘Cannibal’ trait, you can butcher the corpses in the ‘Unknown Camp’ for meat.
If you don’t have the ID paper, you can buy a new one in Noer from the bandit at the harbor backstreet, sneak in if you have a high enough scoutcraft, or bluff your way in if you have high enough Wisdom.
You can fast travel between Pirates Bane and Noer by talking to the stable master (person next to horses in Pirates Bane and person manning the kiosk in the map next to the Eastern exit in Noer) and selecting the third option while having 2000p.
P4. The Evil in the Mass Grave
– Reward:
2 Large Copper Coins
+1500 XP
+1 Morality
– Quest Location:
Pirates Bane, Inn: Mercenary Guild
– Requirement:
None
– Rating:
Decent quest (7/10)
– Guide:
After accepting the quest, leave Pirates Bane and head East to the pond next to the road surrounded by forest, make sure it is night time. Enter the ‘Mass Grave’, follow the path (talk to the Gravekeeper if you want), kill all skeletons and make sure the area is clear BEFORE talking to the hooded figure.
Make sure you have a good amount of stamina (rest if you need to) and talk to the hooded figure. This will start a battle with a count-down timer, you have to survive until the timer ends. The best way to do this is to run around in circles along the map edges, using the carts to block enemies and break line of sight. The hooded figure will always know where you are and has 2 attacks: spawn/strengthen skeleton (looks like a red fire), and drain energy (most dangerous spell, does massive stamina damage, and looks like a green fire).
After the countdown timer ends, the hooded figure and the summoned skeletons will despawn. Make your way back to Pirates Bane Inn and hand in the quest to the receptionist.
– Tips:
It is practically impossible to beat the hooded figure for 2 reasons: before talking to him he will attack with his scythe if provoked that does 100+ damage a hit and in the count-down section he will summon too many skeletons to fight properly (the skeletons easily trap you if you fight, causing you to get hit by his drain energy spell, causing you to get ganked by the skeletons). You cannot win, run around instead.
A companion is NOT recommended as they will either aggro on the hooded figure and get themselves killed or block your path in the count-down section which can cause you to get trapped.
Treat this quest as a “learning to kite and run away” rather than a “fight against all odds”, it will make it much easier.
Bringing Cocona as a companion will trigger special dialogue from the hooded figure
P5. Message from North Point
– Reward:
1 Large Copper Coin
+1000 XP
+1 Morality
– Quest Location:
Pirates Bane, Inn: Mercenary Guild
– Requirement:
None
– Rating:
Good quest (8/10)
– Guide:
After accepting the quest, leave the fort and follow the road North. Just past the swamps is a bunch of barricades on the road, this is the Northern Outpost. Enter this tile.
Interact with the body once you are out of combat either through killing the goblins or sneaking past the goblins. A short scene will play where you are told to run away. You can do so and leave for Pirates Bane to hand in the quest.
– Tips:
The Necromancer and his summoned skeletons who appear after interacting with the body is not actually hostile to you and will nor attack unless provoked. This means that you can freely stay in the outpost while the Necromancer kills the goblins and vagrants for you, allowing you to pick up any dropped loot.
Completing this quest will cause the Necromancer to show up in the Pirates Bane Inn. He is currently a WIP (0.3.5.6.1) and does nothing other than cause people to aggro on him, where he proceeds to curb stomp them. If he doesn’t show up, you might have to complete ‘The Evil in the Mass Grave’ quest as well.
P6. Wetland Camp Assistance
– Reward:
+4000 XP
– Quest Location:
Outpost East of Pirates Bane
– Requirement:
None
– Rating:
Poor quest (4/10)
– Guide:
From Pirates Bane, follow the road East. You will reach an area with 2 guard towers and a camp in the ruins (Wetland Camp), enter the camp. Once inside, head North and a guard will talk to you; at the end of this dialog, a timer will appear wherein 5 additional deep-ones spawn from the waters to attack.
Defeat the total of 8 deep-ones. It is best to stay with the guards so the deep-ones aggro on them. Once the deep-ones are defeated, talk to the guard with the red bandanna and spear to complete the quest.
– Tips:
This quest is best done together with the ‘Gouge Out the Eyes!’ repeatable quest.
If the guard with the red bandanna and spear dies, the outpost will be overrun with deep-ones upon re-entry regardless of the other 2 guards surviving.
P7. Rescue the Maid
– Reward:
3 Large Copper Coins
+1250 XP
+6 Morality
– Quest Location:
Outpost to the East of Pirates Bane
– Requirement:
Complete ‘Wetland Camp Assistance’ quest
– Rating:
Awful quest (2/10)
Poor quest with ‘Lantern’ equipped (4/10)
Debatable quest with ‘Lantern’ equipped and 10+ blue potions (5/10)
– Guide:
Once you have completed the ‘Wetland Camp Assistance’ quest, talk to the guard with the red bandanna and spear again and select the second option. Accept the quest by selecting the second option again. Leave to the camp by going South. If you do not have the necessary supplies, head West to Pirates Bane to buy a Lantern and ticket back to Noer to buy blue potions from the clinic. You could also buy or forage White Dragon Weed (restores 10 stamina) in Pirates Bane if you want to take a big risk or, if you have the ‘Dark Pot’ ability, to craft blue potions (2 White Dragon Weeds per Blue Potion).
Follow the road going to the East and eventually North. Once you see the cave in the middle of the swamp surrounded by mountains, travel through the pine forest to reach it (avoid as many swamp tiles as possible, the swamps are difficult to escape and there is a deep-one war-band spawn point nearby). Enter the cave and head North.
[Puzzle 1] There will be a engraving on the wall with 4 tablets containing symbols to the East and West of it. The possible symbols are: D, Womb, Jumping Person, and Running Person. These symbols are the key to entering the deep-one lair.
The 4 corresponding tablets that need to be changed to match the symbols in the engraving are found on the walls to the North-East, North-West, South-East, and South-West of the room. Interact with these tablets to change the image. Once you match the symbols on the wall with the symbols on the engraving, a water vortex will open. Interact with this vortex.
Once inside the deep-one lair, head North. there will be a statute with 4 more engravings around it and a chest with randomized loot. There is another puzzle in this lair, identical to the one before, that needs to be completed to escape. Do this puzzle BEFORE rescuing the person to make it easier.
[Puzzle 2] Once you memorize (or write down) the required symbols; Starting from the middle of the altar, head south until you reach the large stalagmite (rock sticking out of the floor). Head West into the cave. Note: there are deep-ones in the waters and they will ambush during this puzzle.
Follow the Northern wall in the cave until you see a glow to the North, this is the tablet that corresponds to the top-left engraving. Change the tablet to the correct symbol.
Head South until you see another glow, this tablet corresponds to the bottom-left engraving. Change the tablet to the correct symbol.
Follow the Southern wall until you see another glow, this tablet corresponds to the bottom-right engraving. Change the tablet to the correct symbol.
Follow the Southern wall until you see another glow, this tablet corresponds to the top-right engraving. Change the tablet to the correct symbol.
Once the water vortex opens, head West to the area where prisoners are held. Talk to the girl with amber hair. Escort her to the water vortex (needs to be within a 3×3 square next to the exit to follow you, that means waiting for her). Staying within 3 tiles of her will help with path finding because being further away makes her more prone to going in the wrong direction.
Head South towards the exit, once close enough to the exit a green arrow will appear above the girl. Talk to her when this happens. Leave the cave and return to the Wetland Camp by following the road South. DO NOT cut through the swamps, it takes longer, consumes more stamina, and is more dangerous.
Once inside Wetland Camp, talk to the guard with the red bandanna and spear. This will finish the escort mission and you will be given +5 morality and a letter. This letter needs to be delivered to the Mercenary Guild’s receptionist in Pirates Bane to the West to receive the final reward of 3 Large Copper Coins, +1250 XP, & +1 Morality.
– Tips:
Deep-ones lurk in bodies of water and can be identified by a dark-blue circle moving in the water, similar to fish but bigger.
Kill deep-ones that spot you as fast as possible as they will start a count-down timer after a while, this includes the babies.
A more cost-efficient method is to frequently rest between engagements so you do not need to consume as many blue potions, but this requires you to bring a lot of food.
You can interact with the big fish piles (there is usually 2-3 in the prisoner area) to collect a total of 5 fish without any stamina cost.
If the countdown begins halfway through the second puzzle (you already matched the top and bottom left symbols), there should still be enough time to escape and there are no additional deep-ones spawning in the entrance room.
Being captured by deep ones to the East of Pirates Bane leads you to being a captive here, you need to complete puzzle 2 to be able to escape.
Doom Fort – One Time
D1. Escort Travelers
– Reward:
2 Large Copper Coins
+2 Morality
+10000 XP
– Quest Location:
Abandoned House on the road from Saints Monastery to Doom Fort
– Requirement:
None
– Rating:
Great Quest (9/10)
– Guide:
On the way to Doom Fort using the same road that goes to the Saints Monastery, you will see a tent and cart in the abandoned houses. Enter this tile.
When inside, head North and let the cutscene play. After the cutscene you get a dialogue choice, the second choice of ‘goblins are coming’ is only available if you have the nymphomaniac trait: taking this decision makes the homeless runaway so you do not need to fight.
If you do end up fighting, killing the 3 homeless people is easy enough. Once all 3 are dead, talk to the girl and accept her quest.
Continue North to Doom Fort and enter Doom Fort once there. In Doom Fort talk to the girl again to complete the quest and get your reward.
– Tips:
Best done when on the way to Doom Fort for the first time
D2. Pickpocket Quest
– Reward:
1 Large Copper Coin
+3000 XP
– Quest Location:
Doom Fort, Inn
– Requirement:
‘Milo’s Invite’ one-time quest not yet started
– Rating:
Meh quest (6/10)
– Guide:
Enter Doom Fort Inn, head North, and enter the Eastern most room. Talk to the person in armor and select the second option. After that, Leave the Inn and enter the barracks through the gate East of you (Select second option then second option again).
The target only spawns during the day, if it is night you can sleep (relatively) safely in the Eastern most side of the map near the wooden building. If you have companions tell them to wait on the Northern or Eastern edge of the map.
Head South then East from the entrance to the Sergeant (man with a cowboy hat and in his underwear, has a red arrow above him). Stand to the direct East of the Sergeant.
Throw a rock 2 tiles West of the Sargent and follow behind him, repeat this until you reach the wall. Note that he sometimes teleport back to his spot if he loses ‘interest’ so standing behind him is important to prevent him from backtracking to the previous rock.
Once you reach the wall, Make a save then hit the sergeant once to stun him and then pickpocket him (it’s a skill you need to equip to your hotkeys: Menu > Skills > Steal, at the bottom of the list). Stunning him greatly increases the chance of success.
Once you get ‘success’, a key-card looking item will drop to the ground, pick that item up and return to the quest giver in Doom Fort Inn (it seems to drop in a random direction and can sometimes be a bit hard to see, but it does drop).
Return to the quest giver and avoid going to the barracks for a time as the sergeant will be temporarily hostile to you.
– Tips:
Success rate for stealing depends on your scoutcraft skill and how many NPCs detect you (NPCs that see you will reduce success chance even if they are not the ones being pickpocketed)
Talking to the Sargent and selecting the second option has a reference to a movie and gives you +3000 XP (selecting the first option gets you punched).
Having Cecily as a companion allows you to skip the check by the barrack gate (not that it matters that much anyways).
Upon completing the quest, the quest giver states that he has another job for you in 2 days.
By completing this quest you get an additional choice during ‘Milo’s Invite’ one-time quest.
D3. Steal A Gun [TBD]
– Reward:
2 Gold Coins
1 Musket
+7000 XP
– Quest Location:
Doom Fort, Inn
– Requirement:
‘Pickpocket Quest’ to be completed
2 day cycles to pass after completion of ‘Pickpocket Quest’
– Rating:
– Guide:
After robbing the Cowboy man and giving Adam (In Doom Inn’s western room) the ticket, Adam says that in 2 days he’ll have another job for you.
The job is stealing a rack of musket prototypes.
They can be found in the tower just a few squares south-east of Doom Fort.
Use option 2 to get in (not sure what it means since it’s all in Chinese).
Once you’re there; open the door, to the left of the counter, and go behind it.
There will be a door, on your left, leading to a set of rooms, stairs leading up and a guard intently staring at the wall.
The guard is surprisingly vigilant.
Ignore the stairs up and just go through the door.
Sneak past all the patrolling guards.
Use rocks to lure them away.
Make your way to the last room to the east.
There’s a rack with muskets there, on the wall, and a chest with random crappy loot.
Make your way out secretly.
If detected on the way out you can just sprint past the guards, to the door, and out.
No morality damage if you don’t harm the guards and detection on the day out will not result in quest failure.
Bring the muskets to Adam (He’s chilling in his usual corner in the Doom Inn western room).
D4. Eastern Checkpoint Assistance
– Reward:
2 Halberds
+1 Morality
– Quest Location:
Eastern Checkpoint (East of Doom Fort)
– Requirement:
None
– Rating:
Meh quest due to weight of reward (6/10)
– Guide:
Starting from Doom Fort, follow the road South then go East at the intersection. You will reach a barricade on the road with the ocean to its North and mountains to its South, enter this tile.
Head East inside the tile and talk to the crusader looking person. He will tell you that they are being overwhelmed and need reinforcements. Head back to Doom Fort.
Enter Doom Fort, go through the second gates to the East, then North to the Barracks. Talk to the person directly North of the barracks behind the table with books. You must then go back to the Eastern checkpoint. Once you enter the Eastern checkpoint, talk to the crusader looking person again. He will assign you with the task of loading the cannons.
Load the cannons by entering the shack and picking up ammunition directly East (you can only carry one pile at a time), heading back outside, and loading the cannon by interacting with it. Do this to both cannons and after a while, a cut scene will play where 2 additional ‘super’ enemies will show up.
[Method 1] Give a good pounding (Weapon Expert / Mana Knowledge trait)
Start off with ranged (throwing knives do little damage so use a bow) or magic to target the super abominations as there is little risk of friendly fire at the start. Note that these enemies have ‘grabbing’ tentacles that pulls you next to them so maintain a large distance. Once they get close to the guards, run East so they de-aggro on you and aggro on the guards instead.
Once they aggro on the guards, join the ganking of the abominations with a melee weapon (avoid ranged attacks as friendly fire will spell trouble for you) and spam the attack button. Because there are 3-4 people attacking at the same time, the super abomination jumps from target to target and is thus rendered ineffective. Once the super abomination you are ganking is at low health and starts showing the ‘scared’ affect (3 blue water drops) it will stop attacking and try to run. It is then safe to focus on the other abomination as the guards will finish it off.
[Method 2] Receive a good pounding (Succubus trait)
Rush one of the super abominations that spawn and hit it once to try and stun it (not strictly necessary, but helps). Then use your sex attack on it. While you are busy killing this super abomination, the guards will handle the other one. It is necessary to be as far away from the guards as possible so they do not interrupt your sex attack by dealing damage to the super abomination.
Once the super abomination is juiced to death, participate in the ganking of the other super abomination with a melee weapon (sex attacks are ineffective because it will get constantly interrupted).
Once the 2 super abominations are dead, a small cut scene will play and you will receive your reward.
– Tips:
The abomination enemies continuously re-spawn the first time you enter this area so helping them fight does nothing.
Halberds weigh 36 each (total of 72) so have carrying capacity before doing this quest, this reward is the equivalent of 2 large copper coins.
The Eastern Outpost will have a constant attack of re spawning enemies before and after the quest’s completion.
(as of 0.3.8.1) If all guards are defeated, you can leave and re-enter the map to ‘restart’ the mission, this will most likely change.
D5. Love Letter
– Reward:
1 Big Copper Coin
1 Small Copper Coin
+2000 XP
– Quest Location:
Doom Fort, Barracks
– Requirement:
None
– Rating:
Bad quest with ‘Tough’ personality (3/10)
Poor quest with other personality (4/10)
– Guide:
Note that it has to be night for the guards to spawn in the barracks. Starting from initially entering Doom Fort: head through the gate to the East, go North into the barracks, go East to the sleeping area, find the soldier with a green arrow above his head ( if he is not there, wait until the next night as the guards sleeping are changed), and talk to him. Select the second option after the quest description is presented to accept the quest.
Go to Noer, recommend using the Town Relay (fast travel system) by talking to the station employee (outside the Inn to the East). In Noer, starting from the Eastern gate: head West until the road turns North, head South through the buildings, turn 1 tile West then East after you reach the coast, and enter the tile with the red house (same building model as the Clinic).
After the small interaction, you need to head back to Doom Fort using your preferred method. Talk to the guard again, if he is not there go to the next night as the people sleeping are on a ‘rotation’. You have the option to lie or to give him the letter.
[Option 1] Telling John the Truth
Giving him the letter will cause him to become berserk upon learning that his uncle cucked him, causing him to become hostile to everyone. You will then receive a XP reward of +2000 XP after the dialogue ends.
Run away as attacking him will still be counted as assaulting a guard, giving you a morality malice.
[Option 2] Lie to John (‘Tough’ personality is unable to choose this option)
Doing this will end the quest more peacefully as John just becomes very sad instead of becoming berserk and rewards you with +4000 XP.
– Tips:
You could just accept his quest but never complete it as he gives you the monetary reward as a down payment.
Using the recommended tip of utilizing the Town Relay will essentially remove all monetary rewards from this quest as it costs 2000p to use (roughly 1 big copper coin and 1 small copper coin). Using the Relay twice will result in a net loss of 1 big copper coin and 1 small copper coin but saves a lot of time.
D6. Woodson Family
– Reward:
9 Big Copper Coins
+10000 XP
+1 Morality
– Quest Location:
Doom Fort, Inn
– Requirement:
None
– Rating:
Decent Quest (7/10)
– Guide:
Note that this quest is significantly easier with a melee companion, but you would need to hire one from Noer. An easy way to do this is with the fast travel system available in both Noer and Doom Fort.
After accepting the quest, leave the inn and talk to the old woman walking around the street with an exclamation mark above her head. You can get some lore from her.
Leave Doom Fort and head South, eventually you will a farmhouse in the forest behind the mountains. Cross the mountain range, into the forest, and enter the farmhouse.
Follow the road in the map BUT be wary of traps as the ground is full of them. At the end you will reach a barricade and passing that barricade will cause dialogue to play. From here on out there are 2 options: Capture or fight.
[Option 1]: Drink the Kool Aid (Capture, requires 20 Wisdom)
This one is a longer journey, once arriving at the Woodsons some dialogue. Talking to them will cause them to offer stew, accept the ‘kind’ gesture. Once you finish the first portion, accept the desert.
After getting captured and raped, you are now in the captivity of the Woodsons and must do tasks during the day and ‘satisfy’ Fat Bray during the night.
Note that going too far West and getting too close to the barricades will cause them think you are trying to escape and attack you.
Each day you get ’embraced’ by Fat Bray, have ‘dinner’, do a task for the Woodsons (weeding, feeding the chickens, ‘cleaning’ the Woodsons Family). Once that is done, you go to sleep (where Frat Bray ‘cuddles’ with you) and start the night.
Each night you get punished for not completing tasks fast enough (if the timer ran out or you skipped a task), ‘romanced’ by Fat Bray (If you did not complete your task on time or at all), and then you try to sleep; then the day begins anew.
When you want to end this cycle, just talk to Fat Bray during the night and convince him to overthrow his mother (You need 5 Wisdom for the first choice, 10 for the second, 15 for the third, and 20 for the last option).
Go through one last day and Fat Bray will kill the Father and Mother, then you will asasisnate Fat Bray in his sleep.
[Option 2]: Only good commie is a dead commie (Fight)
This one is quite simple, you can just attack them outright or have a meal with them ONCE (don’t accept the desert offered) then attack. Or have Cecily as a companion, this will automatically cause a fight when Grey Rat states that he knows the woman.
There are 4 people you need to defeat: Jim Woodson, the woman, the dog, and the fat dude crawling in the field. The only real danger is the dog due to its high DPS. Once the dog and Jim Woodson are killed, the other 2 will just run away from you instead of trying to fight.
Once the Woodsons are defeated, there are 2 locations of interest and that is the House and the Shack. The house has a note in the bedroom all the way North then West called ‘Jim Woodson’. The shack similarly has a note North and a bit West under the closet called ‘My Suicide Note’.
There is also a chest outside directly next to the Western wall of the House and is used to store your stolen gear if you chose option 1.
Once done, return to Doom Fort and talk to the old woman on the street and select the second option to get the completion token. Then head back to the Inn to complete the quest and receive your reward.
– Tips:
You can delay killing them and instead use them as a source of food as there is no consequence of accepting 1 meal and leaving.
Doing option 1 without the quest leads to Fat Bray taking over the farmhouse.
Not much a tip but this quest is based on the famed cult leader James Warren Jones (a.k.a. Jim Jones) who caused the Jonestown mass suicide.
The family dog aggros on everyone so moving back a bit will cause the dog to aggro on the Woodsons instead, handy.
Having Cecily and Grey Rat as a companion unlocks extra dialogue during the quest.
After completing the quest, the old woman will run off to the Woodsons’ farmhouse. However, returning to the location will reveal that it has been overrun by goblins and the old woman is nowhere to be seen.
666. Rabbit of Caerbannog
– Reward:
Chest with Randomized Loot
+5000 XP
– Quest Location:
Cave in the mountains to the North
– Requirement:
None
– Rating:
Decent quest (7/10)
– Guide:
There are 3 ways to do the quest: Divine Intervention, Oh God Oh Fk, and Do It Like The Charlie’s Did
[Method 1] Divine Intervention (easier)
Exit Noer through the North gate and follow the road North. Once you reach the refugee camp area, enter the ‘Society of Saints Monastery’ (the church) and buy ‘Holy Water’ from the Priest to the North. Leave the church
Now continue following the road and go East at the intersection above the church. Continue East until the next intersection where you go North. You will see a mine in the mountains (the big door), enter this mine. Inside the Mine, talk to the person next to the tent and select the third option.
Go East into the cave and get near the rabbit. When the rabbit aggros on you, run back West and try to get the rabbit to step on the tile with the holy water. Once this happens, the rabbit will slip on the holy water, bump his head, then explode. A chest will drop but the people there will not let you take it because they believe that they did all the work and deserve the loot.
[Method 2] Oh God, Oh Fk (harder)
This method requires the ‘Weapons Expert’ trait as you need a longbow.
Exit Noer through the East gate and follow the road North. Keep going North until you see a mine in the mountains (the big door), enter this mine. Go East and stand behind the crawling man. Face the rabbit and use your ‘Control’ weapon ability (‘Snipering’ with your Longbow). You can use it a maximum of three times before the rabbit closes the distance. If the rabbit hits you, you are Fked because it shows no mercy, hence the name of this method.
Run back to the mercenaries and run around them until the rabbit aggros on them instead. Just stand right next to the exit and hope they take the fight to the East so the rabbit doesn’t aggro back on you once it kills everyone, you can also hide using stealth if you can. Once the rabbit return to it’s lair (or the NPCs somehow managed to kill the rabbit), repeat the strategy used before to finish it off, it takes ~4 hits in total to kill the rabbit. If the NPCs are, somehow, still alive they will claim that they deserve the loot and will not allow you to take it.
[Method 3] Do It Like The Charlie’s Did (You can get blown up to kingdom come)
This method requires 2-3 frag mines and 9+ frag bombs that can be bought from Lisa in the market at night.
Exit Noer through the East gate and follow the road North. Keep going North until you see a mine in the mountains (the big door), enter this mine. Once inside, go East until the rabbit and get close enough for it to aggro on you. Run West so the rabbit kills the person crawling, once he is dead, set a frag mine horizontal to the rabbit (select it in your inventory and press ‘space’, make sure to sprint while presings a directional key when exiting the menu or you will blow yourself up) and place 5-6 frag bombs around it (select it in inventory and press space).
Set another trap behind you for the NPCs for when they try to steal your loot by pacing 1 frag next to a person (they move towards the cave) and place 1-3 frag bombs next to each person or by placing a similar trap to the one above but near the entrance of the cave.
Killing the rabbit and NPCs in 1 go is a bit RNG dependent as the blast can knock people backwards or forwards and that determine show many more explosives will hit them. To remove some RNG, set another trap or use even more frag bombs. When ready, get the rabbit to aggro you and run past your trap(s) and let the bunny go boom. The NPCs should follow suit shortly thereafter. If the rabbit didn’t die, set another trap: same goes for the NPCs.
Kill the NPCs. They surround the chest if you interact with the chest once and become hostile to you if you interact with the chest a second time (this also makes stealth nearly impossible). The danger is that the map is narrow so baiting them one by one using rocks is recommended or using an aoe attack when they are grouped together after interacting with the chest once (you can use a bomb which can be bought from the Noer market at night from Lisa to the North-West).
Get your reward from the chest, the chest content is randomized and you have to exit and re-enter the map BEFORE killing the rabbit to re-roll the contents.
– Tips:
“Run Away!” – King Arthur
For method 1 when you already laid down the holy water, an easier way to kill the NPCs is to get them to aggro on you by attacking them and then luring them to the rabbit, where the rabbit will rip them apart.
After this quest is done, the mine will become infested with goblins once you leave the mine and re-enter.
Noer – Repeatable Quest
N-R1. Collect White Dragon Grass
– Reward:
2 Small Copper Coins
+2000 XP
– Quest Location:
Noer, Inn: Mercenary Guild
– Requirement:
None
– Rating:
Bad quest (3/10)
– Guide:
Exit Noer from the Eastern gate, cross the bridge to the East, enter the rain forests below (next to the water).
Look for ‘White Dragon Weed’, which look like tall grass/hay/rice, and stand on top of it and press enter/z. When you have low wisdom, you only get 1 White Dragon Weed per map so you have to exit and re-enter.
After getting 4 White Dragon Weeds, go back to Noer and enter ‘Elise Obstetrics and Gynecologist’, the building on the top right of the large square road area (small red building with a chimney). It is only open during the day (press ‘ctrl’ to skip time without stamina cost in the world map if you need to wait). When inside, go directly North and talk to the person behind the counter.
After handing in the herbs, head back to the Inn to complete the quest.
– Tips:
More info about gathering in the ‘job guide’ under ‘gathering’
Watch out for boars, they are dangerous and can easily stun lock you although killing them gives a lot of meat.
Gathering any material (other than wood) costs 3 stamina. However, equipping a sickle while gathering will reduce that cost from 3 to 1 stamina.
Higher wisdom increases the amount of herbs that spawn on the map. Glasses, which can be bought from the magic merchant above the dock during the day, is an easy way to increase Wisdom (although the glasses by themselves have a limited affect).
N-R2. Mine Monster Cleanup
– Reward:
1 Large Copper Coin
+3800 XP
+1 Morality
– Quest Location:
Noer, Inn: Mercenary Guild
– Requirement:
None
– Rating:
Meh quest (6/10)
Decent quest with ‘dark cauldron’ or ‘omnivores’ trait (7/10)
Good quest with ‘dark cauldron’ and ‘omnivores’ trait (8/10)
– Guide:
Hire a companion: Jobless Adventurer is recommended due to his AOE attacks and lantern. Do NOT hire additional adventurers with Jobless Adventurer as they WILL get hit by the Jobless Adventurer, causing a free for all. A lantern is also highly recommended, so you can see.
Exit Noer through the Eastern gate, head East (cross the 2 bridges), then head North, and then enter the mine (door surrounded by mountains).
Talk to the ‘pit manager’ in the room to the West, leave the room then go South, and then all the way West to the wall. At this point you will have to navigate the maze that is the infested mine.
Your companion will wreak havoc in his path and you just need to pick up the meat (you can easily get 40-80 ‘mutant flesh’). If the adventurer runs out of energy (starts crawling) run away to an already cleared area and sleep there, this will restart the map and the adventurer’s stats.
Do this until all ‘spores’ in the mine is destroyed, the stationary, pulsating sacks of meat (Lona will have dialogue when all spores are destroyed).
Talk to the pit manager again and then return to the inn to hand in the quest.
– Tips:
Save frequently, a lot of things can go wrong so always have a point to revert back to.
There are 5 things you need to be careful of: small enemies (moves quickly and ‘jumps’ across characters, stand behind your companion to stop the small enemies from jumping), spores (looks like a ball of pulsating meat, releases several enemies upon damage or being too close), red floaters (floating balls of meat that explode upon death, dealing big damage and leaving a pool of deadly acid), tendrils (large tentacles from the ground, attack at range or set fire to them) and Jobless Adventurer (his whip is an AOE attack and getting hit causes a stun/slow-down effect which can get you swarmed).
Monster meat can be made into smoked mystery meat using dark cauldron which can be sold for ~75p a piece as opposed to the 10p a piece for monster meat. Recipe is an even number of monster meat and 1 log, every 2 pieces of monster meat gives 1 smoked mystery meat.
Alternatively, you can eat the raw monster meat amd/or the smoked mystery meat with little penalty if you have the omnivores trait.
N-R3. Undead In Cemetery
– Reward:
7 Small Copper Coins
+3800 XP
+1 Morality
– Quest Location:
Noer, Inn: Mercenary Guild
– Requirement:
None
– Rating:
Decent quest (7/10)
– Guide:
Hire a companion: personally recommend Cecily and Grey Rat or the Jobless Adventurer.
Enter the cemetery (West of the Northern gate, in the walled off district) and walk around the cemetery. Your companion will aggro on any skeletons and kick their ass.
Be careful of bone piles on the ground as those are ‘sleeping’ skeletons. They will turn into a skeleton and attack if you step on them or deal damage to them.
After 20 skeletons are killed, Lona will have some dialogue to state that fact, go to the ‘Gravekeeper’ near the entrance and talk to him.
Make your way back to the Inn and end the quest by talking to the guild receptionist.
– Tips:
If there are skeletons with shields, attack them so they aggro on you and starts chasing you. This allows your companion to bypass the shield block move and kill them faster.
Skeletons mostly drop rag clothing, which is practically worthless, but also have a very small chance to drop weapons.
N-R4. Squatters In The Sewers
– Reward:
1 Large Copper Coin
+3000 XP
+1 Morality
– Quest Location:
Noer, Inn: Mercenary Guild
– Requirement:
Although it states ‘One-Time’ it does reappear:
13 day/night cycles to pass from finishing tutorial or last completion of this quest.
– Rating:
Poor quest (4/10)
Meh quest with Weapons Expert/Mana Knowledge/Succubus trait (6/10)
Decent quest with companions hostile to criminals (7/10)
– Guide:
After accepting the quest and hiring companion(s) you want , exit the Inn and head North-West. The entrance to the sewer is the same to where you left the tutorial quest, the grate directly South-East of the Northern gate.
Once inside, your goal is to kill all homeless people in the sewer. Without a combat trait or companions, it will be difficult because of the amount of enemies and their HP: take a lot of food and/or blue potions to have enough stamina to kill all of them (everyone respawns once you leave the sewer and re-enter). If you have Companions and/or a combat trait, the quest will be a breeze.
When all the homeless are killed, Lona will have a short dialogue stating this. Head back to the Inn and hand in the quest.
– Tips:
The homeless are in the ‘criminal’ faction so companions not hostile to that faction will only attack them if you attack first. Hence, Cecily & Grey Rat is the best choice; the dog companion can be made hostile to this faction as well so it is also a good choice.
As the homeless only do 1 damage to basically everyone, their biggest danger is their fast attacks which can stun you and cause you to lose a lot of stamina.
The homeless have a tendency to run away from ‘strong’ companions, cornering them with your companions makes them significantly easier to kill.
N-R5. Only Thing They Fear Is YOU
– Reward:
1 Large Copper Coin
5 Small Copper Coins
+3000 XP
+1 Morality
– Quest Location:
Noer, Inn: Mercenary Guild
– Requirement:
One-time quest ‘Missing Convoy’ to be completed
– Rating:
Poor quest if high world difficulty (4/10)
Meh quest (6/10)
Decent quest with companions (7/10)
– Guide:
Firstly, make sure you have enough food as you will be in the wild for a few day/night cycles.
After accepting the quest, exit Noer through the North gate and follow the road East then North once at the intersection. Stay on the road South-East of North Pass Whistle Tower.
A goblin war band spawns nearby and will attack you if you are in this area, which is what we want. Just pass time on the world map using ‘Ctrl’ so they reach you.
When you kill the goblins, they have a chance to drop their ears, pick them up.
Once the war band is killed, wait around for the next one to spawn and repeat until you have enough orkind ears (10).
Head back to Noer after you have 10 ears.
– Tips:
You can also do this by entering the goblin next in North Pass Whistle Tower so you can get additional loot from the chest with randomized loot. This also takes less time as you can just exit and re-enter the tower to spawn more goblins. You can use any nest you want but North Pass has the easiest layout in my opinion.
Higher world difficulty makes this quest significantly harder as the warbands start spawning with ogres and armored goblins, be wary.
Pirate’s Bane – Repeatalbe – LonaRPG Walkthrough
P-R1. Gouge out the Eyes!
– Reward:
5 Small Copper Coins
1 Large Copper Coin
+1500 XP
+1 Morality
– Quest Location:
Pirates Bane, Inn: Mercenary Guild
– Requirement:
None
– Rating:
Decent quest (7/10)
– Guide:
Once you have accepted the quest, leave Pirates Bane and follow the road West. Go off the road and continue west through the swamp. Then make your way to the Plainfields West of the swamp. The 2 Southern-most Plainfield tiles (just North of the Pine Forest) is close enough to a Deep-One war band spawning point to get them to spawn.
Wait on this tile by pressing the ‘ctrl’ key and enter the encounter. Once inside the encounter, kill the Deep-Ones while collecting the eyeball drops (similar to the tutorial quest).
Head back to Pirates Bane through the same way you came (avoid going South so you don’t get attacked by Deep-Ones in a swamp tile) and hand in the quest.
– Tips:
You can bring along the ‘Addict Mercenary’ (spear man below the 1st bedroom in Pirates bane Inn) if you need assistance with killing the deep ones.
Alternatively, you can hunt for deep-ones in the swamp or by entering the deep one caves but the former method takes much longer and the latter method is much more dangerous.
Deep-Ones are focused on doing stamina damage, meaning that getting attacked by more than 1 Deep-One at the same time can easily lead to a stun-lock and subsequent defeat. Make sure to have enough room to retreat and potions/herbs to restore stamina.
Crawling Deep-Ones are difficult to kill and highly dangerous due to the fact that they jump a lot, they are most easily countered by spears and open areas or having a companion aggro them instead.
World Map – Repeatable – LonaRPG Walkthrough
W-R1. Escort To Town Of Noer
– Reward:
1 Small Copper Coins
+5 Morality
– Quest Location:
Random event that occurs on the world map away from Noer, seems to occur more frequently in refuge camps (tents around outposts).
– Requirement:
None
– Rating:
Debatable quest (5/10)
– Guide:
Once you have accepted the quest, you have a 5 day limit (i think) to make it to Noer, the refugee (only 1 spawns) will act like a companion and is able to be killed by enemies, failing the quest. Once you are in Noer, enter a map and talk to the person you are escorting and this will complete the quest.
– Tips:
You can pay 2000p to the stable master in Pirates Bane to go to Noer instantly and hand in the quest if you are nearby.
You should only take this quest if you have low morality or are planning to go back to Noer within 5 days, there are no repercussions to denying the quest other then feeling bad for them.
Job Guide – LonaRPG Walkthrough
Waitress
– Job Location:
Noer Inn, Boss Mama
– Requirement:
Boss Mama is alive
– Rating:
Bad quest (3/10)
– Guide:
Talk to Boss Mama (big woman on the bar counter), select jobs>waiter>confirm.
As soon as the job starts, go to the customer with a red arrow above them. You only need to be in a tile next to the customer and facing and facing him, there is no need to interact with them. Go back to the counter in front of Boss Mama to pick up the next order. Repeat this until the job is done, you need to do a total of 10 orders. Customers include all people in the first floor, so if you cannot find the customer move to the Eastern side of the room (that area is dark and makes difficult to see the dark red arrow).
Time is money in this quest and how much time you take affects the outcome: Boss Mama pays the full amount of 2 small copper coins and ~100p (10 orders with more then half of the time remaining), Boss Mama gets angry and pays you 1 small copper coin (10 orders with less then half the time remaining), Boss Mama beats you up and kicks you out without payment (less than 10 orders and time runs out).
– Tips:
Sprinting while serving the drink prevents patrons from being able to grab you and remove clothing/ molest you. You can walk for most of the quest and sprint when you are about to serve the customer to prevent groping and potential loss of equipment. Although being groped does increase the rewards, the gain is negligible and can be ignored.
To reliably get the maximum reward requires continuous sprinting which averages at a 40-50 stamina. A reward of ~460p does not allow you to get that stamina back in food, making it quite a bad job.
Working while lacking clothes (either by working naked or having your clothes removed by customers) causes patrons to molest Lona and can cause them to aggro on Lona and start attempting to rape her.
Being molested within Boss Mama’s view causes Boss Mama to aggro on the molester, this will usually cause a bar fight and make completing the quest near impossible. However, you can abuse this by removing all equipment (better to leave pants OR shirt on to prevent too much aggro) to get NPC’s to aggro on you in front of Boss Mama and pick off the loot (re-equip all your equipment before this so no new enemies aggro on Lona); this is best done early on as you are basically guaranteed to get kicked out by Boss Mama for failing the quest. This tactic is the reason the quest is a 3/10 and not a 2/10.
A more difficult method to the above is doing the tactic above on your 9th customer by only removing your clothing before serving the 9th customer. This is more RNG dependent but has much more rewards as you can stay inside as the brawl progresses. The RNG comes from the 10th customer as you cannot serve customers who are fighting so the 10th customer has to be uninvolved in the brawl. The game does switch customers if they are fighting but this takes a while and can even switch to someone already fighting so time can run out quickly.
This method is also the most reliable way to get Boss Mama killed (her husband will take over and reduce the price of all soups to 10p but remove the waitress and dancer job) if you so desire. Do note that Boss Mama does play a role in the story, namely the ‘Cemetery Negative Energy’ quest, and I am note sure if her husband replaces her in that regard so be aware that you could lose out on some (small) quests or lore if you choose to kill Boss Mama.
Dancer
– Job Location:
Noer Inn, Boss Mama
– Requirement:
Boss Mama is alive
– Rating:
Meh job (6/10)
Decent job with ‘exhibitionist’ trait (7/10)
– Guide:
Unequip the following gear: ‘Head’ (unless you have a pony tail), ‘Top’, ‘M-Arm’, ‘S-Arm’, and ‘Mid-Ext’
Talk to Boss Mama (big woman on the bar counter), select jobs>dancer>confirm.
On the stage, run/sprint (depends on how much stamina you want to spend) to the tiles with a dotted green outline. After a while, the audience will throw coins at the stage which you can collect by walking over it. The coins stay for ~8 seconds before disappearing and each coin is worth 200p.
Taking too long to go from dance square to dance square or having a low ‘sexy’ stat causes the audience to boo and throw stuff at you. Stepping on a tile with a thrown object will stun you for approximately a 1/3 of the timer, so waiting for the object to disappear is better. Find the balance between picking up coins and dancing.
How long you dance depends on how much the audience ‘likes’ you, doing a good job means longer dancing which means more money, However, this causes the audience to get excited and attempt to gang-rape Lona (For a guesstimate earning 3000p or more triggers this) while Boss Mama bails so she won’t defend you. Try to have 10-20 stamina at the end of the job or a ‘blue potion’/’white dragon grass’ to replenish stamina to run away from the ‘excited’ crowd (escaping to your room or leaving the Inn will reset aggro).
At some point, the dance squares will disappear and this signals the end of the job, you must now wait for the timer to end. While waiting, re-equip your clothes and weapons to decrease your weak stat so people don’t try to attack you.
Payout for this quest is 1 small copper coin for every 600p earned (e.g. getting 3800p gives you 6 small copper coins) not sure how the left-over P is calculated but you normally get below 200p left.
– Tips:
On average, you earn 4-6 small coins (720p-1080p with 0 Wisdom) for practically all your stamina, making the gains minimal.
Decline the requests of ‘masturbation’ (think there was another one but can’t remember) because it consumes way too much stamina.
How well the audience reacts and pays you also depends on your ‘sexy’ stat.
Having the ‘exhibitionist’ trait makes you gain mood rather than lose mood during dancing.
If a dance square is directly in front of a person, said person has a chance to molest Lona when you enter the dance square.
There is a special clothing set ‘Dancer Clothes’ which can be bought from the The Golden Bar Club or the ‘Shekels’ Merchant.
If you don’t care about Lona being gang-raped, buy a ‘Buring Keg Room Key’ before starting from Boss Mama so you aren’t kicked out with -100 stamina after fainting.
Gathering [Under Construction]
– Job Location:
Practically anywhere on the world map, more specific areas in the ‘Tips’ section
– Requirement:
None
– Rating:
Meh job (6/10)
Good job with ‘sickle’ and ‘glasses’ equipped (8/10)
Great job with ‘Dark Pot’ trait and ‘sickle’ + ‘glasses’ equipped (9/10)
– Guide:
Exit Noer using the Eastern gate for easier access to the following map types: Rain Forest, Plainfields, and Mountains.
Exit Noer using the Northern gate for easier access to the following map types: Pine Forest, Corrupted Land
Enter desired map type and search for gather-able materials, herbs are worth the most money and food is useful to extend amount of time able to be spent there (1 ‘raw’ food replenishes the food bar by 5 points).
Once you have gathered all the desired plants in one map, exit the map and re-enter (you do not need to change tile) to get a new map.
If you have the ‘Dark Pot’ ability, you can make ‘Dry Meal’ out of food plants to increase food gain or sell for more money (recipe is even number of any plant-food, you can mix and match, and 1 wooden club: for every 2 foodstuff you get 1 dry meal). Alternatively, you can make ‘vegetable soup’ by removing the wooden club but these sell for next to nothing. In addition, you can also make medicine from the herbs, recipes will be in the tips section for their unique herbs.
If you decide to hunt the local fauna, you can make ‘smoked meat’ (recipe is even number of any meat, you can mix and match, and 1 wooden club: for every 2 foodstuff you get 1 smoked meat) or meat soup if you remove the wooden club. Note that mixing ‘undesirable’ meat (meat with a red warning on it: human meat, monster meat, etc) will cause all the end-product to be ‘smoke mystery meat’ which is worth much less.
Once you have gathered enough, return to Noer and sell your plants to the bank (East of the Inn) as they offer the best price for coins or directly to a merchant you want to buy from.
– Tips:
You can gather wood (wooden clubs) from basically any tree in a map by facing it and interacting with it. Harvesting wood has a high stamina cost (-15 stamina).
Gathering any material (other than wood) costs 3 stamina.
Higher wisdom stat increases the amount of herbs that spawn on the map, buying glasses (2000p) from the magic merchant above the dock during the day is an easy way to do this (2-3 herbs per map instead of 1).
Having a sickle (200p) equipped while gathering reduces the cost from 3 stamina to 1 stamina, important if you don’t want to burn through your food. This can also be bought from ‘Central Noer Market’ (the market above the dock) during the day from the weapons merchant or you can go to the blacksmith West of the Inn, which is also only open during the day.
You can interact with rocks (small, white ones on the ground) to get insects to spawn, which you can gather. Not really useful as the stamina cost is quite high for a very bad food source.
Rain Forest (9/10):
Entering this tile costs 6 stamina and 20 time
Food: Apples (trees with red apples), grapes (vines on map walls with purple grapes), Blue Berries (grass with blue berries), and Tomatoes (vines on map walls with red tomatoes).
Herb(s): White Dragon Weed (tall grass/hay/rice)
Unique Recipe(s): Blue Potion (2 White Dragon Weeds)
Watch out for boars, they are dangerous and can easily stun lock you although killing them gives a lot of meat. They are normally not aggressive if you are fully equipped (low ‘weakness’ stat) but some seem to attack no matter what.
Pine Forest (6/10):
Entering this tile costs 6 stamina and 20 time
Food: Nuts (dark trees with light leaves that contain sandy/beige pear-shaped nuts), mushrooms (yellow-orange mushrooms)
Herb(s): Tung Flower (white flowers with yellow center)
Unique Recipe(s): Birth Control Pill (2 Tung Flowers)
This area regularly has goblin ambushes due to most pine forests being near to goblin nests, the narrow and winding nature of the maps can make it difficult to escape: try to memories the map.
Watch out for wolves they attack fast and can rip you apart quickly. Some are not aggressive if you are fully equipped (low ‘weakness’ stat) but most attack on sight.
There are also skeletons hidden in the ground from time-to-time so be wary of bone piles.
Plainfield (5/10):
Entering this tile costs 3 stamina and 15 time
Food: Carrots (single bright green plant on ground), Onions (tall and dark green bush), and Potatoes (large and wide green bush)
Herb(s): None
Unique Recipe(s): None
This map has rabbits on the map which can be killed to gain a little bit of meat (1-5).
A very open map makes this an ideal place for hostile encounters due to how easy it is to escape. Note that defeating enemies that are standing at the map border can cause items to drop at the map border, these items cannot be picked up anymore.
Mountains (5/10):
Entering this tile costs 12 stamina and 30 time
Food: Carrots (single bright green plant on ground), Onions (tall and dark green bush), and Potatoes (large and wide green bush)
Herb(s): Dragon Root (small & dark green bush with red flowers)
Unique Recipe(s): Red Potion (4 Dragon Roots)
This map is very narrow and has many choke-points and few exits, making any ‘attack’ events very dangerous on this map: memorizing the map layout is highly recommended.
Watch out for wolves they attack fast and can rip you apart quickly.
Swamp (1/10) [TBD]:
Entering this tile costs 6 stamina and 21 time
Food: Tomatoes (vines on map walls with red tomatoes), mushrooms (yellow-orange mushrooms), fish (dark-blue fish moving in water tiles or bubbles in the water that appear and disappear), Blue Berries (grass with blue berries)
Herb(s): –
Unique Recipe(s): –
You can walk on the water tiles that has a dark-brown bottom but this is hard to see, especially at night.
The narrow winding paths, which are sometimes obscured by the water, and the lack of exit points makes this a very dangerous map as you can easily get cornered and defeated.
Corrupted Land (7*/10) [TBD]:
*This area is extremely high risk and high reward so the 8/10 is not to be taken as an easy way to earn money
There are 3 corrupted land tiles: Badlands (Easiest to traverse, no plants), corrupted forests (Winding paths that lead to dead ends, many mutated mushrooms), and corrupted mountains (hardest to traverse, avoid at all cosrs).
Entering this tile costs
Food: Mutant Flesh
Herb(s): Mutated Mushrooms
Unique Recipe(s):
Filled to the brim with enemies and traps that spawn more enemies, they are specialized in stun/movement locking you then draining your stamina. Recommended to have blue potions and a melee weapon.
General Prostitution [TBD]
– Job Location:
> Anywhere with non-hostile NPCs
– Requirement:
> Has the ‘Prostitute’ trait
– Rating:
> Meh job (6/10)
Backstreet Hooker [TBD]
– Job Location:
> Harbor backstreet
– Requirement:
> Has the ‘Prostitute’ trait
Milk Maid Prostitution [TBD]
– Job Location:
The Golden Bar Club in Rudesin Slope
– Requirement:
Has the ‘Prostitute’ trait
– Rating:
Bad job (3/10)
Saintly Prostitution [TBD]
– Job Location:
Society of Saints Monastery (Northern Church)
– Requirement:
Has the ‘Prostitute’ trait
Asked the priest ‘About the saints’, said ‘I believe’, Stripped, (after scene) left and re-entered, asked priest about ‘More saintly favors’ (you get the ‘Saint Believer’ title after this)
– Rating:
Decent job (7/10)
– Tips:
You can only buy ‘Bread’, ‘Dry meal’, and ‘Holy Water’ here but your trade points do not disappear if you change rooms
Getting past the guard who’s guarding the North-Western most door in the Western wing lets you access the sex dungeon, nothing to do there though.
Additions to the latest version
Fishfolk Village & Related
Elise Quest in Noer, fishfolk village edition
A day or two after the Orkind quest is complete, Elise is seen doing experiments on the red tentacle bats from the caves in his clinic.
Make sure to dodge the fireball to the face by running to one of the corners of the room, then if the bat is not fried to a crisp, kill it.
Now iirc, the next event happens another day or two after where Elise is having some fun times with said bat creatures. After a scripted event plays out you can proceed to talk with him and get a quest to go to the Fishfolk Village.
Proceed to the docks and talk to the fish folk on the very right side, select passage to the village and Elise will pay for the trip.
When you arrive, immediately enter the fish folk market to proceed with the quest.
It’s just some examinations,
First is the direct center with the giant statue.
Second is on the pathway left of the statue, some papers on a building.
Next is a few fish boxes a little further to the right of that building
Finally, it’s a cage on the road leading north holding a slave
From there you can exit the village and head north to the next quest marker.
You get to witness some weird fishy magic, and then a reenactment of when you flushed your goldfish down the toilet.
After a lengthy chat between Elise and the fishaman, they proceed to kidnap him and then flush you. This is not avoidable.
Luckily you keep all your stuff.
You wake up in fish hell, with some crawling deep ones around you. Ultimately it’s not necessary to kill them unless you find them annoying…
By the way, you’re most likely running against a clock, so do this somewhat quickly if you aren’t prepared to fight fishmen.
Also, take care whilst in the water, deep ones swim inside and will pop up like little Fks.
The objective is 4 plinths, each plinth is in a square room, and one is directly underneath where you wake up.
In the top middle, on four statues are the plinth symbols required, from here is where this guide will either save time or burn some asses because I don’t know if these symbols change just yet.
Walk or Run to the first plinth and press it until you see what looks to be a standing person.
Next is to go either clockwise or counterclockwise to find the rest of the plinths.
Clockwise, the next one up has a chest in front of it. This one needs to be pressed til you see what looks to be a man running.
You will come across a fish folk lying on the floor once you continue, this is a different quest line, speak with her several times to activate her quest.
This is also where the four statues reside.
The next two plinths are D emblems.
Once they are all activated correctly, a whirlpool will spawn that lets you escape to the overworld.
Head back to the castle. Once you enter you should prioritize entering the leftmost hallway and will have to kill the patrolling guard on that side.
From there you can sneak the rest of the way to the cells in the very back.
One cell has Deepone women, the other Elise.
You should break the women out first, and then shuffle back into the previous room to avoid aggro. They will attack the fish folk guarding Elise’s side.
If you want to keep this quest super simple, try to knock out the archer that stands back so the deep ones can punch the others to death in peace.
If you’re lucky, you can keep those fish alive and allow them to slowly meander down to the 3 main guards in the first room. Thus making the next part of the quest trivial.
After waking Elise up, whether or not the rest of the fish folk are dead you must transport him to the entrance, where four new fish folk babies spawn.
One catches Elise’s eye and he demands you catch the cutie. They do not aggro on you.
Elise himself makes this complicated, so telling him to wait until you catch the fish is smart. If the 3 main guards are still in this room you will have to fight them to get Elise out the front door.
Once you manage that you can go back to the market and book a ticket to Noer (Elise pays for it again).
Once there you can talk to him again to give the fish baby to him.
He pays you immediately and leaves.
(3 Gold Coins?) <- will verify this.
Fake sea Witch?
This quest is hooked into the previous one, you find a fish folk woman starving to death in the middle of the rooms with all the plinths. The requirements for her quest are to either
A. Feed her 5 cum items
B. Find her a man (this will kill the man)
Be sure to talk with her several times to activate her quest.
If you do not have the 5 cum items, you will have to head out of the temple and towards the fish market town.
Inside the inn in the back right room is a man dedicated to Fking all things, talking with him will allow you to bring him to the temple where he and the woman will Fk.
Before you can get to her there’s a room with similar plinths you must solve. A series of stones will drop from the ceiling once you activate the puzzle, which you must push to the correct plinth with the corresponding icon. There is one deep one swimming in the room which you may deal with as you prefer.
Once complete, a ladder will appear in the middle of the room, from which you drop down into the center of the previous area you escaped from. Simply head north and you will arrive at your destination
She drains him dry and then some. Now you can speak with her.
Runaway Slaves
For this quest you go into the inn in the market town, inside standing below Squidwards Belongs in the Trash painting is a fishman slaver.
He will ask you to hunt down the slaves that escaped, they are in a refugee camp south of town.
Making your way requires some stamina, since you have to walk through many trees to get there, if you have extra food it won’t be a bother.
The slaves have set up some traps in the swamp leading to their camp, tread carefully.
Once you reach them, you may escape the area to tell the slaver where they are or for an extra reward you can slaughter the entire camp.
Evilscale Temple
Speak with the slaver again after completing the runaway slave quest and he will send you to a temple in the Northeast where you are tasked with murdering the deep one cult that has set up shop there.
8 deep ones are set up in a square facing each other, you can throw rocks to get them to leave their formation one at a time to where you can kill them easier.
Kill them however you wish, then return back to the slaver.
Repeatable Quest, Kill the Fake sea Witches
This also comes from the slaver, but it is a simple collection task.
If you have it, all you need to do is kill sea witches and collect stuff from their corpses.
Beach Quest, Astronomia Funeral
To the west of the Fishfolk Temple, there is a beach.
When you arrive at said beach you will be greeted with a funeral procession for a “crusty crab” that mimics the Astronomia meme.
After the cutscene you will see a fishman standing below a tent, speak with him and he will send you to the Crusty Crab Pottery Shack for his “brothers” secret formula.
The pottery shack is to the direct east of the fish temple, but not as far as the Evilscale temple.
When you arrive you will come across several fishman guards and a detective, there will be bodies of deep ones in the doorways.
Enter the right most door, the front door has two deep ones that will gank you.
Kill them all and take the formula, be sure to talk with the detective, it will give you extra exp.
Head back to the beach and speak with the quest giver, no spoilers for what’s next.
Arise Town & Related
Take both of these quests at the same time if you don’t have high wis, if you don’t you will have to slaughter them all twice, and that is not good for your morality.
Arise Town, Bullied Fishman
n between Pirates Bane and Noer there is a small village nestled in the swamp.
This shithole is called Arise, you will be fighting the entire village to escort a fish to the outside of town.
(Nek0mancer – “You can get him out without a fight with high WIS”)
Edit* If you can kill the guards before talking with the fishman, the quest is a lot easier since they are already dead before you escort him out.
They will start combat if you aren’t quick enough, which means the fishman will box with the mob in the middle, he will most likely survive since they don’t lift weights in town.
He is the first thing you see when you walk closer to the main square, a small scripted event will play and then you can speak with him.
Once you interact with him, you will be questioned by a village guard demanding to know if you are with him.
Saying no will not advance the quest, saying um will prompt the guard to turn the entire town hostile.
Killing these villagers results in morality dropping, therefore you run the risk of dropping a decent chunk of your morality if you murder the entire village. I leave it up to the reader to decide the best course of action on that.
What I found worked was to save and pray to Jebus that the spearman and Fishman lose interest in each other.
If they do not, use deadly prejudice on the spearman and try to pry him away from the fisticuffs.
(Walking upward and then to the right usually disengages them from the crowd for whatever reason)
The actual villagers don’t deal too much damage, but there are a lot of them and they can be a problem when trying to clear out the actual threats.
There is an additional spearman further to the right, and two individual archers placed to the very left and towards the field south. At least one more spearman stands somewhere on the road leading out of town. I recommend trying to lead the Fishman toward the south and killing the archer.
That is if the Fishman deigns to follow you, for his pathing is terrible and he will be thoroughly annoyed by the mob.
I did not count the mob of civilians, to my knowledge, there are at least 6 of them.
Clear them out as best you can, by either injuring them enough to get them to flee away a bit or outright slaughtering them.
Getting the Fishman out of town, you must transport him north to his brethren. This walk will eat through your stamina so bring plenty of food. And I mean plenty, like a whole pantry worth.
Finishing the quest gives 5 copper coins, (not entirely sure if they’re big or not) and will unlock the next quest to go into a cave nearby.
Arise Town, Monkey Business
This quest also seemingly causes you to fight the entire village again, but this time it’s for a monkey.
This will give you 4 morality back, but net decrease you overall
Go northeast toward the very last door on the map, a exclamation point will be present to signify it.
Inside is a woman praying to the Saint, talking with her will allow you to accept a seemingly normal quest to save some “girls” from the village men.
Once accepted, leaving the house and going to the opposite side of the map you will see a warehouse structure where they are keeping the girls.
Walking inside you will see two villagers patrolling a hallway and a cafeteria-type area, avoid or kill them as you prefer.
Once you get to the back of the hall or cafeteria, you will hear the sounds of a monkey being violated.
Dispatch the two of them that are doing their best impression of Bad Touch, then unchain the beast.
Take the monkey outside, it will follow you a little better than the Fishman, but it can’t defend itself.
Unfortunately, it seems the entire village takes issue with you taking their sacred cum monkey away from them, so they will violently beat both you and the monkey to death if you let them.
Try to keep the monkey alive as you make your way toward the lady who gave you the quest, good luck.
Buggy Swamp Cave Quest
This branches off of saving the fishman from Arise Village, and by an order of magnitude easier than said quest.
Unfortunately it’s also buggy.
Speak with the fishman to get the quest to go into the cave, he is searching for answers about the deep ones.
Its yet another escort quest, so prepare yourself to guide his pathing.
The entrance room has bubbling water, this signifies the entrance to the next area.
In this new area there are at least 3 more bubbling waters, assume from here that they are random.
There are deep ones swimming around, but Ifound they can be avoided easily.
The exit I went down to progress was on the very top right side of the area.
If that is the correct path, you will be spat out under a waterfall into a room with deep one babies and fish piles.
Kill all the deep one babies, and dont let the fishman get into combat. For some reason if combat is activated it will break the entrance sequence that happens when interacting with the shrine.
Once it is open, if you want to brave out a run down south, there is a chest in the room below you where a few deep ones are swimming. Its through a thin hallway on the right, so good luck.
Once you go through the new door, you will be sealed into the area. Dont worry, the exit is directly north of the central room.
The fishman will suggest going south, ignore the dude and go straight across to the room opposite of you, this room has a puzzle floor that will unblock access to the next shrine you need.
These are the steps to solve it
Firstly step into the room, there will be a slight noise and a shake, the floor underneath Lona will change.
Step one more step further into the direct center, then immediately backtrack to the first tile you stepped on.
Now walk the border, and you will solve the puzzle.
The blocks will dissapear, and you can proceed without having to fight a single thing.
Interact with the next shrine and a cutscene will play out, no spoiler for the cutscene.
To exit, there are two deep one guards sleeping beside the door, you can choose to do whatever you think is best to leave.
If all goes to plan, this quest will breeze by like its nothing, but worst case scenario is that the shrine will not activate due to a bug with the fishman AI and combat.
Luckily the first shrine can be worked around by going to the southern room and exiting, then reentering through the original entrance, the second shrine seems to require you to solve the room.
Pirates Bane
Pirates Bane Unmarked Chicken Quest
Theres a man staring at chickens in the left bottom side corner *at night*, he wants you to round some back into the fence, will net you 2 copper and 500 exp minimum every night.
Orkind lair, Kill the shaman
This requires you to go up towards the outpost that was slaughtered by orks, and where the necromancer appears the 2nd time (refer to Zedteds guide)
Inside of the cave nestled past some mountains is your target, it is infested with both orkind and traps. Use whatever means you have available to dispatch the traps, and go north into the first hallway.
The only other path goes directly into the heart of the nest, which is not prudent for good health.
There’s two goblins to dispatch on this lath, doing so too slowly will cause a timer to initiate.
Once you’ve gone through clearing the traps and goblins, there will be a campfire to your left, slightly above that is the Shaman sitting on his throne.
My personal tactic was to lure the weak goblin standing by the fire to me in order to kill, then sneaking behind the big Ork and throwing a rock to dislodge the shaman off the chair to land a few shots.
He can heal the others, so trying to kill the big guy would be hard work.
The Sea Witch’s rent
After completing two of the quests inside of Pirates Bane (refer to the other guide for clarification) a necromancer will appear inside the inn. He will tell you to speak to the sea witch to tell her that the rent is due.
Simply travel back to the sea witch and solve the puzzle to get into the temple again.
A cutscene will play, afterwards you gain the Saints Relic.
It looks like a remote control with a singular red button.
This item requires you to equip it In the off hand slot, and has a target reticle similar to throwing a rock, if you wish to use it you must stand still for the entirety of the use.
It will look like nothing is happening, but it will in fact call in a bomb strike on the target you selected, remember to stay still til the moment of impact, otherwise it will not function.
Special Defeat Area
If you attack the guards or do criminal activity you will be enslaved and thrown to a pig as a breeding sow.
Cloud Village
Kill the Bat
A village of people starving accused two people of stealing, and is sending you to kill the young boy that is looking for help outside of Noer.
Personally I took Cocona and went on a murder spree in the town so I can’t comment on what happens if you help them murder the boy.
Inside of the building the fat man is standing in front of is two caged doorways, the one on the right leads to the fathers last words to his son, bring them to Garou and he will wander out of the refugee camp.
Inside of the second building further down the street is a lost package addressed to the oriental express in noer, pick it up and deliver it.
Reward for all of this is 8000 xp and the whore clothes at shekels.
Special Defeat Area
If you antagonize the thieves at Cloud Village and get knocked out, you’ll wake up locked in the left cell of the house.
Doom Fortress
The Nine-Inch Cock Tribe
Arrive to the camp, and immediately be spotted by the lookout, they will demand for you to strip. Do so.
Do not put your clothes back on, this will flag the tribe as hostile.
They will ask you to defeat the Spiral King.
It is a slight walk to the south east, be sure to stock up on food unless you are confident you can one shot.
He has two minons with him, dispatch them with whatever means you can first, so you can focus on the King himself without distractions.
If you have gotten this far, I recommend saving.
I personally knock the king out and then backstab, and repeat that a few times. My Lona does around 100 damage a rotation so you’re looking at a total of 300-400 health on the King, and 100 for the minions give or take.
These bastards do stamina damage mainly, so be sure not to engage a head on fight.
The Kings hitbox stretches at least three tiles if you attract his attention, and he can charge you if you’re in front of him.
Once the King is dead, he will explode into a ton of food you can pick up, so don’t be scared to drain your reserves if you need to defeat him.
Go back to the village, they will demand you strip if you aren’t naked, go ahead. Then go turn in the spiral cock which will give you warpaint as a reward.